Introduction
This article consists of a Log Cabin installers video walkthrough of our excellent Flow Log Cabin.
Carried out by one of our excellent installers, Philip and his team.
The Flow is one of our most popular cabins, its 6m long, 40mm log thickness, tall double glazed windows and separate room to the side are all very attractive properties.
The customer of this particular Flow Log Cabin is planning on using his cabin as a garden office to escape the distractions of working from his house. Mr Litchfield also took advantage of our 26mm thick flooring, tantalised profile foundation beams and insulation kits so he can enjoy his cabin all year round.
Although the build is for the Flow Log Cabin, it features the same construction methods of interlocking construction and procedures as all of our other cabins made with logs.
This guide is in addition to the advice we provide in our more comprehensive article “TUIN LOG CABIN TYPE CONSTRUCTION ADVICE”
Flow Log Cabin Uses
Due to its contemporary design and light airy space, a popular use for our Flow Log Cabin is a garden office. However there are many other potential uses for the Flow, such as a garden bar/pub, a summerhouse, games room or even a pool room such as the one in this video sent in by one of our happy customers.
Full Instructional Video – Flow Log Cabin
Here is a full instructional video for you to follow, however please consult this blog for more information.
Instructions Break-down
Tools Required
During the videos you will notice the installers using many professional power tools and equipment. Such tools are very useful but not essential. More basic manual alternatives can do the job just as well.
Basic Tools Required for a log cabin install include:
- Hand Saw
- Screwdriver – A powered screwdriver will help with an assortment of bits including Torx and Posidrive.
- Drill
- Heavy Rubber mallet – Two is ideal.
- Hammer
- Spirit level – at least four foot long.
- Measuring tape
- Pliers
- Ladders / step ladders / scaffold / Harnesses.
- Wood Clamps and sash clamps / ratchet straps for larger builds.
- Plane / powered or hand for trimming and final finishing at the apex or where the pent roof joins at the walls.
- Power tools are useful such as drill, saw or jigsaw.
- Wood glue and pins may also be useful.
Delivery of your log Cabin
Delivery of your log cabin will be via a 40′ articulated lorry. On the back we have a demountable, self-powered Moffett forklift. As such, this can travel for about a mile from the main vehicle if necessary and can operate on ground that a vehicle can. Please see this article for more details: Log Cabin Delivery.
Your Package will come tightly wrapped in plastic, ensuring it is completely water tight. It’s a good idea to keep it wrapped until you are ready for the build. This ensures the logs do not suffer from warping. If you do have to unpack the logs well before installation, store them on a level surface, off the ground.
Inspect the packaging for any knicks and holes in the plastic. If you find any, either tape them up or cover entire package with a tarpaulin.
* If you have ordered felt shingles it is advisable to remove them from the top of the packs as these could melt together due to the bitumen strip within them. Then reseal the package to stop water ingress. If you have ordered flooring it is also recommended it is removed from the packaging, along with loose bags of nails.
A solid level foundation base
A level base is paramount to any log cabin build. Without this, you will have issues with installation, stability and durability, especially in the long term as the cabin expands and contracts throughout the year. Your cabin may also experience warping, twisting, straining, cracking and splitting.
Only a completely 100% level and supporting base can guarantee a perfect assembly of the wall logs, doors, window frame and roof parts.If the base is out, it must be fixed before building the cabin. This was the case when the installers arrived on this particular job. On their arrival they put a spirit level across the concrete base and measured it was out by up to 6mm. Instead of wasting the journey they used blocks of pressure treated timber to overcome any deviation by adding them to the foundation beams and ‘chocking’ where necessary. If you are going to chock a cabin up make sure it is supporting the whole length and not just a corner.
More detailed information regarding the base requirements for log cabins.
Log Cabin Installers – Unpacking the Log Cabin
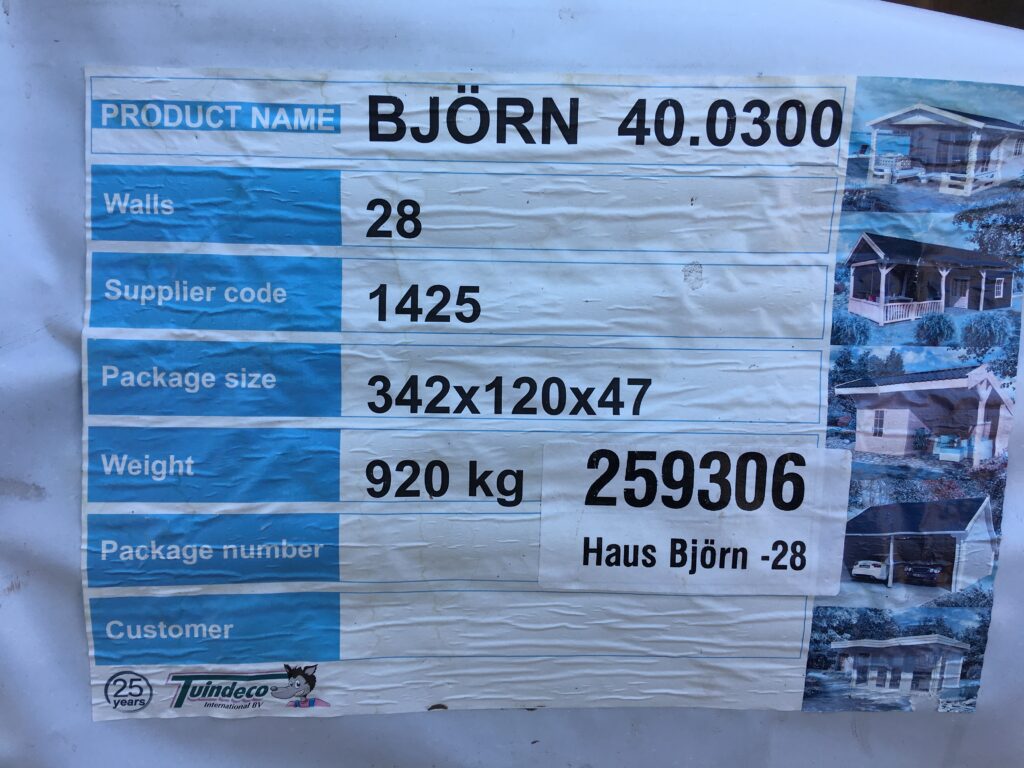
Before you begin unpacking your log cabin, take a note of the unique package number. This is found on the labels on the packets and/or plans. Keep this number safe as it will be needed in the unlikely event that you need replacement / additional parts or to claim later against faults.

Using a packing knife, carefully cut open the plastic wrapping and begin unloading the parts to your cabin. Place them on a level ground near to where they will be constructed later.
As you unpack, check the parts against the packing list which is located within the package itself.
Installation plans
Your plans will always be inside the main package and found within the logs. Study these carefully before you begin your build. They help you understand the overall layout of the cabin and the positions in which to construct the parts.
At first the plans may seem a little daunting, but as you work through them things becoming a lot easier. The plans are hugely important and construction cannot be successful without following them carefully.
The plans contain a ‘list of parts’ page. These are all the parts that will be found in the pack(s). All log cabins supplied by us will always have a consist list and this will be referred to often.
You will also find the elevations of the building. These are drawings that show the exact components used. The plans also contain a floor plan with measurements.
The layout of most of our cabins are interchangeable (Please check with us if in doubt). So doors/windows/openings can be placed in various places throughout your cabin. This was the case in this build. The Customer wanted the front entrance to be on the right hand side of his cabin. Also he didn’t want an internal door between the 2 rooms, but to have it as an external door instead. Please bear this is mind as you build up your cabin as you may wish adapt it as you wish.
Half/Starter Logs
While you are unpacking it’s a good idea to seperate your half/starter logs and place them directly onto your base.
They can be identified by being as the name suggests, vertically half the size of a regular log. They also have a flat bottom.

Lay two half/starter logs and two full logs opposite each other as per the plans and interlock them into place.
Foundation Beams
Foundation beams are important as they act as sacrificial timber to prevent the first log ever sitting in water. They are placed between the starter logs and the base.
We recommend using profiled foundation beams, as they allow any water to flush away from the first log.
With profiled foundation beams, cut the corners at a 45 degree angle. Place them under your already laid starter logs and screw into place. Screw from both the inside of the profiled foundation beams ino the starter logs and down through the logs between the tongues.
Squaring the Base
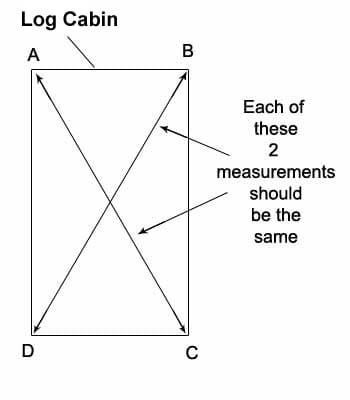
With the base level, foundation beams laid and starter logs down, now is a good time to check everything is square.
all the four corners A, B, C, & D going in a clockwise direction. For the corners to be square the diagonal measurement from A to C must be the same as the measurement from B to D. You will have to keep moving point C and D until you get the measurement to be the same.

Ensure your cabin continues to be square by checking regularly as you build up the walls.
Log Cabin Installers – Building Up the Walls
You can now begin to build up your walls. Simply interlock the logs one on top of the other, and securing into place with a mallet. *It’s important to not screw the logs together, if you do you will have major issues in the future including gaps and splits in your cabin.
It is easy to get carried away when building up the logs because it’s such an easy process. However, keep referring to the plans and count the number of logs high you are as you build. This will make it easier for when you want to add window and door frames. We also send a number of additional spare logs with your cabin in case of damages, so ensure these are not added to your cabin if ot required.
Continue to ensure the cabin is square throughout the build.
Timelapse of the Flow Log Cabin Log Cabin Installers Build
Constructing Door frames & Installation of WIndows and Doors
Once you are 3 – 8 logs high both side of the windows and door openings, it is time to fit them.
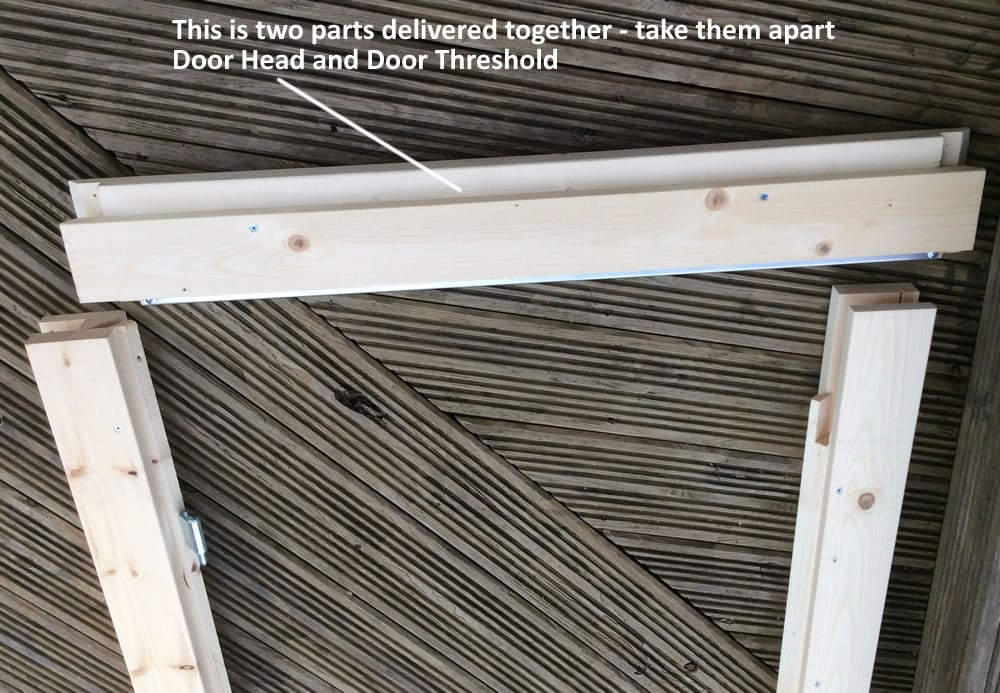
The door head and door threshold are often sent one inside the other and will slide apart to reveal two parts.

Single doors will come pre-made so can simple slot into the openings. Double doors will arrive in sections and simply require screwing together as seen on the video.
The windows and door frames can then simply be slotted into the opening. Push and mallet down until secure. Do not screw the frame into the wall logs.
Facia boards can be removed before installation if desired. This makes slotting in the logs between the frames easier. Once the logs are in place the facia boards can then either be screwed or nailed back into the frames with a 10-15mm overlap.
Continue building up the rest of the logs
Once the door and window frames are in, continue building up the walls, counting and consulting the plans as you go.
It is normal for the outer walls to come away from the windows and door frames, they will be pulled back into place when the top logs are secured.
Secure Rafters
Once wall logs are put in place, counted and checked with plans, secure the roofing rafters. These are installed in the same way as the wall logs, connected by interlocking with the top wall logs and secured in place with a mallet. Again, no screws required. Then check the cabin is square once again.
Hang doors, install locks and handles
Doors can now easily be hung onto the flag hinges. Cylinder locks are be inserted into pre-cut holes, as well as door and windows handles.
Handles are secured into place with an allen key, and backplate secured with screws.
Roof Eave Blocks
Secure eave blocks into place by screwing them to the top logs from the inside.
Place Roof Boards onto Roof
It’s a good idea to place all the roofing boards onto the roof with the tongues facing the same direction. This saves time and effort when it comes to installing them.
Log Cabin Installers – Securing Roof Boards
Starting at one end of the cabin, begin securing the tongue and groove roof boards onto the roof.
As you are laying the boards keep checking that the edge of the boards are running parallel.
The boards are secured into place with two nails side by side into the top log and where they cross the rafters. (The installers are using an air powered nail gun for speed and ease, however a basic hammer will also suffice). If you are planning on using an air gun yourself, please ensure the nails are at least 50mm long.
When a board overlaps a rafter lengthways, screw the boards into it. Also screw the boards into the wall logs around the perimeter of the cabin.
Log Cabin Installers – Cut last roof board & trim front and back
Mark where the last board overhangs the eaves, cut to size, and secure in place as before.
Mark and cut the roof boards front and back to create a straight edge.
Log Cabin Installers – Roof Battens – For Insulated Roofs
If insulation is being installed, lay battens around the perimeter of the roof. Screw through into roofing boards and top logs, cut when required.
Roof Insulation
Insulation kits are an option extra, recommended for all year use. More info on our insulation kits.
Lay insulation boards onto roof.
Measure and cut when required.
Lay OSB Boards
Top the insulation boards with OSB Boards which are supplied with the insulation kits.
Mark and cut where required.
Secure boards into place by screwing them into the insulation boards.
Again the installers are using an electric circular saw for speed and ease, but a manual hand saw will suffice.
Fitting the Barge Boards
Install the barge boards to the perimeter of the cabin using screws into the eaves.
Roll out EPDM Rubber roof
Ensure the roof is clear of debris and screwheads are flush.
Roll out EPDM onto roof and leave it to rst for 20 – 30 minutes. This will decrease the amount of creases in the material.
Install EPDM Rubber Roof
There are three ways to fit EPDM, this includes Ballast, Mechanically Attached and Adhered. This procedure will follow the adhering method.
Note – There are a few different methods of installing an EPDM roof. The following instructions are a preferred method by one of our most experienced installers.
Tightly roll one half of the EPDM into the center of the roof.
Shake the cans vigorously before use. Spray a generous amount of contact adhesive onto the OSB boards. (The spray adhesive is found within the EPDM roll)
Begin slowly unrolling the EPDM over the sprayed area, applying more adhesive to the EPDM to the roll as you go.
Flatten and press down onto the adhesive to secure in place and to remove as many bubbles as you can.
Detailed Blog on laying EPDM onto a log cabin
Fitting roof trims
Note – There are a few different methods of installing roof trims. The following instructions are a preferred method by one of our most experienced installers.
For more roof trim ideas and guidance visit our blog on Laying EPDM on a Log Cabin.
Secure the roofing trims onto the barge boards, tightly sandwiching the EPDM material in-between.
Fold over the corners of the EPDM and secure trims in place with screws.
Cut the end of the trims where required.
Finish off by cutting the EPDM under the trims using a knife around the perimeter of the cabin.
The Flow Log Cabin is now complete
Log Cabin construction is now complete ready for flooring, guttering and timber treatment.
Log Cabin Installation Top Tips
- Read our very informative blogs before you begin, Base Requirements for a Log Cabin, Log Cabin Construction Advice, Log Cabin Fitting Tips, Laying EPDM on a Log Cabin,
- Unpack parts and take the time identification them in the plans.
- Place the most common parts together and near to where they will be installed.
- Do not screw or nail logs together.
- Try not to rush and get ahead of yourself and consult the plans throughout the build.
- Count the number of logs high the cabin is as you go.
Installation Service
All of our cabins are designed to be constructed by the customer. However, if you are unable, or want the convenience and piece-of-mind of a professional to build it, we offer a log cabin installation service.
Philip,our lead installer can be found on his Social Media Platforms . You can also contact him via WhatsApp.

Turnkey Installation Service
We now offer to help with much more than just the supply of your new log cabin. Here we can take over the supply and fit of nearly every aspect of the whole project in this Turnkey Log Cabins range. From laying the base to fitting the building with electrics.
Please find more information on our turnkey services here.


