


I have said it before but these are my favourite posts. I thoroughly enjoy hearing from customers with their thoughts on our buildings, service and other details. Mr W has some good ideas on his base and how he carried it out which may well assist you. Please see below his review of the Sten Log Cabin:
Part 1 – The Delivery
We were contacted in advance and advised of the delivery date but also given the opportunity to select days that would be suitable for us.
The cabin arrive on the programmed day and dropped off in the requested location without fuss. Due to living in a cul-de-sac, a fork lift truck transported the package to the house. We could not see the delivery lorry.
Weather proofed plastic securely strapped to a pallet protected the contents. The floor boards and bearers arrived strapped together but a separate entity. The roof shingles were loose on top of the package.
The main cabin packaging was intact and I would have been happy to leave it outside safe in the knowledge it would be well protected from the weather. However, because of the location, we moved it.
The following weekend we set about moving the main cabin into the garage. I intended to apply a protective finish prior to erection. The timber elements were very securely strapped to a pallet with metal bands. Removing the protective plastic revealed the cabin.
Two of us moved the various components to the new location which gave the opportunity to become familiar with the different parts and do an initial sort into back front roof etc. I am a keen wood worker and was very happy with the quality of the wood noting the lack of sticky resin and the dryness and general finish. Important to note that the window and door was shipped glazed and arrive in one piece undamaged which is a reflection of the good packaging and handling considering its long journey.
With all the parts checked and accounted for I can say I am very impressed with the quality. The window unit is robust and the fitted hinges and catch work perfectly. Likewise the door and lift off hinges are also well constructed. Worth a note here most parts are screwed and not nailed to the door / window units. The roof shingles require careful handling and storage. Over all I am very happy with the product and would describe it as recommended. I look forward to erecting it in the near future when I will write part 2 of this review with photos.
Mike.
Part 2 – Erecting the Sten Log Cabin
With the summer coming to an end I started by treating the components prior to erection. After careful research I went for a Ronseal product called ‘Total Wood Protection’. This provided both rot protection waterproofing and colour. This oil based product is quite thin and absorbed by the wood rather then sitting on the surface like paint would. This I felt was ideal because it would not prevent the log tongue and grooved joints fitting together. It was very easy economical and quick to apply probably because of the very good finish on the timbers and the drying time was down to a few hours on a warm day. I have to say this is a monotonous job but well worth the effort and finally all the parts were back under cover and by now quite familiar.
My thoughts were now on the base design and construction.
The site for the cabin was on an area of well constructed, existing slab patio. However it was a little uneven and subject to puddling in heavy rain so not an easy base option.
Because I was also not keen on an impractical concrete slab, I decided to choose a timber ring beam footing with centre spine beam all on concrete piers. This minimises the amount of concrete required.
The the ballast, cement and timbers cost £100 to deliver.
The lifted and cut back the existing patio slabs under the building footprint, nine holes dug to a depth of 500mm below the existing finished ground level. These were filled with concrete to the level of the adjacent patio slabs.
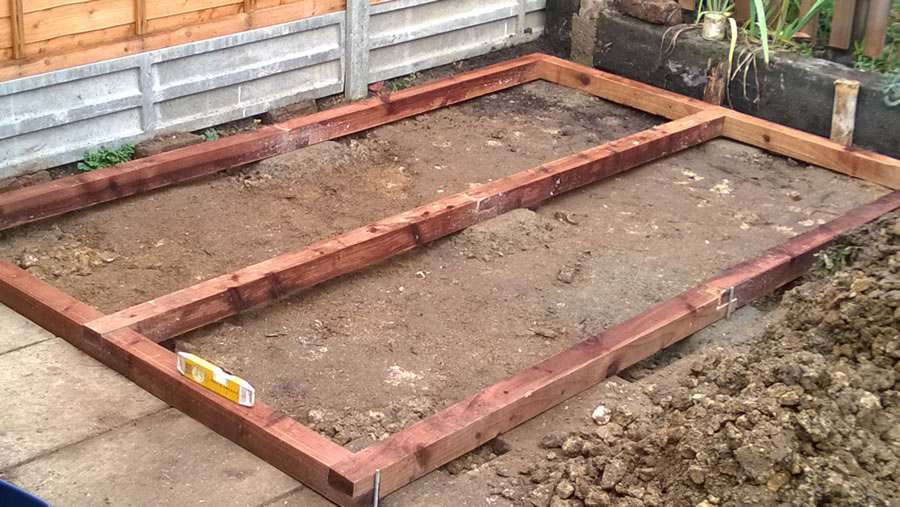
We cut, joined and assembled the 3×3 timber perimeter ring beam on the piers packed level. Afterwards, we applied sand and cement grout to fill any gaps.
Upon completing the grout, we cut the 70×40 timber foundation beams supplied with the cabin to length and screwed in place on top of the timber ring beam with a mastic sealant, preventing water seeping into the joint. At this stage the base was level and all that remained was getting the frame square by checking the diagonal dimensions were equal.
This work was the hardest part of the build but provided an elevated level and square base which made the cabin erection trouble free.
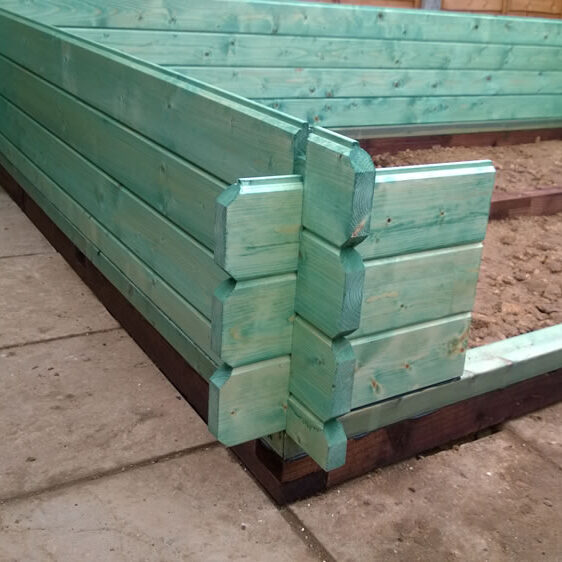
So at last I was able to start the cabin build. The first logs satt out on the base and checked for square. After that it was simple to build up the walls log by log.
One thing I did do was apply a mastic sealant to the perimeter under the first log at base level between the log and the top of the timber foundation beam. This was to prevent water seeping into the joint as it is a butt joint with out the benefit of a weather proof tongue and groove joint.
The quality and precision of the components made the erection very simple and with the roof purlins dropped in place the roof boards could be nailed down ready for the felt singles.
The felt singles are in fact easy to fit. Probably easier than roll roofing felt, and also provides a quality roof.
I did not rush this build which took me several weekends to complete. By now, the weather meant I had to brush frost off the roof to finish the roof shingles!
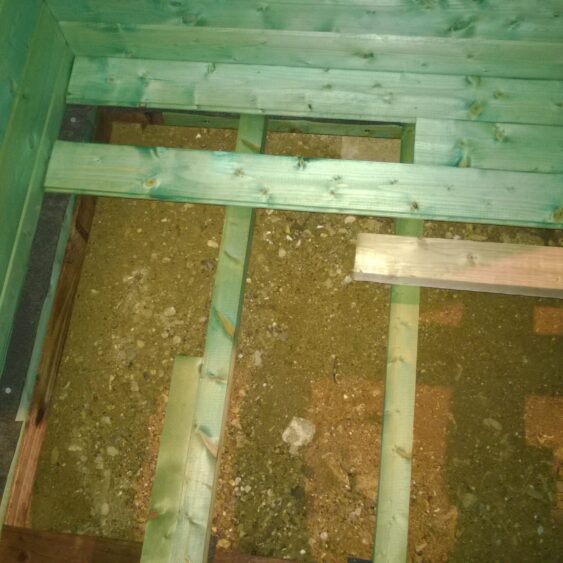
The floor was the final element of the build and I used the 40×40 bearers supplied spanning on to the centre spine beam. These 40×40 bearers have provided a solid support because of the short span and close centres.
There is a 125mm void under the floorboards ventilates. Also, all of the floor members sit on a damp proof membrane.
One point to note here is because I had used 3×3 ring beam timbers I had to screw a batten to the inside face to provide end support to the floor bearers. If I had used 3×4 or 4×4 timbers the floor bearers would have sat on the top of the ring beam.
Finally, we attached the proper lock assembly supplied (not padlock) to the door and the cabin was complete.
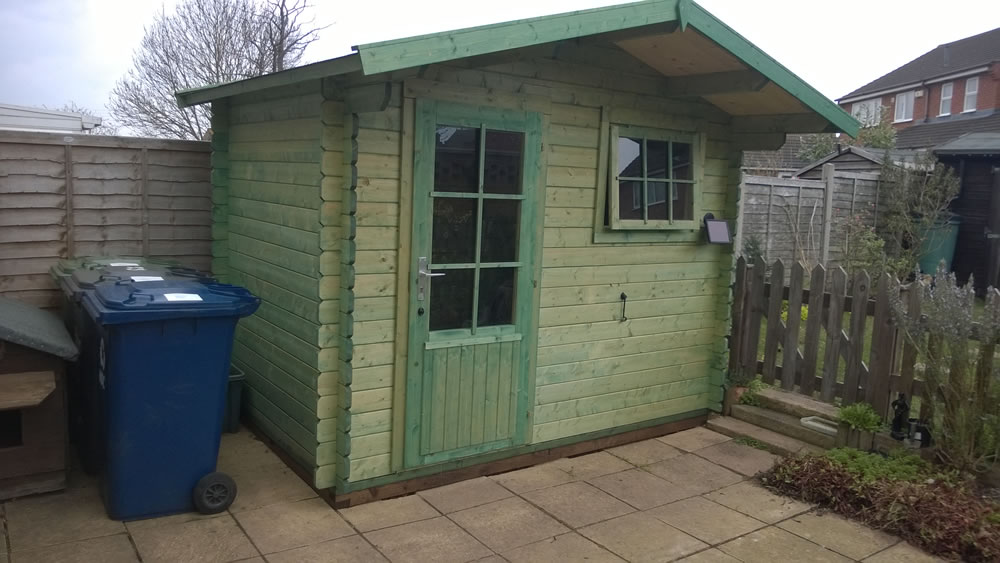
The Finished Sten Log Cabin
The cabin has been up for several months now and over the winter. It has with stood some very windy and wet weather with out any problems. I did screw fix the purlins to the fascia using small steel angle brackets internally for peace of mind.
One small issue was the line of ridge tiles some of which blow off during a very windy period. This I put down to not using mastic to fix the free edge due to the cold damp conditions at the time. Also the the roof nails were a little short as I had several layers of shingles at the ridge. I had folded the top singles over the ridge and so there is not a roof leakage problem. The ridge tiles being aesthetic only.
The cabin has proved to be dry and very practical. We installed the solar lighting option which is a great success and adds to the usability over the winter months. I will apply a further coat of finish externally early in the spring and sort out the ridge.
Do not confuse this product to a DIY. Store shed. It is a real building with a solid quality feel. We look at the Cabin as an extension to our living space not as a garden shed.
Mike W.
Thank you for your review Mr W. I hope you enjoy your Sten log cabin and the presents we sent you as a thank you.
If you feel, as a reader, you would like to contribute to this blog, please do let me know.
Other customers buildings posts and thoughts:
- Inside a log cabin – selection of pictures inside customers log cabins
- Petit log cabin review
- Onyx Log Cabin Review from Mrs G
- Wolfgang log cabin review and how long it took
- Lukas log cabin review – Mr W
- Mr B’s twisted log complaint – Heino log cabin
- Shepherd Hut review by ME
- Asmund log cabin review – Mr F
- Log Cabin delivery – Mr S
- Mr T log cabin in the woods – Edelweis – A great timber framed base