


Our customer ordered two Ulrik Log Cabins to solve three problems at once. Mr J has been kind enough to share his story of the build with us. Read through his story for inspiration and tips, especially with the detail on Mr J’s timber frame base.
Using one of these cabins for a garden office. Not only providing a dedicated and productive workspace but also increasing his property value. Especially with the current trend of remote and hybrid work, as it caters to the growing demand for functional home offices that don’t take up precious space inside the home.
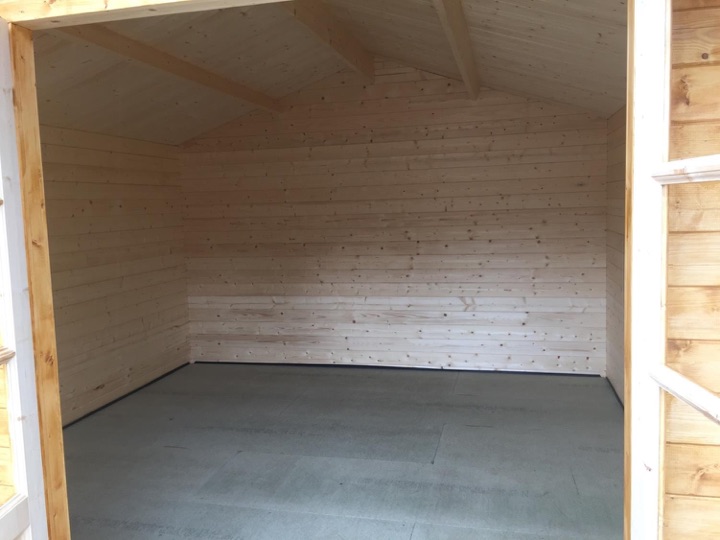
The second Ulrik Log Cabin is providing both a storage shed and wooden workshop. Giving Mr J his own area to build, create and repair with all of his tools in one place. As the Ukrik Log Cabin measures to 3.80 x 3.80m, there is still ample space inside the cabin for storage. Creating a stylish storage shed to solve the last problem on his list.
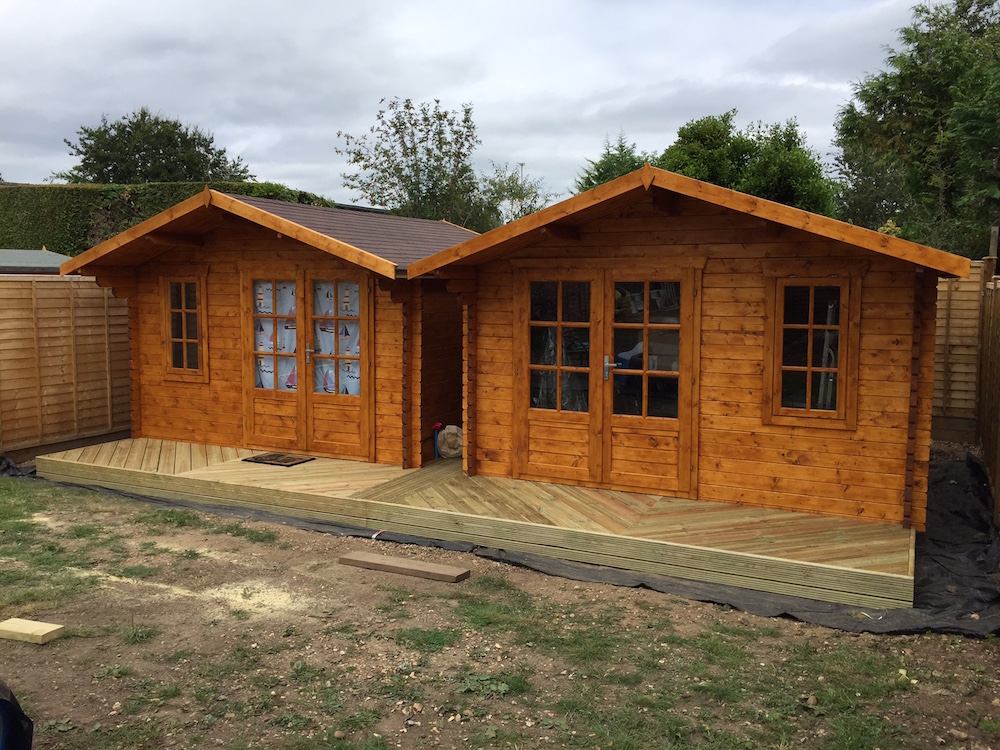
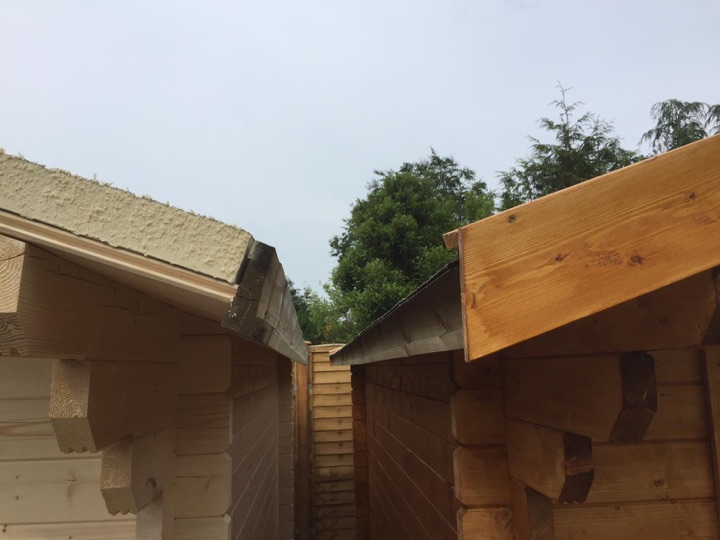
These are the finished Ulrik Twin Log Cabins on a timber frame base with decking.
Ulrik 45mm log cabin, also available with double glazing
The Customer
As well as a lot of other cracking ideas Mr J had an interesting use for our foundation beams, he wrote:
Firstly, I just wanted to say how delighted we are with our pair of Ulrik cabins. Your comprehensive website made the build process an absolute breeze, so I averaged 1.5 days for each including insulation – but not including treatment (almost at the end of 4 coats a piece using Sikkens).
Speaking of which, I thought I’d share a little ‘tip’ I discovered during the build.
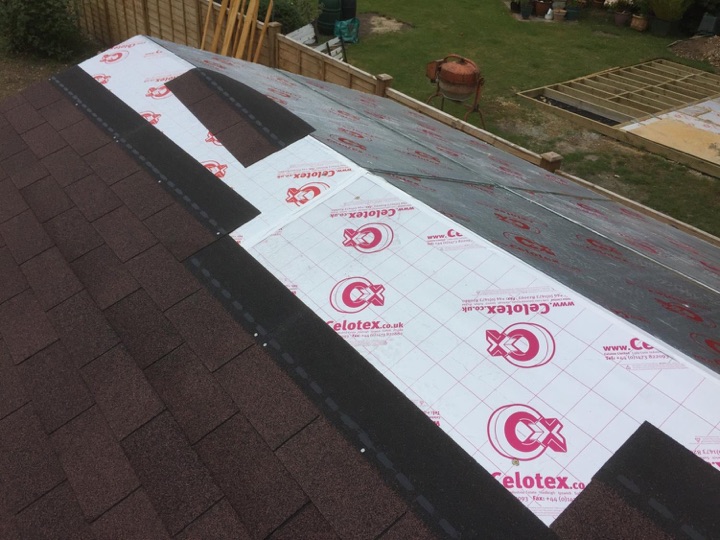
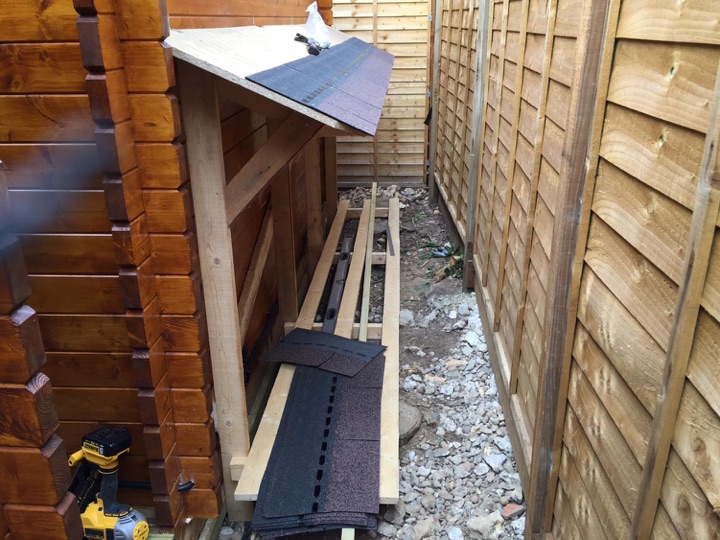
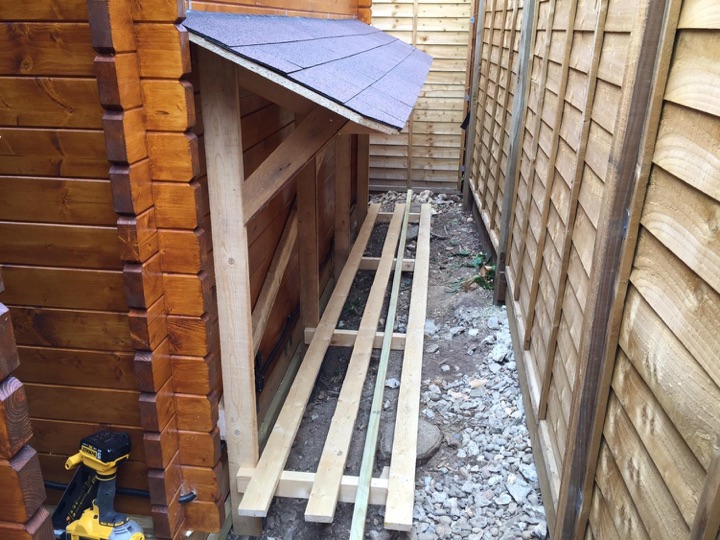
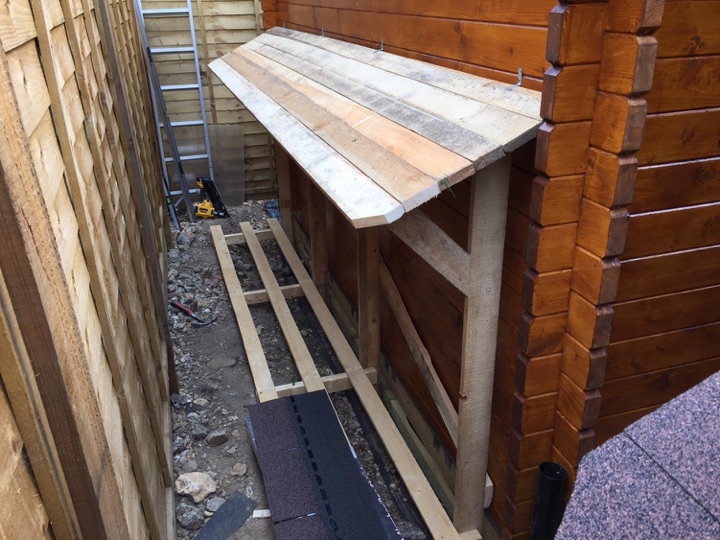
I insulated both floor and roof (100mm and 50mm celotex respectively). I’d had a look at your website to see how you trimmed the eaves to cover the 50mm celotex, noting you said that additional wood may be required. Whilst I’d ordered the tantalised, profiled foundation beams with the cabin, as my build was already on a wooden frame they were effectively surplus to requirements. However, as luck would have it they are also very conveniently profiled so that mounting them to the eave edge with the lower ‘lip’ under the roof boards leaves almost exactly 50mm of upstand for the celotex! I just pilot drilled through to hit the roof board ends in the centres and fixed with 60mm screws.
Not only does the end result look perfectly neat, it resists the weather being tantalised! The fact that the lower lip acts as a drip edge is just a bonus. I just need to add the guttering.
Anyway, have attached a couple of pics of the trimming and the ‘twins’ now that they are complete. Who knows, it may result in some additional orders for the foundation profiles! Feel free to pass on with the website if you think it’s useful? I showed my neighbour (who also ordered a Tuin cabin on my recommendation) and he adopted the same approach – well, I helped him build his too after all.
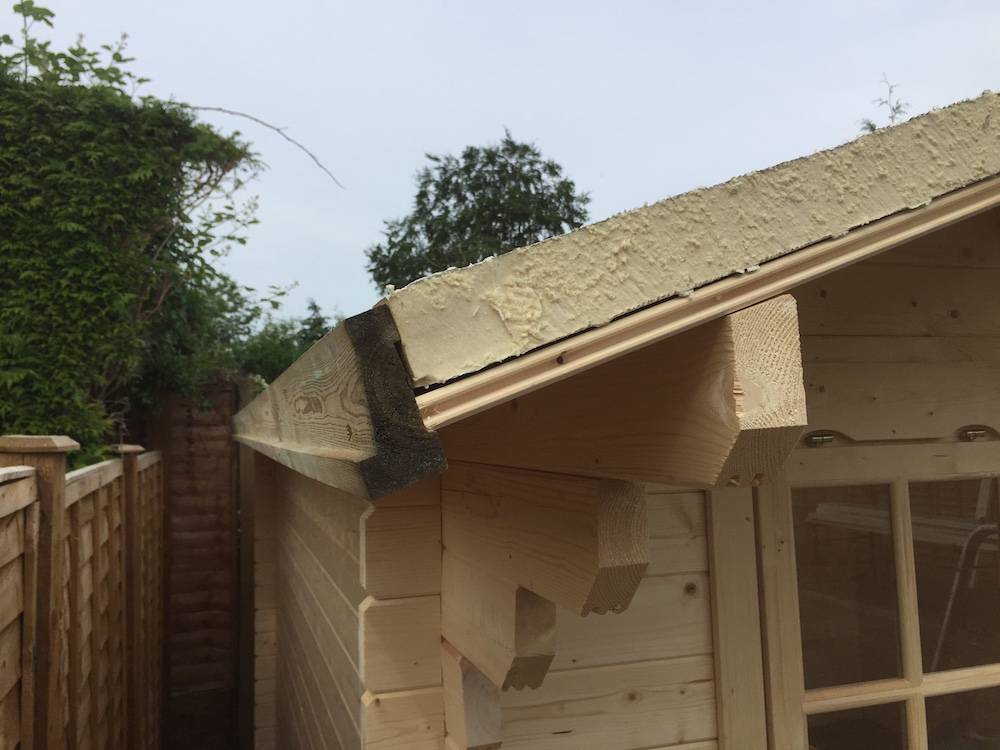
Interesting use of our foundation beams when insulating the roof
Below is Mr J’s story, pictures, tips and advice which may also help you in your build. There are a lot of tips and very relevant if you are intending to use a timber frame base for your Log Cabin as well as some good hints on the actual install.
The Preparation
-
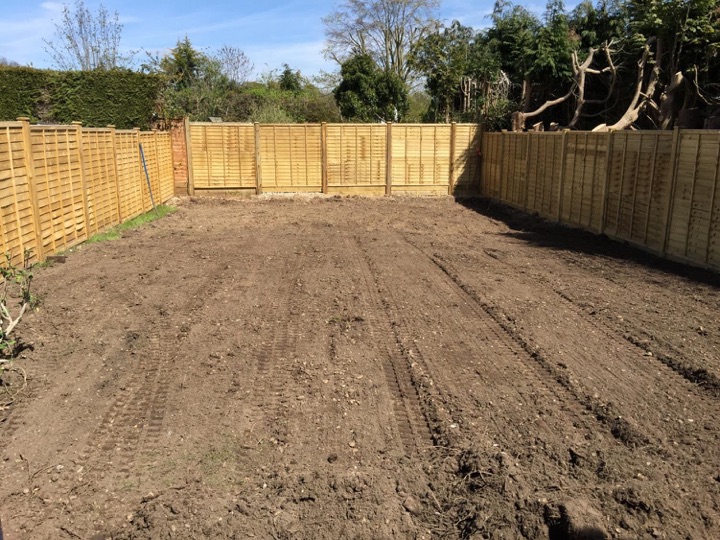
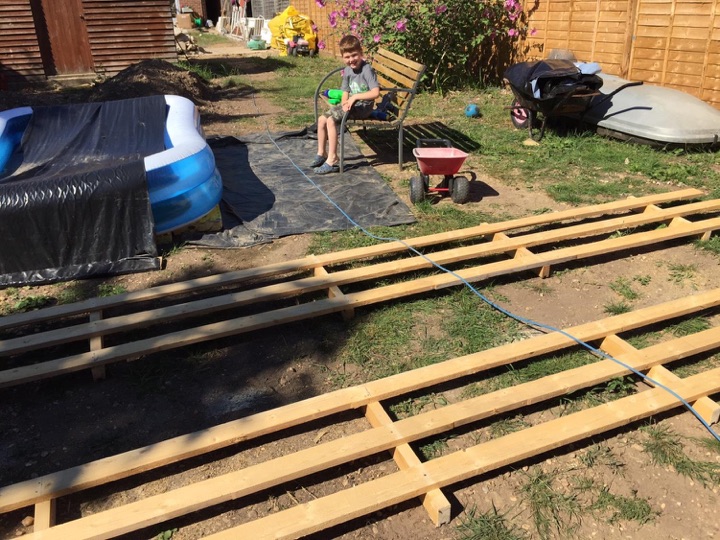
- First job was to level the site. The garden has quite a fall on it, so the end was lowered and flattened to level. This also kept the ridge height below 2.5m
-
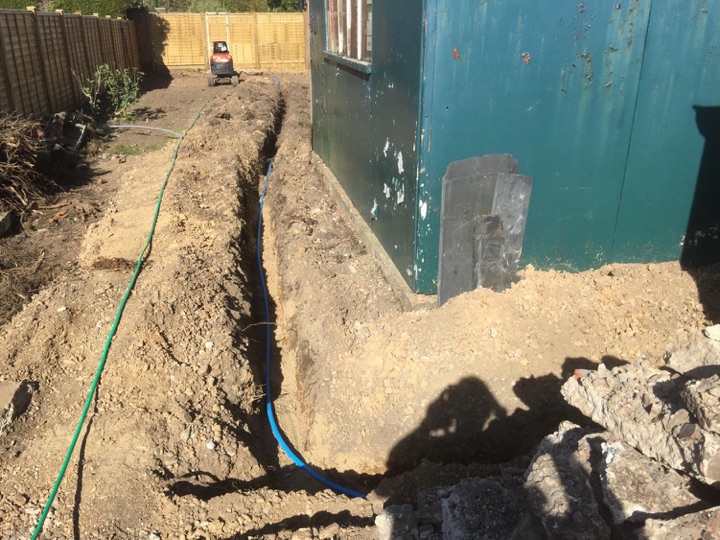
- A 600mm-700mm trench was dug from the house to take 2 x 6mm SWA cables for electrical supply. The blue conduit contains 3 x CAT6 cables for internet etc.
-
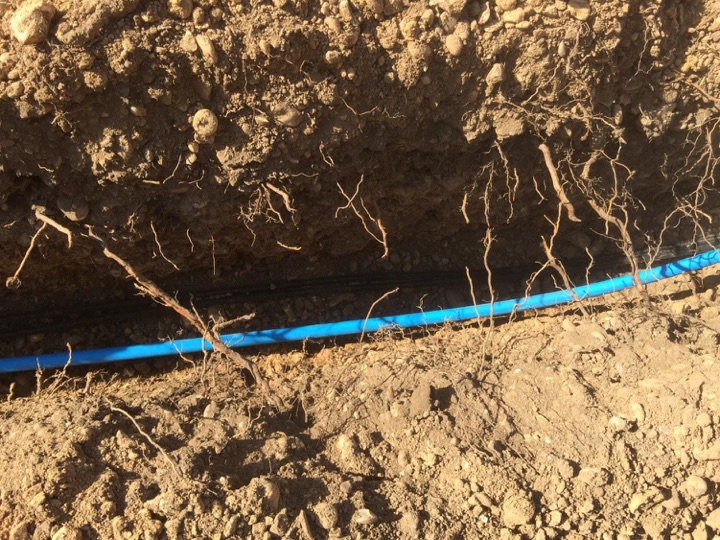
- The blue conduit contains cat5 to the log cabins
-
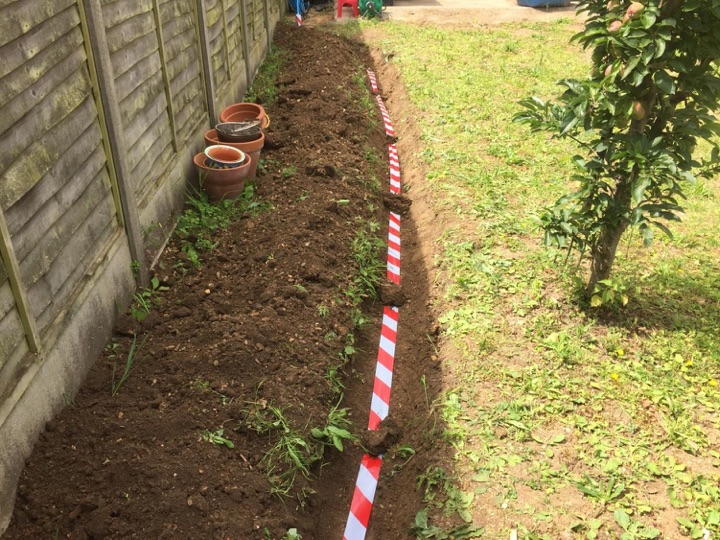
- The trench was partially backfilled, then hazard tape laid to give warning for any future digging.
-
- This was the supply to one of the old sheds. Plastic conduit just under the turf with twin and earth. Definitely NOT recommended!!!
-
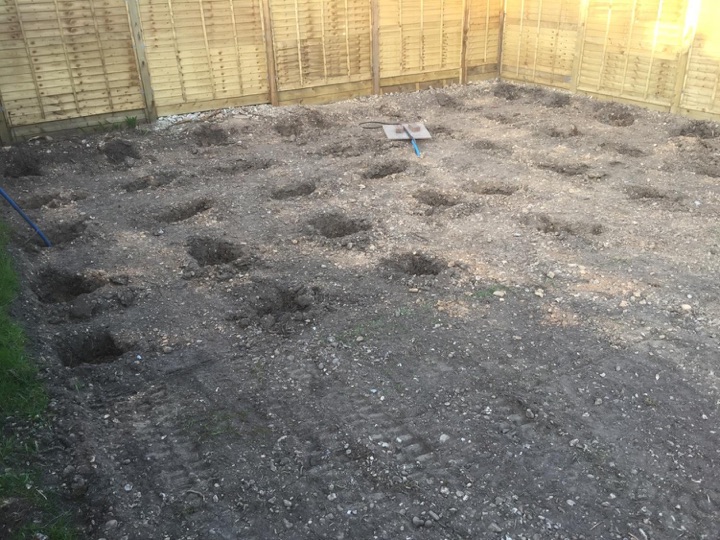
- Site was marked out for the foundation frames and holes dug for the supporting posts.
-
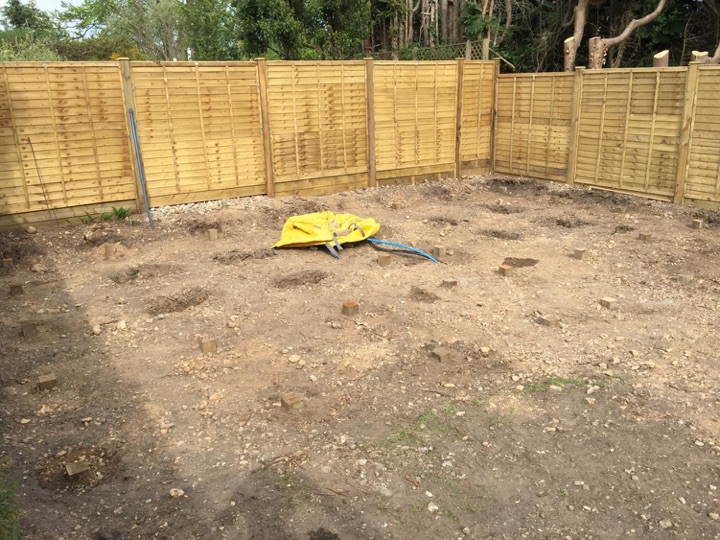
- To support the wooden frame, holes were dug to take 4” tanalised posts set in postcrete. Whilst only 50mm-100mm is visible, each is about 600mm long
-
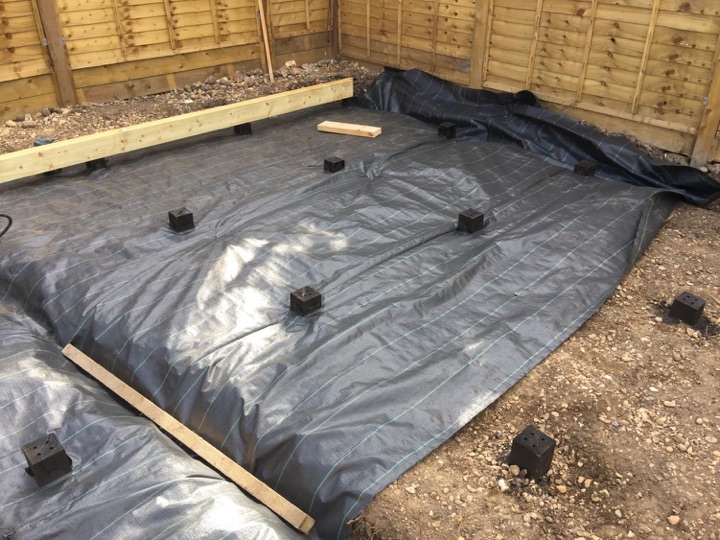
- As a ‘belt-and-braces’ precaution, the posts were also coated in Creoseal. The bore holes in the top ensure that the Creoseal got to the heart of the post to stop rot. Whilst it’s the earth/moisture and organic matter that rots the posts, the holes were backfilled mostly with stones to deter this. A strong weed membrane was laid, large enough to create a French drain around the perimeter. Although, a soakway was also dug to take rainwater was the cabins will be guttered.
-
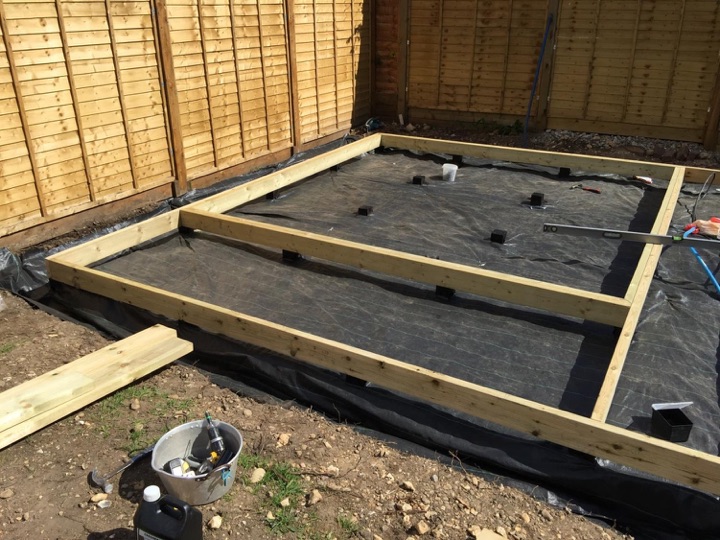
- The frame extends also to create a front decking area. The cabin foundation ‘ring’ was doubled up with 150mm x 50mm timbers. This also means that the floor has something to sit on as the second timber sits inside the foundation perimeter.
-
- Care was taken at every stage to ensure the frame was absolutely level. Whilst a fall is required for the decking, this would be added later with spacers under the decking itself.
-
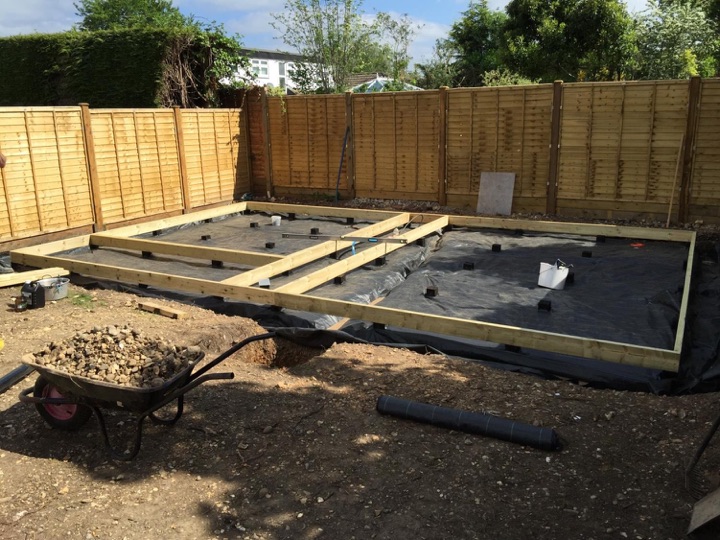
- Perimeter beams all in. Now to fit the rest of the joists. Note soakaway to front. Rainwater will be collected via gutters to a water butt at the rear with overflow into the soakaway.
-
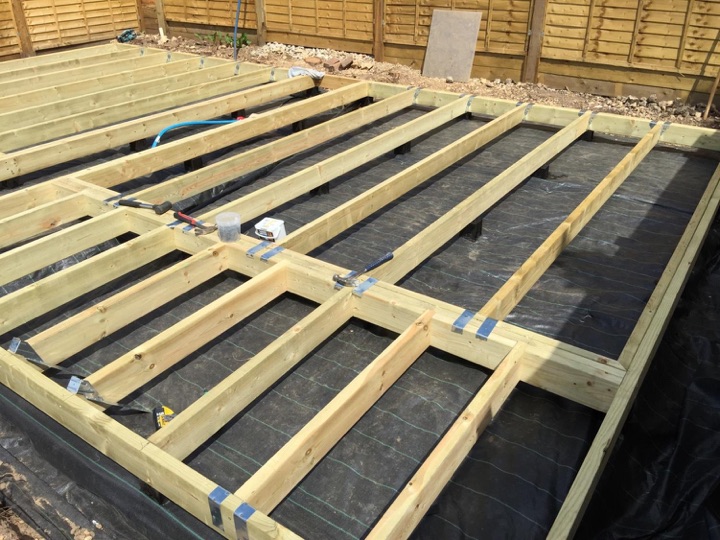
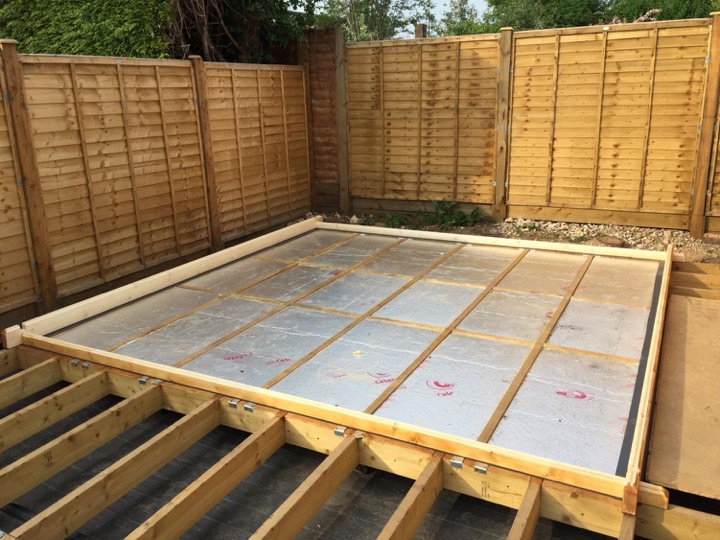
- Joists installed with hangars. You could build a house on this frame, let alone a cabin!
-
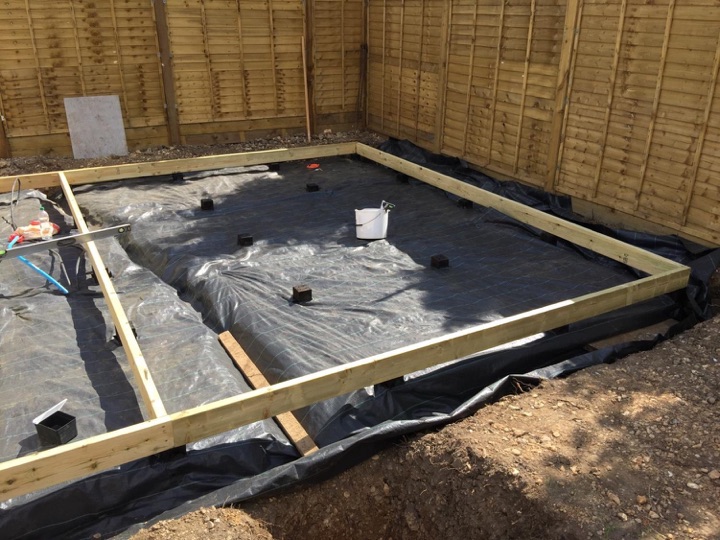
- Framework done, 100mm of Celotex was installed. As you can see from the middle ‘holes’, batten was used to the lower sides of the joists to support it. I have some concerns about rodents getting into it, so you could ply out the bottom first. But we have a cat ☺
-
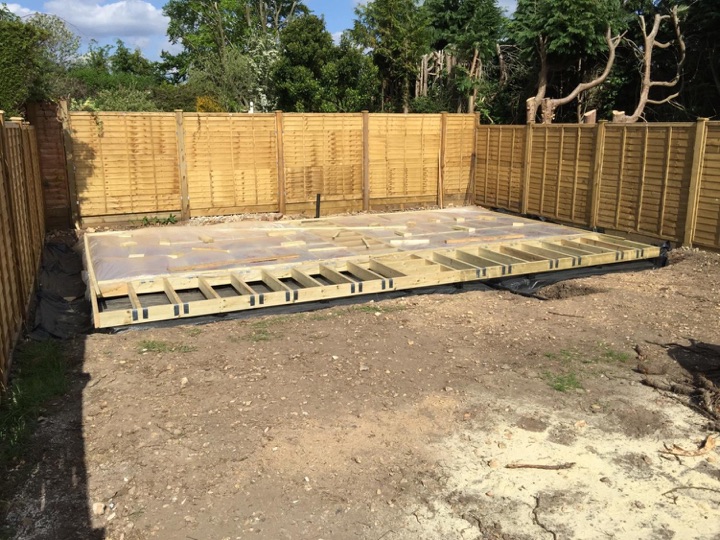
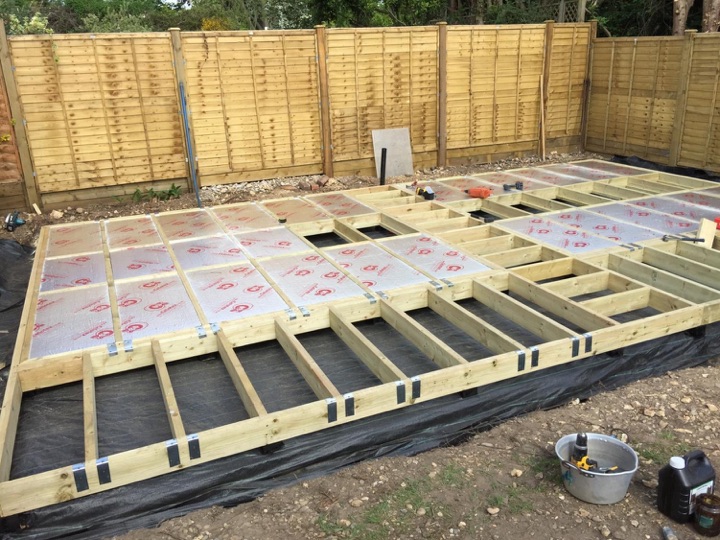
- Foundation framework all done – so just need some cabins to put on them.
-
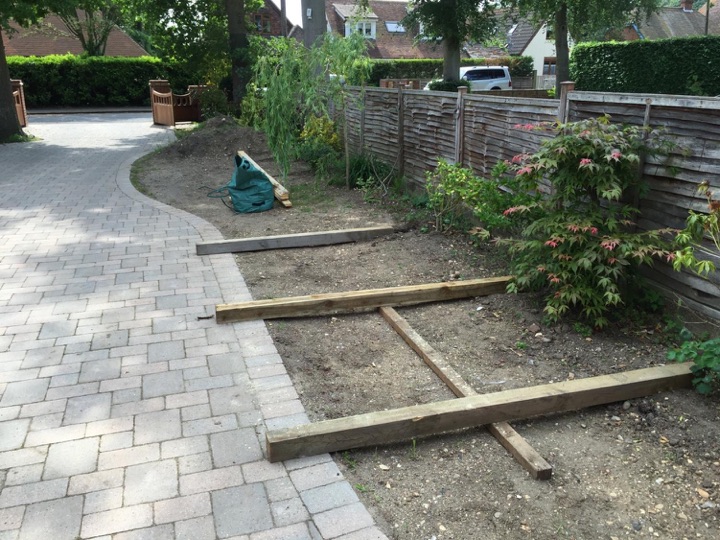
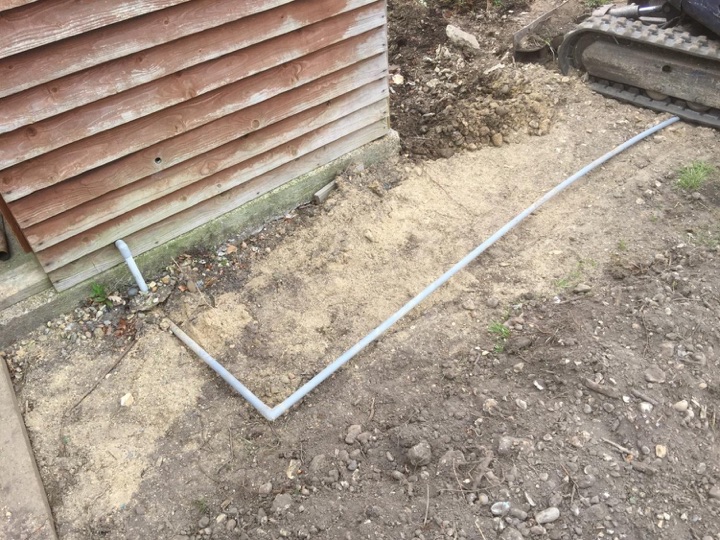
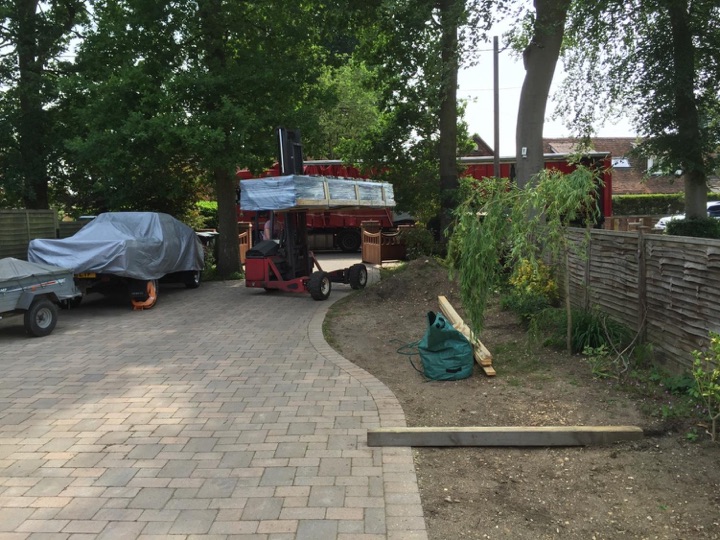
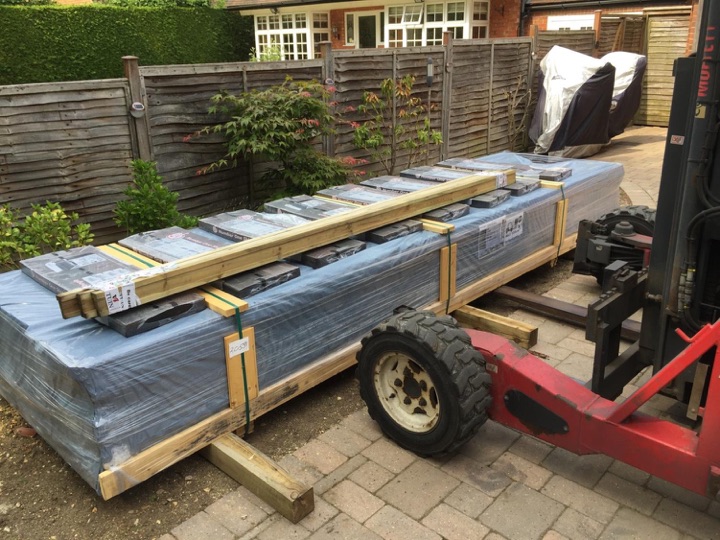
- Unfortunately for us, the site location is about 50m away from the drive where the cabin will be offloaded. Beams laid (level) to keep the cabin off the ground in case of rain.
For installation advice, videos and walkthroughs please see the Log Cabin Installation Advice page
The Delivery and Building Process
-

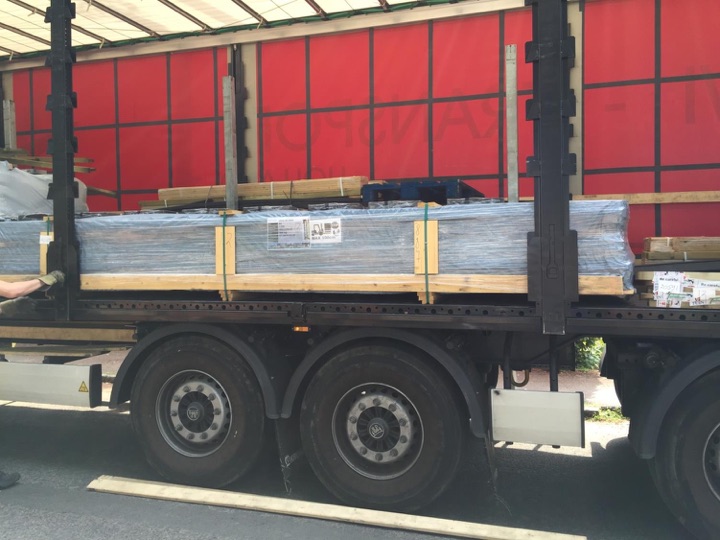
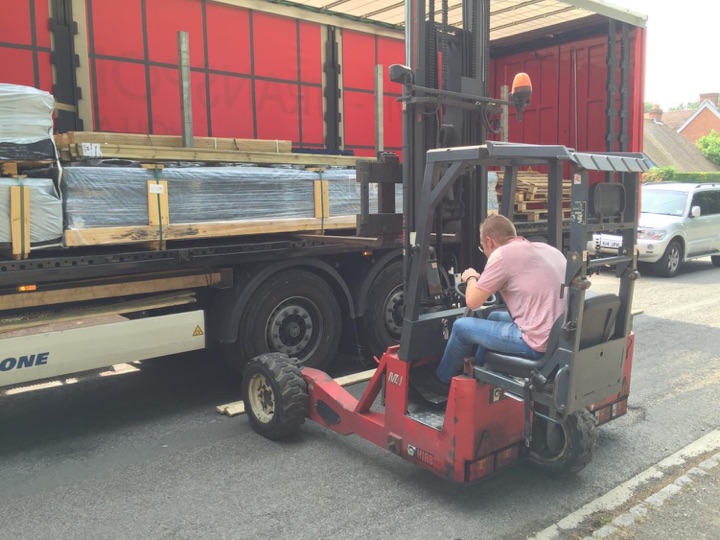
- Timely delivery of the cabin and the moffet lift.
-
- Whilst we ordered two cabins, they came at staggered timings allowing us to erect each independently.
-
- Easy does it!
-
- The shingles were removed and stored in case by some miracle we got some hot weather whilst the log cabin was built.
-
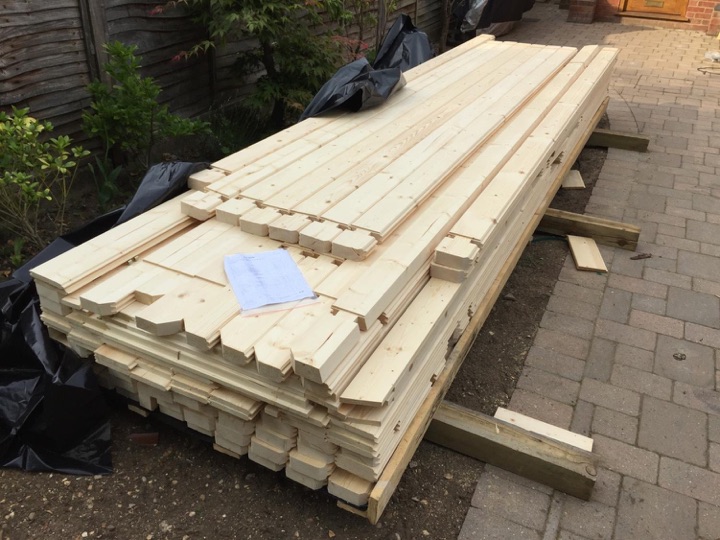
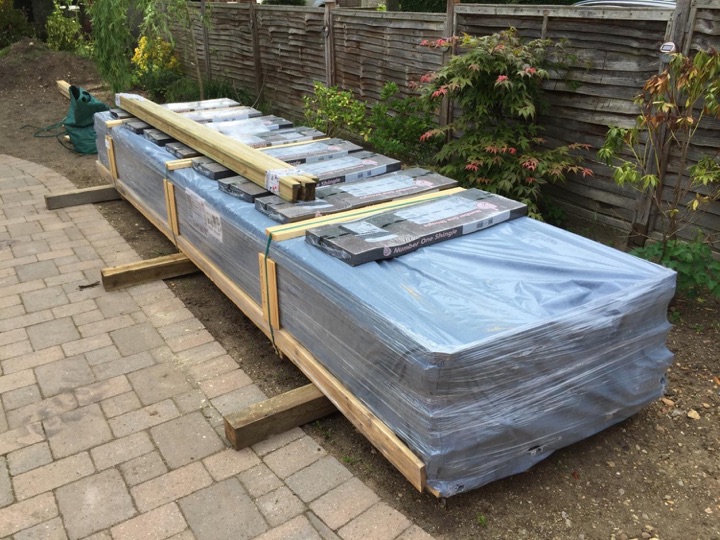
- The packaging of the cabin is cleverly done, with very little wasted space. The plans are inside the package – but have a good pre-read of Tuin’s website to get a feel for the process
-
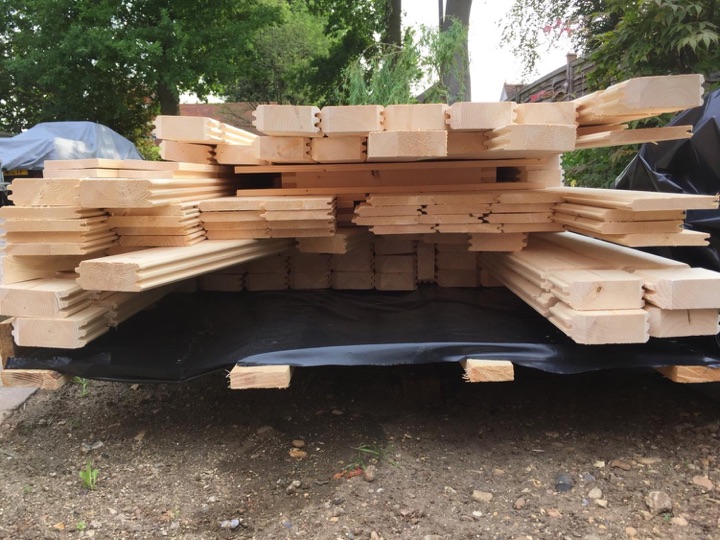
- The packers at Tuin must love ‘Tetris’ 😉
-
- This was the second cabin I’d built (the other is exactly the same and sits to the right of this shot), so I knew the process. But to give you an idea of time – the foundation beams were laid at 18:05. I pre-treated the undersides of them with Sikkens Cetol and they also sit on a DPC. Checked for square, a screw was put in each corner to stop it moving about.
-
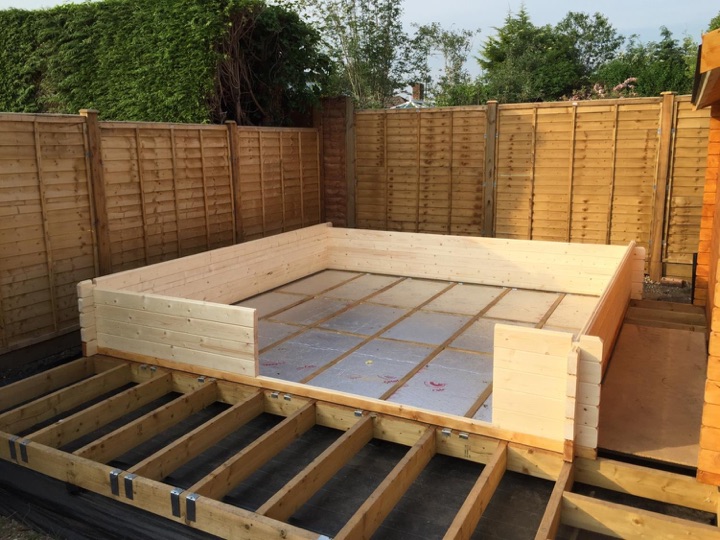
- Now the walls start to be built.
-
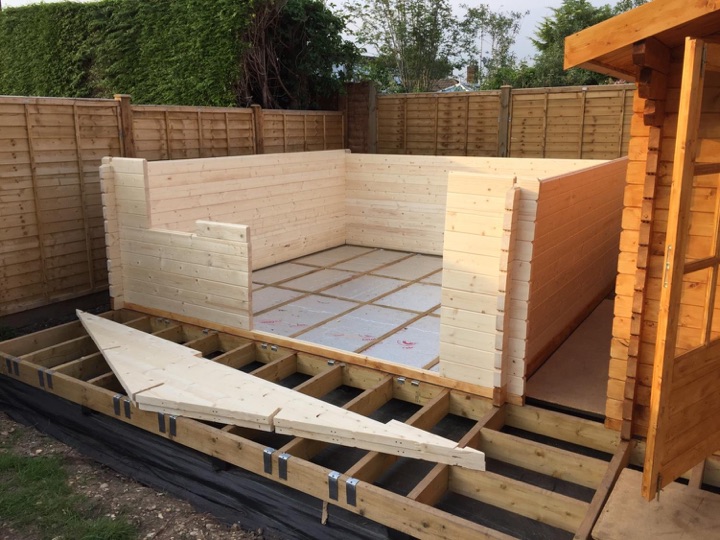
- Refer to the plans to ensure you don’t build too high for the windows. It’s easily done as the walls go together so quickly! There’s quite a lean on the right side in this shot, but that will be corrected later when the gable goes on.
-
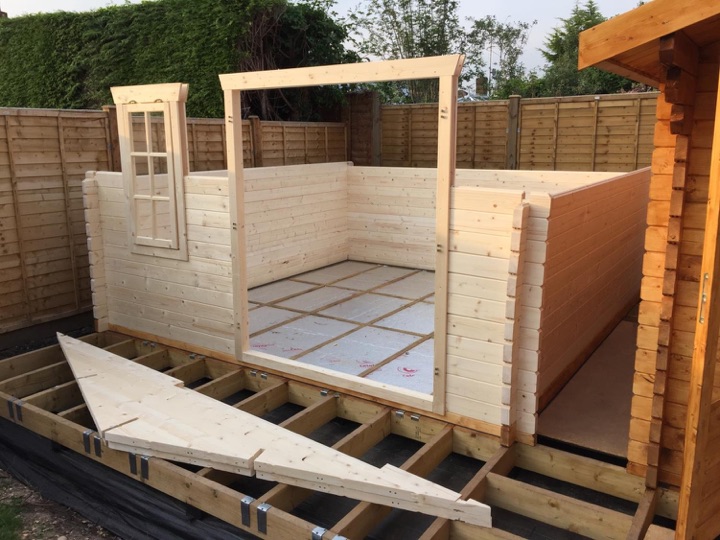
- Door and window frames installed. Remember, do NOT fix these to the walls. They should float which allows the wood to move as it expands/contracts with varying moisture levels
-
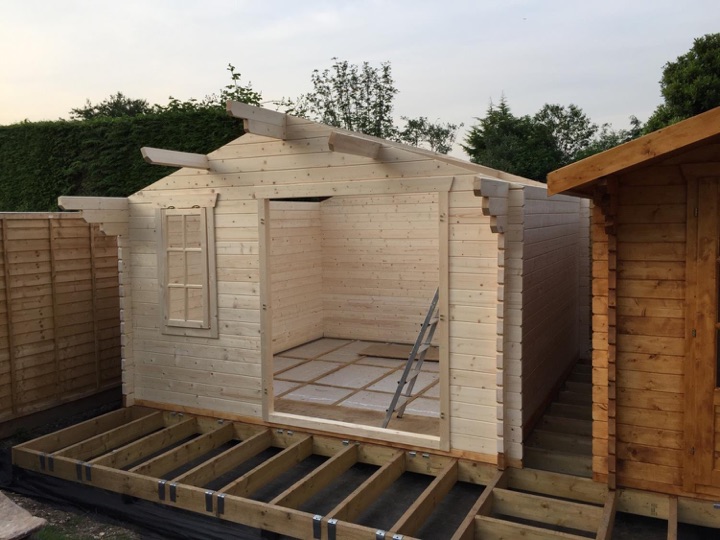
- Now the gable and purlins are on, things are a bit more plumb – but not quite right yet.
-
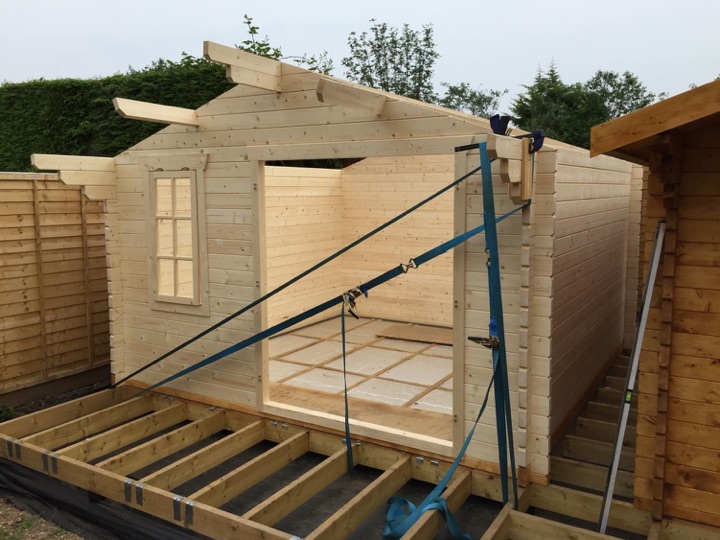
- I didn’t have this issue with the first cabin, but that’s the nature of wood. The top wall planks on the right had a bit of twist in them which was pulling the wall out. A bit of ratchet strap engineering was employed and the cabin left overnight to settle. To get from foundation beam to this took just 2.5 hours – time stamp on pic shows 20:37
-
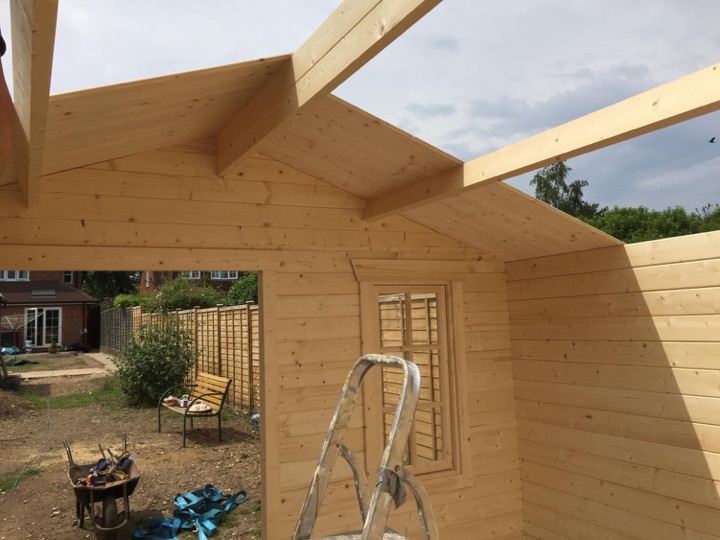
- With the sun out on the following morning, it was time to roof the cabin.
-
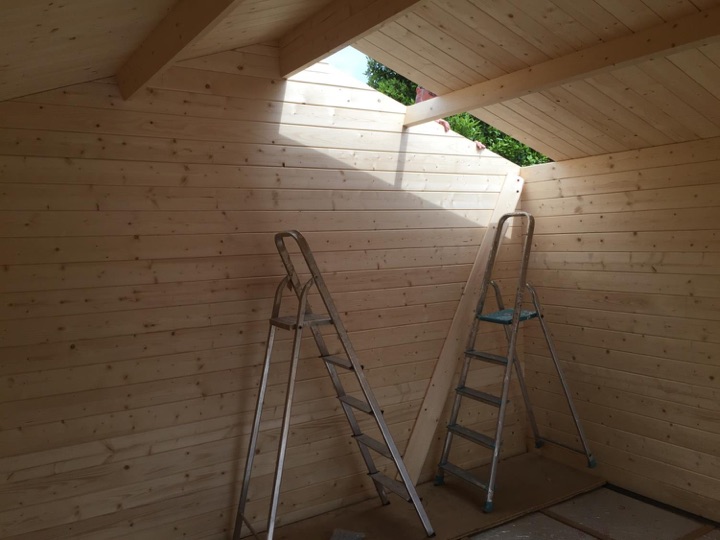
- On a cabin of this size (3.8m x 3.8m) it takes about 90 minutes to board out the roof with two of you working on it.
-
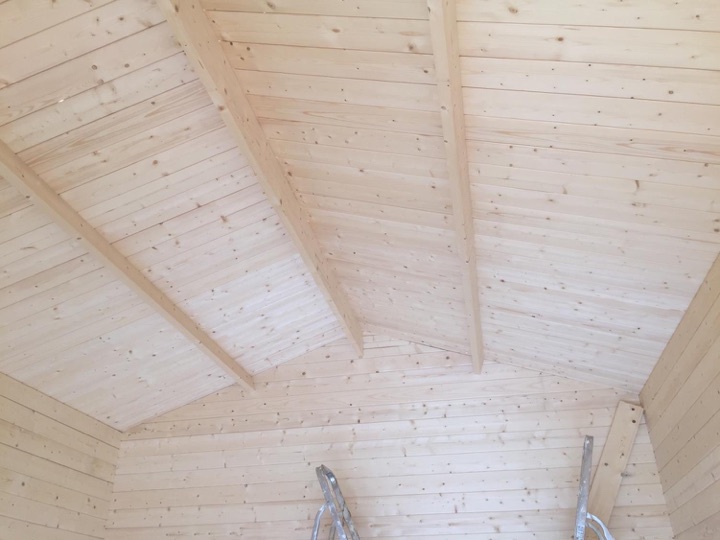
- Lovely ☺
-
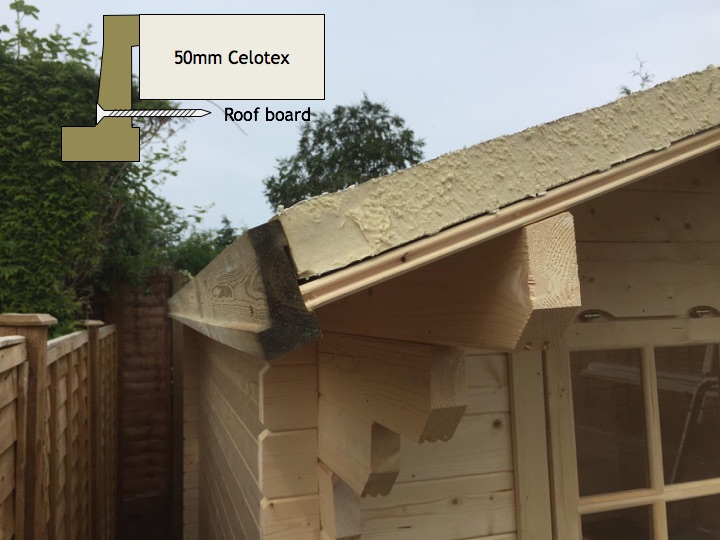
- Top tip. Whilst I’d ordered tanalised, profiled foundation beams, I didn’t need them as I have a wood frame foundation. However, they are pefect to create an upstand on the roof edge for 50mm Celotex insulation! Being tanalised they’re perfect for the job ☺
Mr J gives a good solution here to a rare problem. If build time is critical, brace one side with a spare log or pallet parts to bring the structure square. When the roof boards are nailed on to the top logs and purlins, the twist will always come out
-
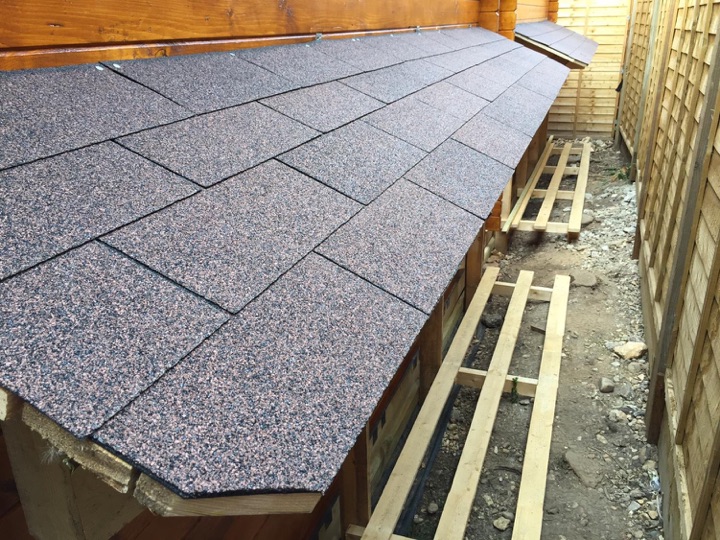
- As you see, the profiled beams are perfect to trim the insulated roof boards. Note the double shingle layer on the right roof. The lower shingle is installed upside down (gravel side facing ground). I have over sailed to allow for guttering.
-
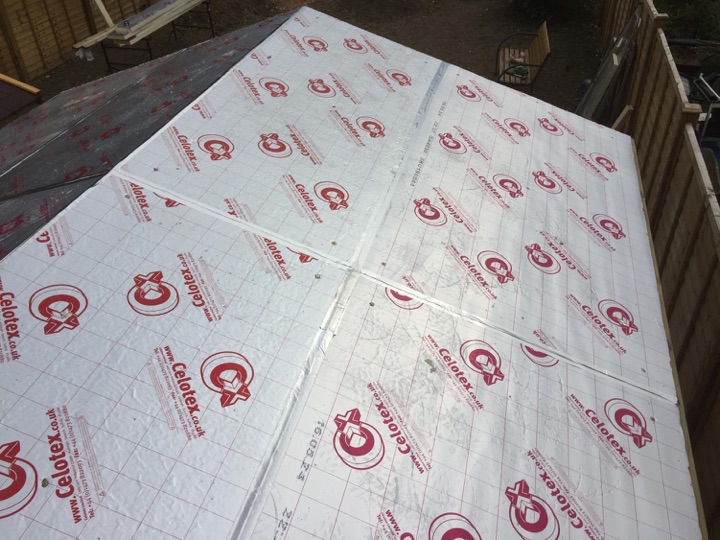
- 50mm Celotex fixed to roof with 60mm screws and washers (to stop screws from pulling through the Celotex). Boards foil taped together.
-

- Before and after shingle-wise
-
- Shingles take time to do, but are very simple. Good instructions on the Tuin website. Note neighbours foundation frame – they have a Tuin Log Cabin arriving shortly too!
-

- Ridge done accounting for the usual wind direction.
For installation advice and videos showing the shingles please see: IKO Shingles. Please note when using roof insulation you will need to use longer clout nails sourced locally, for more advice on insulating your log cabin please see: Insulating a log cabin roof and floor
-
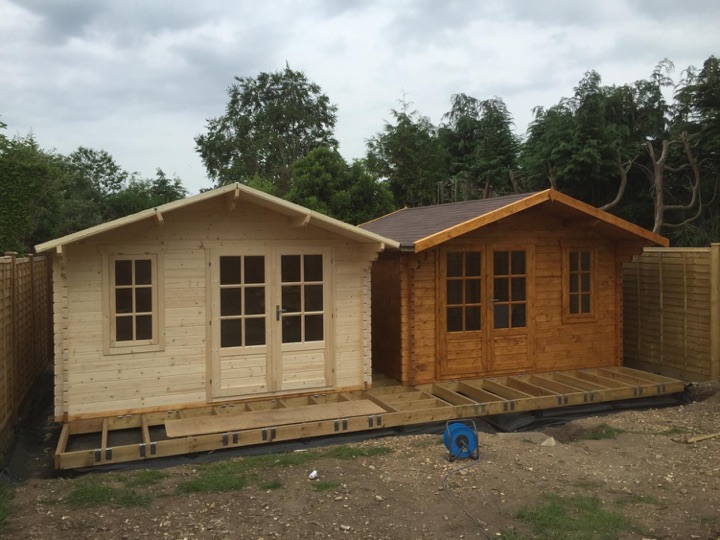
- The Ulrik ‘twins’ log cabins. The wood is protected with 2 undercoats of Sikkens Cetol HLS plus and finished with a further 2 of Sikkens Filter 7 Plus in light oak.
-
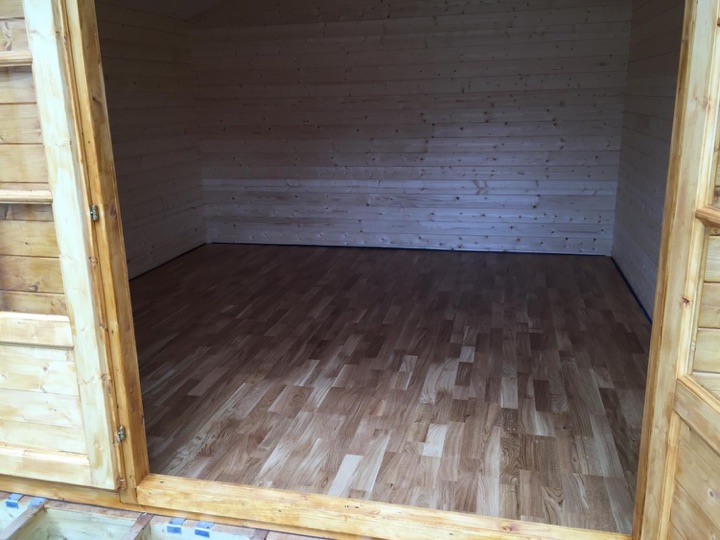
- Flooring installed using 22mm P5 T&G floor boards. Edges glued and screwed.
-
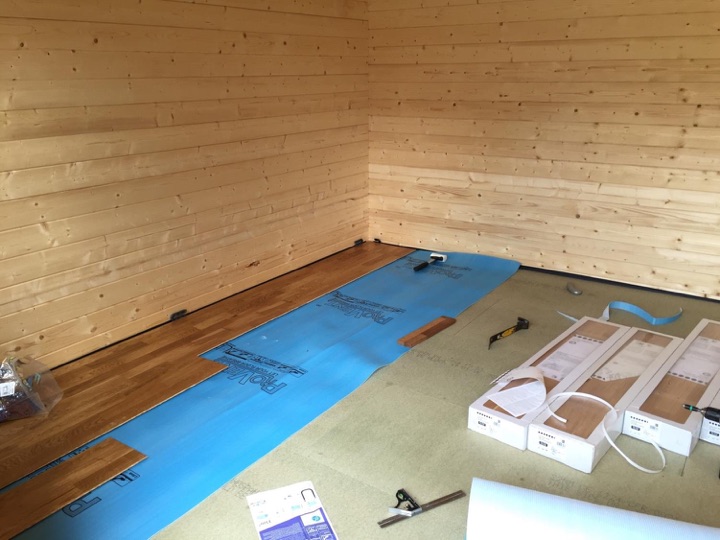
- Whilst one of the cabins is purely a workshop, the other is a day/play room. As such, it gets an oak engineered wood floor. The base membrane is breathable to prevent warping due to different moisture levels between the P5 and the flooring.

-
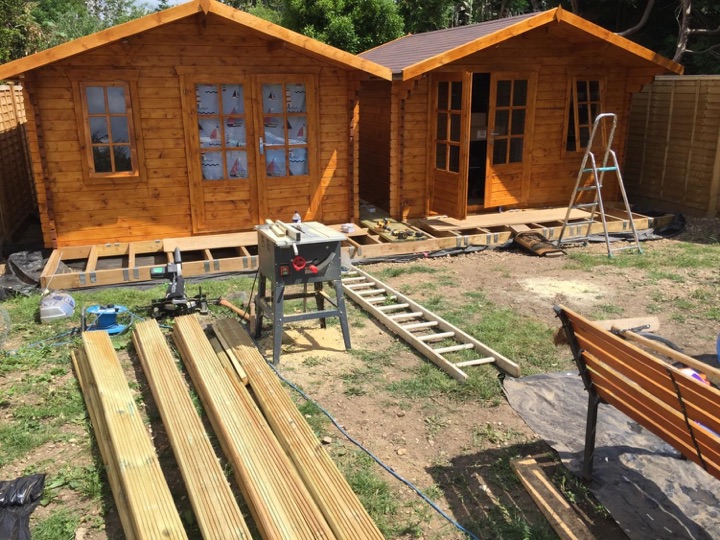
- Cabins finished, time to deck the front. 144mm x 32mm Redwood planks in this case.
-

- Decking finished, the only jobs remaining are to fill the French drains with slate, guttering and install the electrics.
The Electrics
Mr J shows very good examples of the neat fitting of electrics to log cabins. This, as well as a handy wood store made from leftover pallets and shingles.
-
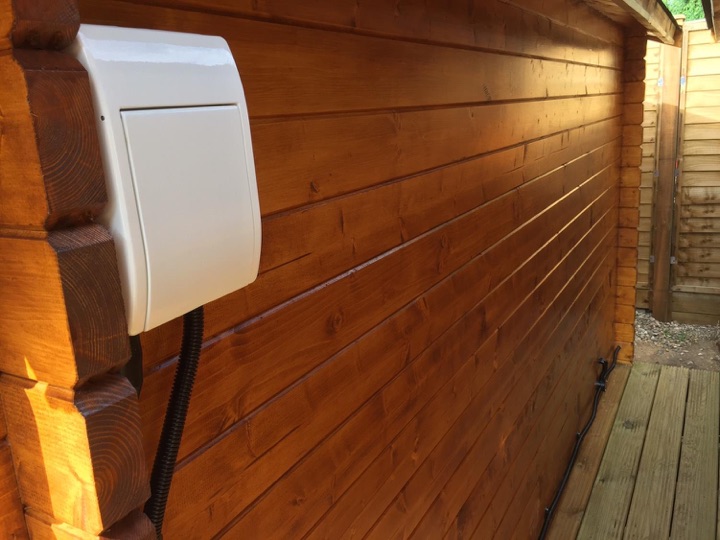
- Consumer units are fitted externally (IP65 rated). These small garage ones from Screwfix hide away nicely behind the log corners.
-

- Twin and earth was run around the outside of the cabin in flexible conduit, to allow for movement in the wood.
-
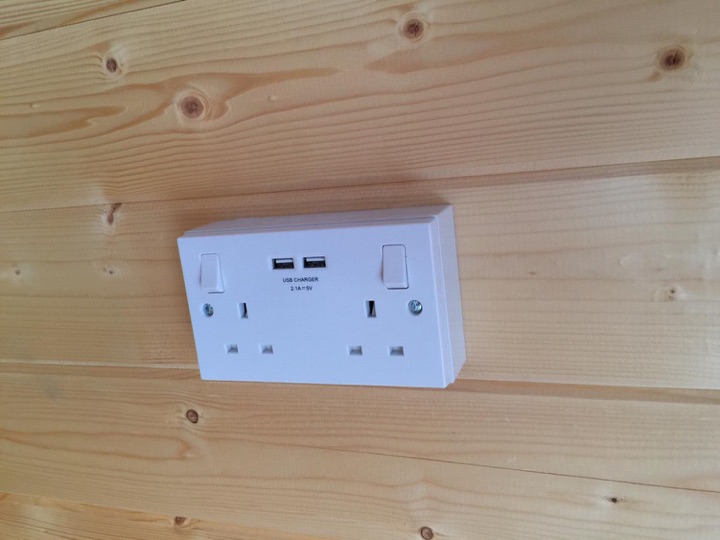
- Nice and neat inside as a result
-
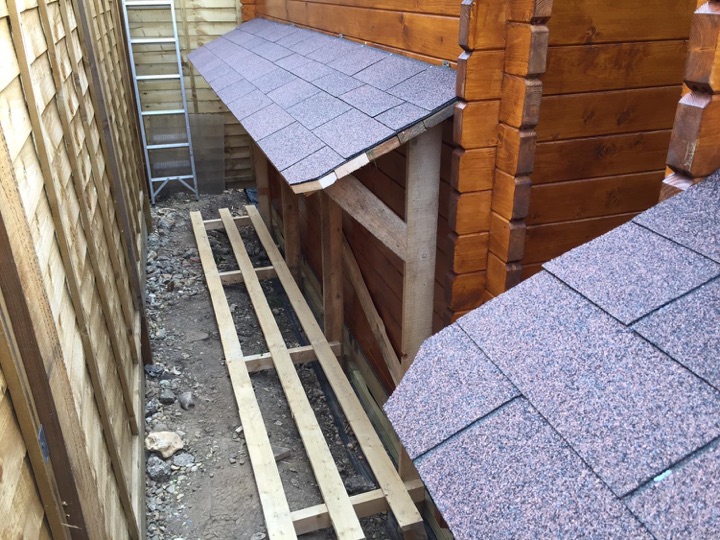
- The pallets that the cabins came on didn’t go to waste…
-
- My wife had the genius idea to make timber stores out of them in the ‘wasted’ space at the rear of the cabins. The ground here is very uneven due to the old Leylandi stumps.
-
- The base was raised on legs to level, with upstands to the roof.
-
- Same on the other cabin. Whilst they are tied to the cabins, they are done so with slotted hangars to allow for movement in the wood (the ones shown here were temporary)
-
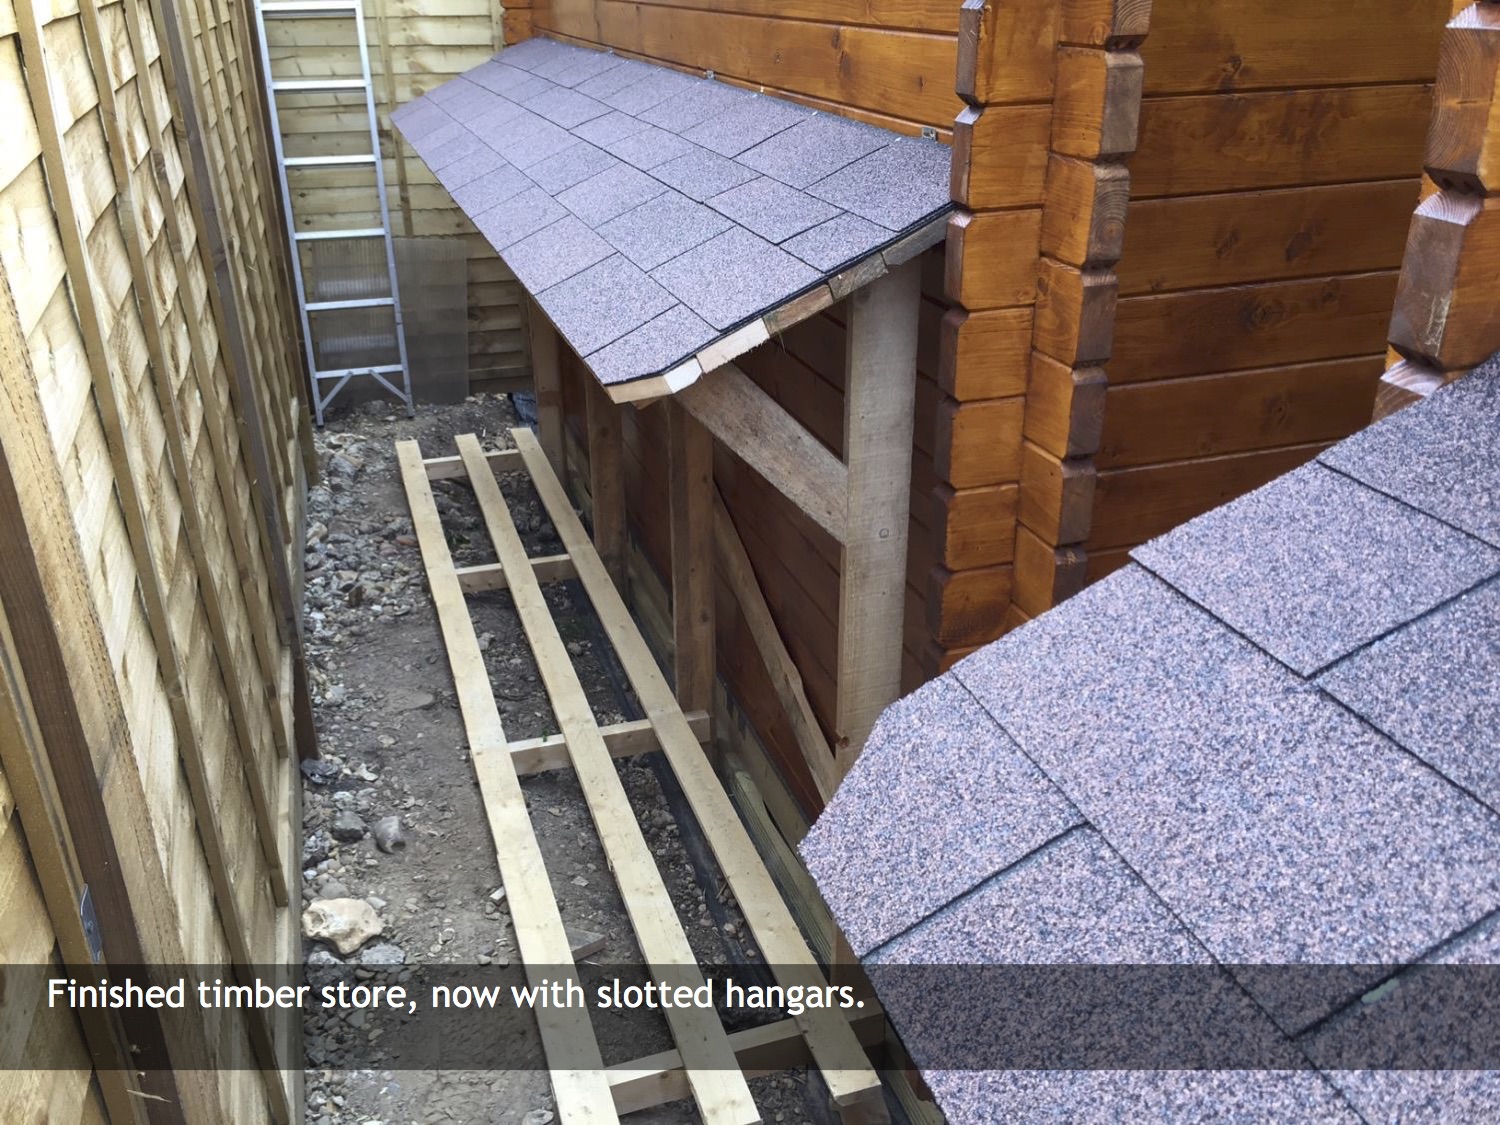
- Finished timber store, now with slotted hangars.
-
- Finished timber store, now with slotted hangars.
-
- Plenty of storage for timber now!
Thank you to Mr J for sending in this post and pictures. There is some great information here and I know it will help other customers with their project.
If anyone would like to send in pictures and a story, we always offer further discounts on products, presents and, in some cases, a cheque.
For all Customer pictorial reviews please see this page: Tuin Customer Blog Reviews
Excellent in depth view into a Log Cabin build I have picked up a few useful tips -I could see the run out on the right hand wall -and I would have been concerned -but now I see how you can pull the cabin structure round ,It has given me more confidence with my forthcoming build.
I am planning to make a photo Blog of my build as well – its great to look back on such a personal achievement – but it also gives others the confidence to step out of their percieved comfort Zone and have a go at building one for themselves !
I am more excited than the Grand children at the prospect of the cabin arriving !
Kind regards and what a great website this is- I can spend days on here, so much vaulable information.
Best wishes to all Jon