


In early April I had the fantastic opportunity to visit a happy customer and their incredible Lilou Log Cabin which they are using for an outdoor seating and sunken hot tub deck.
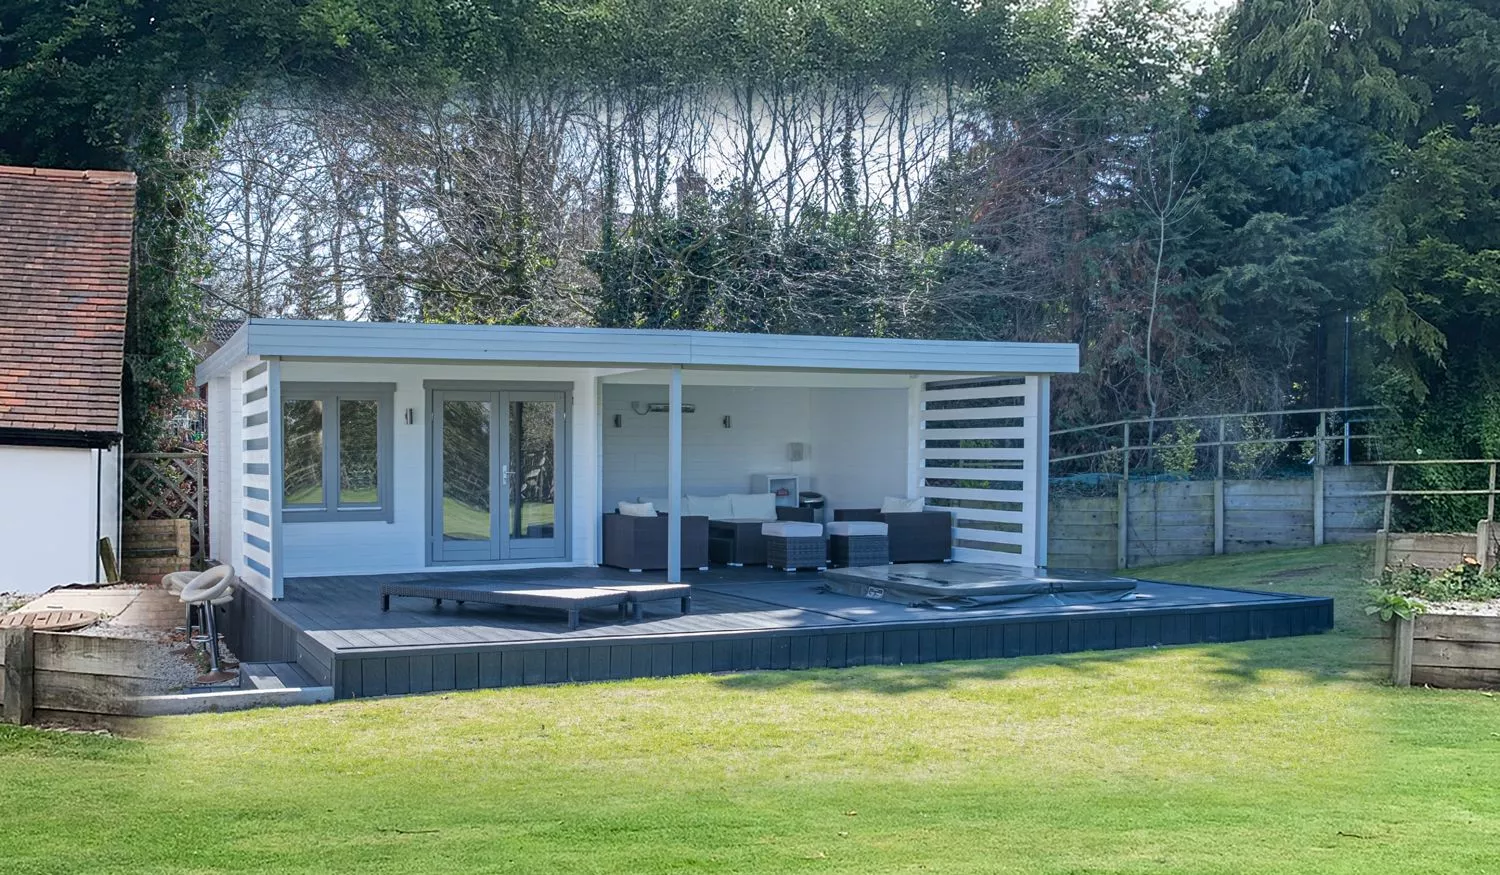
Upon walking around the side of Mr & Mrs Entwistle’s property I was immediately presented with the Lilou Log Cabin wonderfully presented on a large decked area which included a sunken hot tub!
One of our larger cabins, the Lilou really packs a punch with its large L shaped outdoor sheltered area flanked by its modern styled slatted sides for shade.
The Lilou Log Cabin features a flat roof with clean lines and simple geometric shapes that create a minimalist look and feel. Its unique slated side shades give it an individual and distinctive look.

Why the Lilou Log Cabin for a Sunken Hot Tub Deck?
When looking for a log Cabin for their garden, the Entwistle’s focused on finding one with a large veranda for outdoor socialising. They immediately come across the Lilou Log Cabin which was perfect for their needs. It’s almost 27m2 covered veranda area was certainly an enticing proposition. It is perfect for an outdoor seating area, a BBQ area, a hot tub, or simply just somewhere to relax.
Mr Entwistle commented
The TUIN website is excellent. There is plenty of choice and all the details we needed to plan our project was easy to find.
With our wealth of knowledge on our website and blogs about our products and excellent customer service it is easy to see why people choose us to supply them with their perfect outdoor buildings.
Lilou Log Cabin with Sunken Hot Tub Deck Feature Video
Garden Transformation
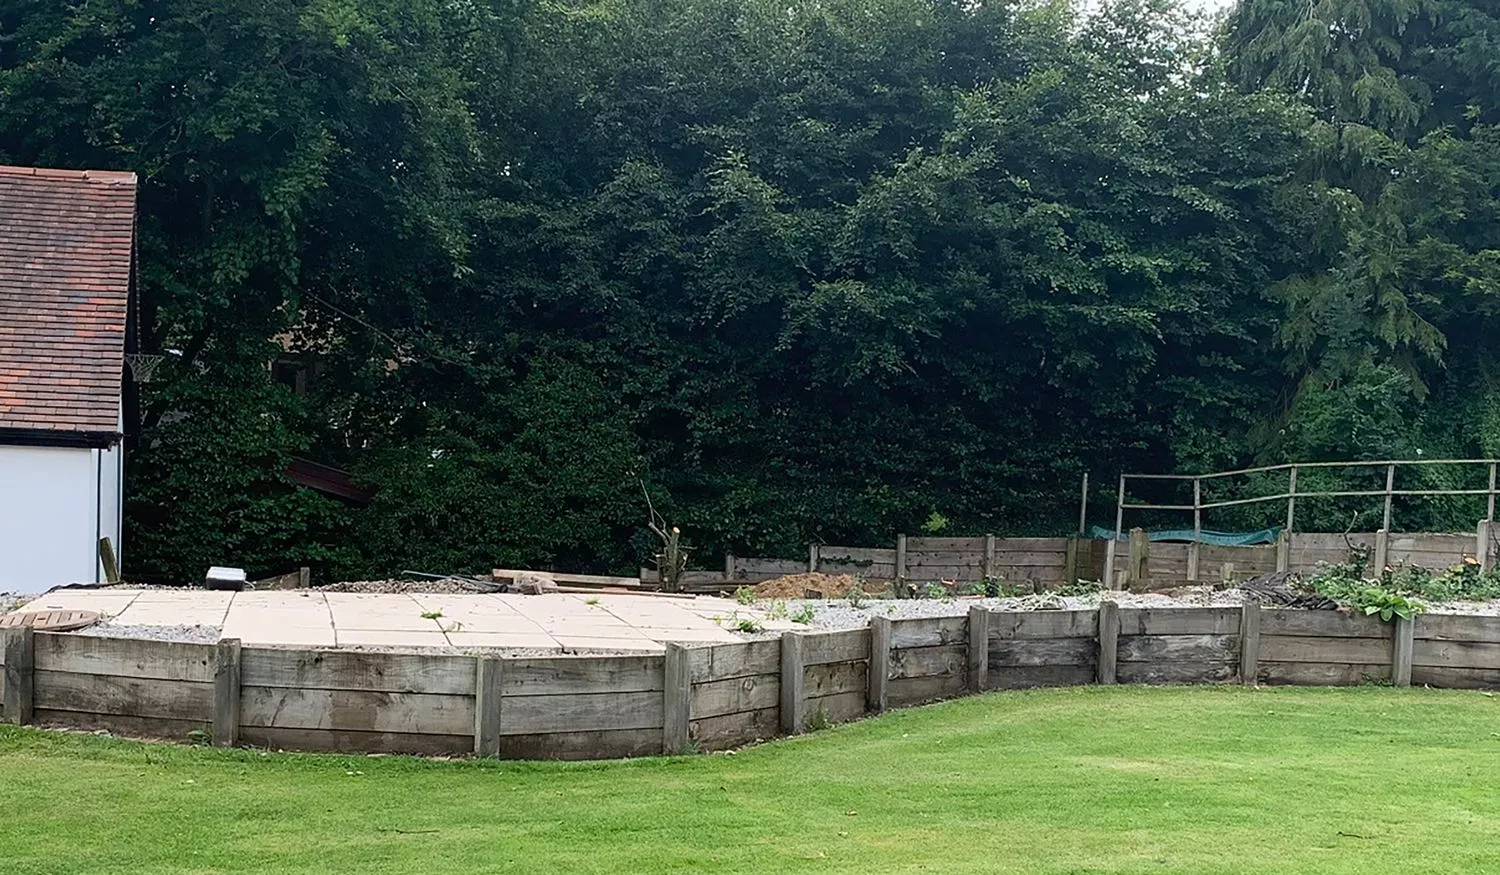
When I go out to visit our customers, I always ask them if they have any photos of their garden before they broke ground to build their new log cabin. It is always nice to show a before and after comparison. It highlights the efforts customers make to improve their outdoor space. Also to inspire others to create their very own idyllic gardens.
Sunken Hot Tub Deck
The customers chose to compliment their striking log cabin with a sunken hot tub in the garden decking. Personally it is the first time I have come across one face to face, I can definitely see the appeal. There are many advantages to having a sunken hot tub opposed to a free-standing one, they are:
- Aesthetic Appeal: A sunken hot tub can add a unique and attractive feature to your outdoor space. It can create a luxurious and spa-like atmosphere, while also blending in with the surrounding decking and landscaping.
- Improved Safety: By being level with the decking, a sunken hot tub can help prevent accidents caused by tripping or slipping on steps or uneven ground. This is particularly important for those with children or older individuals who may have mobility issues.
- Privacy: A sunken hot tub can offer greater privacy and seclusion than an above-ground tub. By being lower to the ground, it can also help to block out noise and distractions from the surrounding environment.
- Temperature Regulation: A sunken hot tub can help to regulate the temperature of the water, as it will be sheltered from the wind and other weather elements. This can help to reduce energy costs and improve the overall experience of using the hot tub.
- Versatility: A sunken hot tub can be designed to fit a variety of shapes and sizes, making it a versatile option for any outdoor space. It can also be integrated into an existing deck or patio, or designed as a standalone feature.
Preparing the area
As you can see from the images, the customers carried out extensive groundworks to allow for the design and functionality they required.
The ground was on a slope so we put in foundations and then build a block wall the exact footprint of the cabin with all weight bearing going onto the block wall. This design meant we could create a void to install a sunken hot tub in front of the veranda, and by raising above ground level it was easy to install the joists that support the decking without them being in contact with the ground
Mr Entwistle


Sunken Hot Tub Decking Build
Here are some steps you can follow to build decking for a sunken hot tub:
Determine the location and size of the hot tub:
- Before starting the construction process, you need to determine the location and size of the hot tub. This will help you determine the size and shape of the deck. Also take the suns path into consideration, do you want more sunlight on your decking early in the morning or later on? Natural sheltering from the wind may also be a factor in deciding where to locate your decking.
Plan the deck design:
- Once you have determined the location and size of the hot tub, plan the design of the deck. Decide on the shape and size of the deck and determine the materials needed to construct it.
Materials:
- Decide on what materials you would like your decking to be constructed from. Timber decking is cost effective, eco-friendly, and versatile. A number of finishes can also be applied to timber. Composite decking is very durable, low maintenance and come in a variety of designs and colours.
Prepare the site:
- Clear the site and level the ground where the hot tub will be located. Use a shovel or a tiller to remove any grass or vegetation in the area. Compact the soil using a plate compactor to ensure that the ground is stable.
Electrics:
- Run armoured electric cable from a consumer unit to where your hot tub will be situated. Also think about if you would like recessed decking lights as this will determine where you will run cables.
Build the support structure:
- Construct the support structure of the deck using pressure-treated wood or steel. Use concrete footings to anchor the support posts in the ground. Make sure that the support structure is level and square.
Install the deck boards:
- Install the deck boards over the support structure. Use screws or nails to secure the deck boards to the support structure. Make sure that the deck boards are level and spaced evenly.
Cut out the opening for the hot tub:
- Using a jigsaw or circular saw, cut out the opening in the deck for the hot tub. Make sure that the opening is large enough to accommodate the hot tub but also leaves enough space around the edges for maintenance and access.
Install the hot tub:
- Carefully lower the hot tub into the opening in the deck. Make sure that the hot tub is level and secure.
Finish the deck:
- Once the hot tub is installed, finish the deck by installing the railing and any other accessories that you may want. Apply a coat of sealant or stain to protect the deck from weather and water damage.
By following these steps, you can build decking for a sunken hot tub that is both functional and aesthetically pleasing. However, it is always a good idea to consult with a professional builder or contractor to ensure that your deck is built to code and meets all safety requirements.
The Lilou Log Cabin Build
Thinking about building a cabin this size can initially feel pretty daunting. With so many different size and shape pieces it’s understandable that it could be a little off-putting for the regular DIYer. Having said this, the Lilou og Cabin (as with all of our log cabins) is manufactured with the customer in mind. With clear guidance from the plans and drawings, as well as the wealth of knowledge on our website and build tutorials the process can be a straightforward and enjoyable one.
As with a large project like this, pre-planning is paramount to a successful and faultless build. We always advise to read the plans thoroughly before you begin your project, as well as browsing our help guides, blogs and youtube channel.
Mrs Entwistle mentioned that unpacking the logs was initially pretty intimidating. However, after laying all the pieces into same sized piles and carefully reading the drawings, they soon got their heads around what went where.
DELIVERY
The customers have a large driveway allowing access for the delivery truck to dismount the log cabin package with ease. The customers unwrapped the package and carried the logs the short distance to the rear of their property. Having a very large rear garden proved very useful as they had plenty of space to spread out their log cabin pieces.
SORTING THE LOGS
The customer placed the pieces into similar sized piles close to where they will be constructed. They used scrap pieces of timer to keep them off the ground. They placed the items near to where they will be needed later. By consulting the build diagrams they were able to assess where things were going to go. This makes for a much easier build process without having to sort through numerous logs to find the one you’re looking for.
FOUNDATIONS
Having already had a large structure on the site, the customer confirmed it was solid and level so was able to get straight into the construction of their new project.
Starting with the foundation beams, these are placed directly onto the base. They are to keep the bottoms logs from getting wet and being damaged. Once the foundation beams are down the starter/half logs are placed on top and screwed into the foundation beams. This is the only time the logs ar screwed down.
WALL LOGS
Now the log walls can be built up. This is a very straightforward process and requires only a mallet for tools. The 40mm interlocking logs are placed one on top of the other and secured down by malletting along the logs. Although this can be a speedy process, it is always advised to refer to the drawings throughout. This will ensure everything is going to plan. Logs can be removed if you have gotten ahead of yourself but this can be time consuming and cumbersome.
Once around 8 logs high either side of the openings, the window and door frames can be slotted into place. Again, a very straight-forward and easy task. Some customers opt to build up all the wall logs first and then remove the window and door fascia’s allowing them to push them into place. Then reattach the fascias afterwards. This is entirely up to the customers preference.
ROOFING
Once walls were built up, focus was then set on the roof. The rafters were fitted in the same way as the wall logs, interlocked and malletted down. This is where an assistant comes in handy as it can be difficult for a single person.
The roof boards can now be laid. The 16mm tongue and groove interlocking roof boards are nailed into place allowing a gap for expansion between them. The customers of this build didn’t opt for roof insulation, however if they had, it would be laid on top of the roofing boards and topped with OSB boards.
EPDM roofing comes as standard with the Lilou Log Cabin. It is a type of synthetic rubber material commonly used in roofing due to its excellent durability and resistance to weather, chemicals, and UV radiation. EPDM is a very popular material for flat roofs due to its ability to withstand extreme temperatures and weather conditions. EPDM is a very versatile and reliable material that can last for decades with proper maintenance and care.
Read our blog for help and tips on lay
ing EPDM onto a log cabin.
When asked; Were there any unforeseen issues you came across and how did you rectify them? Mr Entwistle’s response was;
“The only challenge was lifting the rubber roof to get it on the top of the cabin because it was extremely heavy. A clever ramp system and some pulleys worked a treat but even that needed some extra man power”
Did the build take as long as you were expecting?
“Yes, done inside a couple of days as the website suggested”
Were there any unforeseen issues you came across and how did you rectify them?
“The only challenge was lifting the rubber roof to get it on the top of the cabin because it was extremely heavy. A clever ramp system and some pulleys worked a treat but even that needed some extra man power”
Lighting & Cabling
Correct lighting for your log cabin or outdoor space is important. Getting the balance of natural and artificial light is key in providing the atmosphere you desire.
- Consider the cabin’s natural lighting: Log cabins often have large windows and doors that let in a lot of natural light. Take advantage of this by using light fixtures that complement the natural light rather than compete with it.
- Think about the cabin’s style: If you’re looking to have a rustic, cozy feel. Choose lighting fixtures that reflect this style, such as lantern-style pendant lights or wrought-iron chandeliers. For a more moren feel, choose minimalistic lighting made from aluminium or brushed steel.
- Use warm, ambient lighting: To create a welcoming atmosphere, use warm, ambient lighting such as soft-glowing table lamps or wall lamps.
- Highlight key features: Use accent lighting to highlight key features of the cabin, such as exposed wooden beams or a stone fireplace. This will create visual interest and add to the overall ambiance.
- Consider energy efficiency: To save on energy costs, choose LED light bulbs or other energy-efficient options.
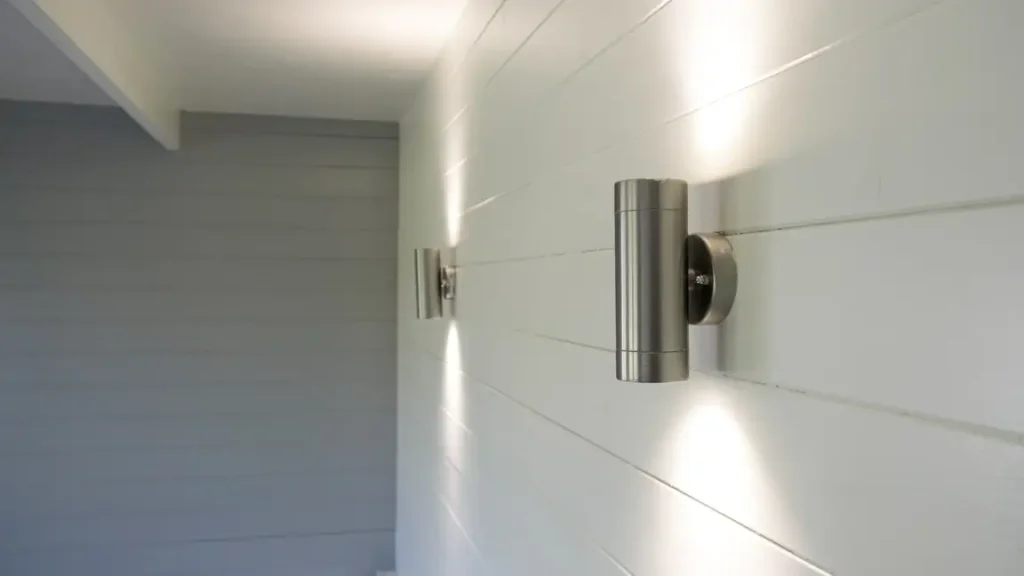
In keeping with the cabins modern looks and aesthetics, the Mr & Mrs Entwistle opted for these stainless steel LED Twin Wall Lights both inside and out.
The modern design of the up and down wall light is an appealing choice for any outdoor space. They also allow for the cables to be fed through the walls as to not need the use of internal conduit which affects the clean, modern presentation of the cabin.
Lilou Image Gallery
Photographing this cabin was a joy. A sunny spring afternoon allowed me to capture the Lilou Log Cabin and garden in all its beauty. Although the hot tub is currently not in use it’s clear to see how the customer and their friends and family can enjoy a relaxing time soaking up the atmosphere.


Veranda Heating
The british weather and climate is not always predictable. The veranda area can shelter you and your guests from the elements to a certain degree but adding a heater or two can definitely make the outdoor area more enjoyable. The Entwistle’s have mounted a few electric infrared heaters to there sheltered area to allow them to enjoy the outdoor space during the colder months.
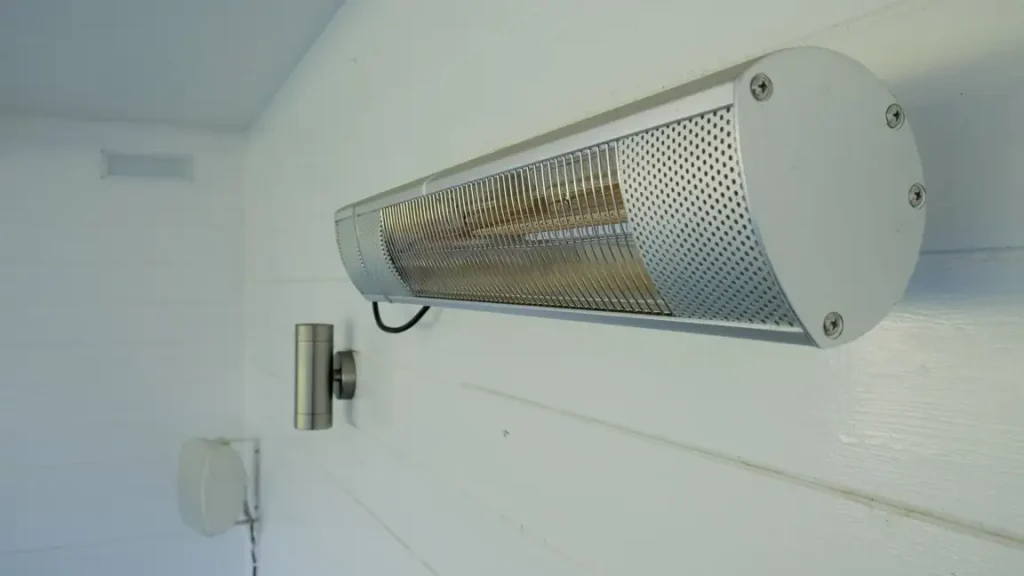
Using our Garden Building Wall Heater, is a very easy and quick way to give yourself some heat in your gazebo or perhaps a log cabin, you’re always one click away from some quick heat.
This water resistant 70x14cm outdoor Halogen heater has an output of 1800w and warms up incredible quickly.
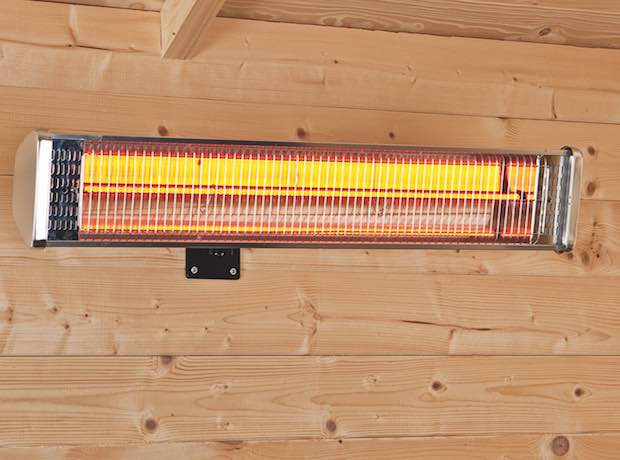
This Ceiling Mounted Halogen heater is ideal to use in the center of your log cabin or gazebo to provide quick and reliable heat whenever you need it.
The water resistant heater has two settings of 900w and 2100w and can provide 360 degree warmth to you and your guests.

Similar Log Cabins
The style and design of the Lilou is undeniably unique. However, if the Lilou Log Cabin is not to your taste or requirements, we do have a number of other similar cabins you may be interested in.
The Funen Log Cabin is another modern styles log cabin. This cabin features 2 covered outdoor spaces as well as a central summerhouse. This cabin is ideally situated in the corner of your garden and has a number of uses. This Funen Log Cabin is being used as a shelter for a hot tub and outdoor seating area.
The Gretel Log Cabin with shelter combines both modern style aesthetics as well as a traditional poise with its attractive Pyramid Roof. Its large 5.4m gazebo area is perfect for entertaining guests for a BBQ, birthday party or simply to relax in after a hard days work in the garden.
Conclusion
The Lilou is a stunning log cabin, and the Entwistle family have done it proud. The addition of the large decked area with integrated sunken hot tub gives it both an aesthetic appeal and excellent functionality. The Lilou log cabin has an extensive veranda area enabling the owner to use it for almost any function they wish. In this case, a large seating area for hosting BBQ’s and parties has been created.
It was a joy to visit the Entwistle’s Lilou Log Cabin. The thought and effort they have put into creating this fantastic space is admirable and made photographing it a pleasure. I’m sure the family will enjoy many more days relaxing in their amazing outdoor space with the help from TUIN and our gorgeous Lilou Log Cabin.