


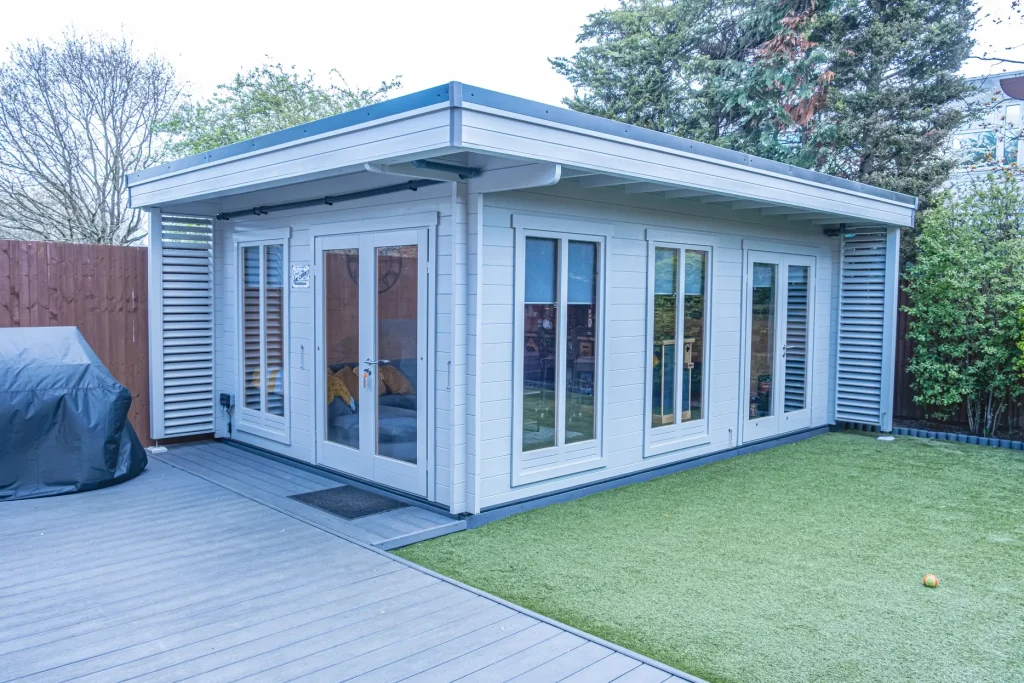
In late April I had the fantastic opportunity to visit one of our stunning Hildegard Log Cabins being used as a Back Garden Bar & Lounge, located in Hornchurch, Essex.
Situated in the corner of Mark’s modestly sized back garden, the Hildegard stands boldly and proudly, immediately drawing visitors attention.
The Hildegard is one of our gorgeous modern styled log cabins. It features a flat pent roof, 3 full height double glazed windows as well as 2 full height double glazed double doors with high quality fixtures and fittings.
With the Hildegards well sized measurements, the possibilities for its potential use are almost limitless. It’s ideal for a home office, a craft studio, summerhouse, or in this case, a lounge and bar area.
Feature Video – Hildegard Modern Log Cabin – Back Garden Bar & Lounge
Take a closer look at our Hildegard Log Cabin in this feature video.
Why TUIN and the Hildegard Log Cabin as a Back Garden Bar & Lounge?
There are many reasons our customers chose TUIN to purchase their garden buildings, from our high quality timber to our excellent customer service.
Mark, as with most customers who want to find a prefect cabin for their gardens looked at many different suppliers. One of the reasons Mark chose us here at TUIN is our high level of supports and knowledge of our products.
“I reviewed the various suppliers on the market and was impressed with the level of support and guidance TUIN offered on its website. Watching and reading the various YouTube videos and blogs before the build made a huge difference.“
“The attention to detail on the website is what stands out for us as this paved the way for a decent DIYer to build their own fully functioning cabin.“
Mark (Hildegard Customer)
The Hildegard is a unique log cabin as it differs from a lot of standard cabins on the market. The biggest reason our customers love the Hildegard is its size, design and the high amount of light from the numerous glazed windows and doors. This is exactly the reason Mark gave when asked why he chose the Hildegard for his Back Garden Bar & Lounge.
“We wanted a more modern look and also we were quite specific in the size (6m x 4m). The amount of windows it offered and their layout was also a factor as the cabin was going to sit in the left corner of our garden.“
Mark (Hildegard Customer)
Mark’s Garden Transformation
Mark has transformed his garden by removing a shrubbery and garden pergola to make way for his Hildegard Log Cabin. The evolution of his garden is apparent, making use of all space he had available to him to create a wonderful expansive garden building for him, his family, and his guests to enjoy throughout the year.


Hildegard Log Cabin Build
All our log cabins kits are manufactured with the customer in mind. They can be built with only a few basic DIY tools and knowledge.
We highly recommend looking through our many help pages and blogs prior to a build. This is exactly what Mark done so he was fully prepared and organised.
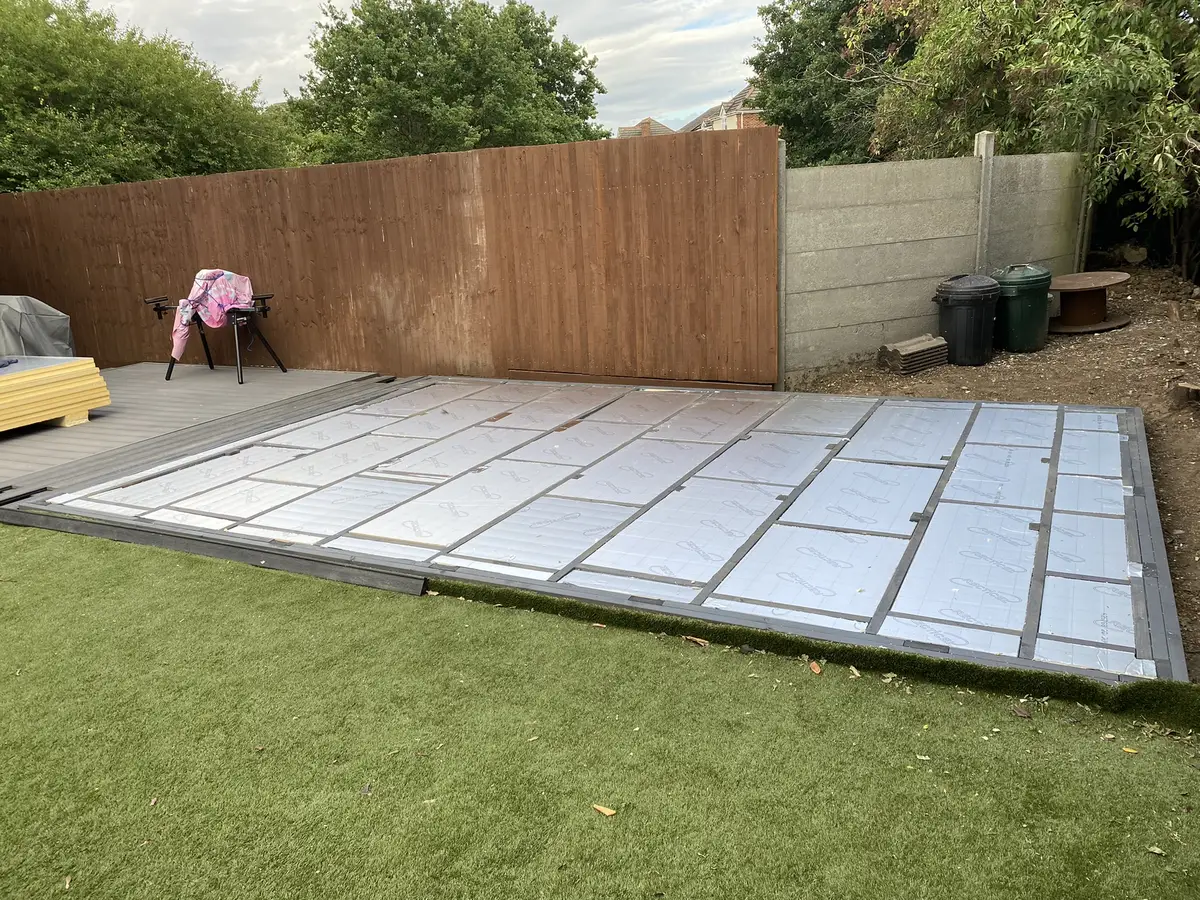
1. The Base
As with all our log cabins, its foundations are paramount to a strong, durable structure. Armed with this knowledge, Mark got to building his base.
After clearing the area of shrubs and foliage Mark levelled and flattened the space and built a wooden base using 6×2” timber perimeter bolted to stilts cemented into the ground at 1000mm centres. The floor bearers were then added using 4×2” (he wishes he had used 6×2” for these too as there is a bit of flex in the floor), before insulating again with 40mm boards and then covering with 18mm structural board.

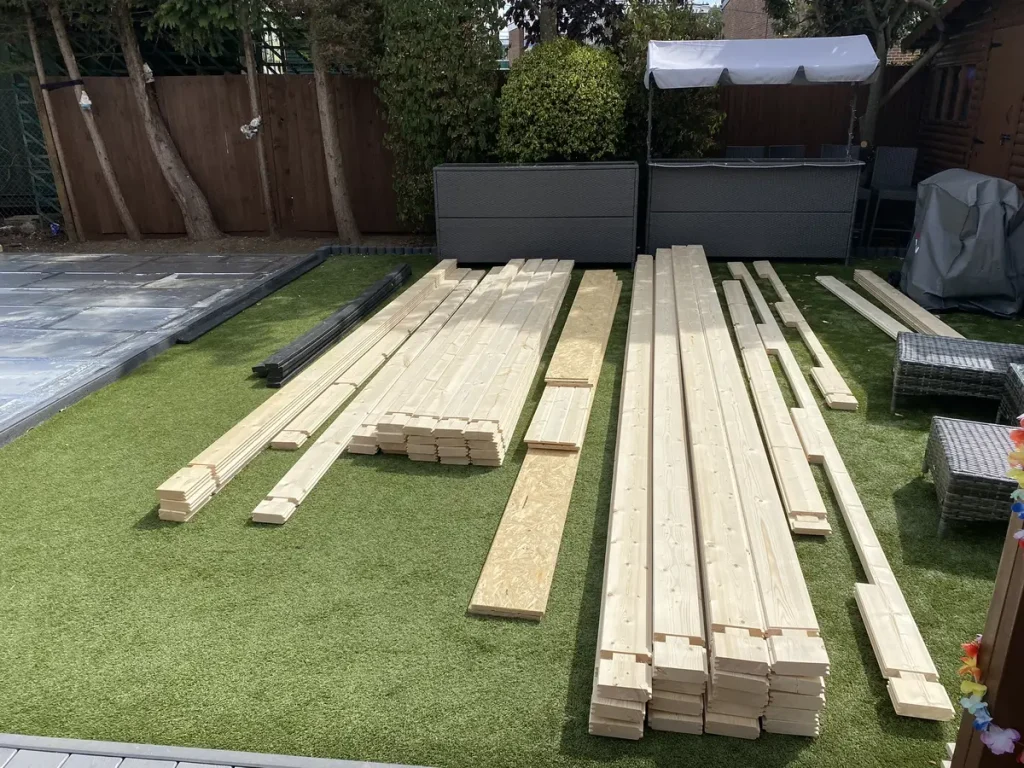
2. SORTING THE LOGS
The customer placed the pieces into piles of comparable size in proximity to their designated assembly area. To prevent the pieces from touching the ground, they utilized scrap timber. The items were placed in close proximity to there future location, and by referring to the construction diagrams, the organizer was able to determine their intended placement. This approach simplified the building process, as there was no need to search through a large number of logs to locate a specific piece.
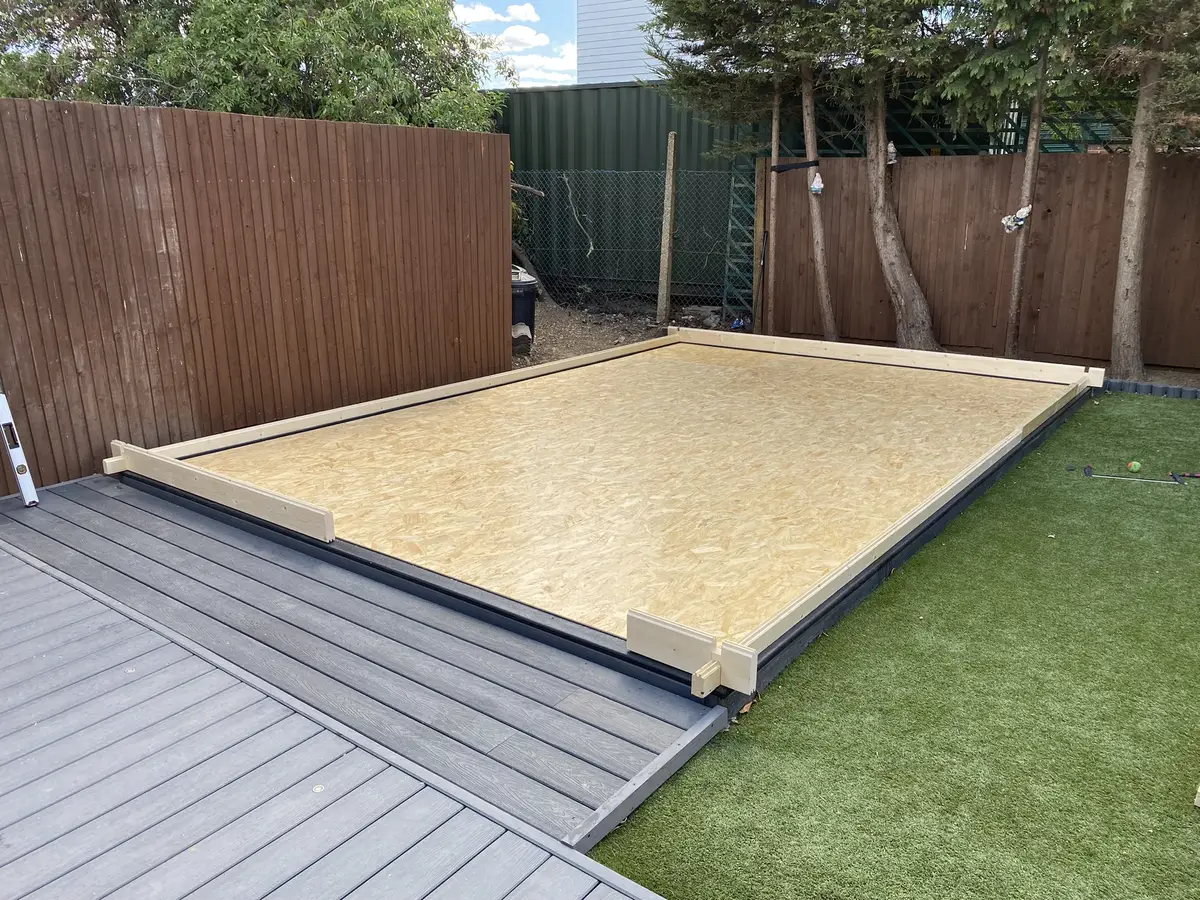
3. FOUNDATION Beams
The construction process begins with the placement of the foundation beams, which are positioned directly on the base to protect the bottom logs from moisture and potential damage. Next, the starter or half-logs are positioned on top of the foundation beams and affixed by screwing them into place. It is worth noting that this is the only instance where the logs are secured using screws.
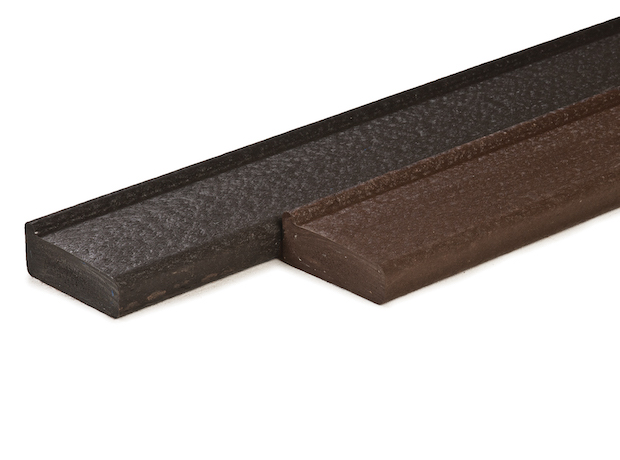
Mark opten for our composite profiled foundation beams. These beams are made from recycled plastic and will never rot. They are profiled to allow any water to drain away from the base of the cabin.

4. WALL LOGS
The subsequent step involves constructing the log walls, which is a simple process that necessitates the use of only a mallet. The 44mm interlocking logs are placed one atop the other and secured by malleting along the logs. While this can be a swift procedure, it is always recommended to consult the drawings periodically to confirm that everything is proceeding as planned.
After stacking roughly 8 logs on each side of the openings, the window and door frames can be inserted into their designated spots, which is a simple and uncomplicated task. Some customers choose to first build up all the wall logs, detach the window and door fascia’s, install the frames, and then reattach the fascia’s afterward. However, this approach is entirely based on personal preference.


5. Roofing
After constructing the walls, attention was directed towards the roof. The rafters were installed using the same technique as the wall logs, interlocked and secured with a mallet. However, this task can be challenging for a single person, and having an assistant would be beneficial.
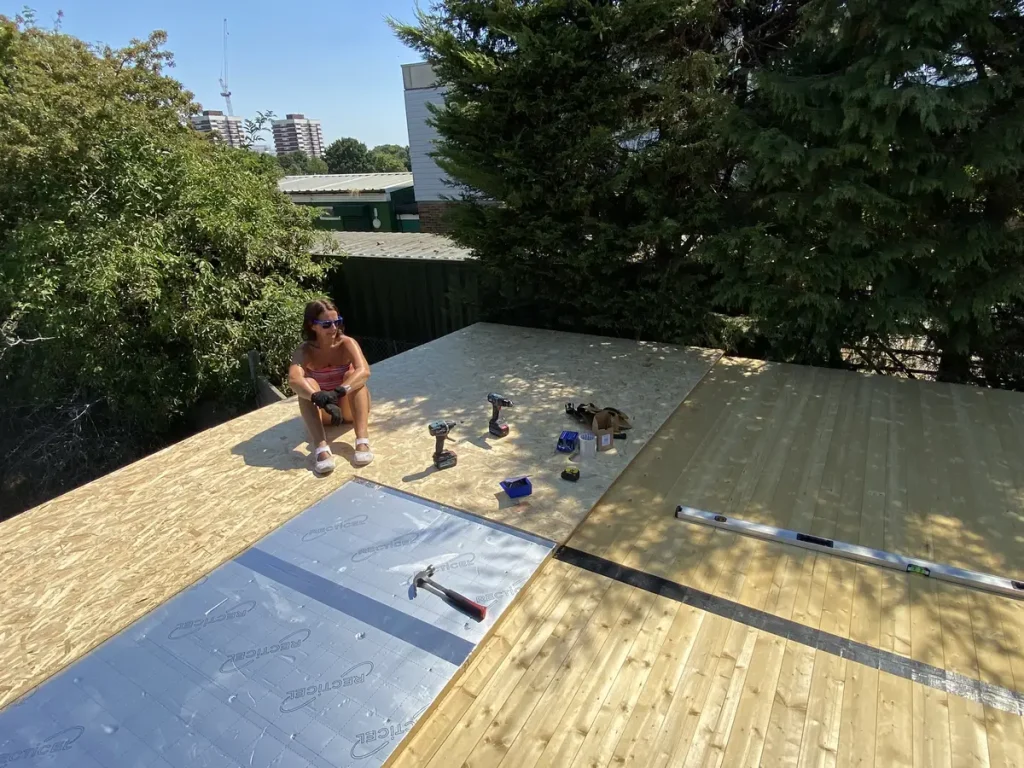
The installation of the roof boards can commence. These boards are 16mm thick, with interlocking tongue and groove joints, which are secured into position with nails, while ensuring that there is enough space left between them for any potential expansion. Mark then laid down the 40mm insulation boards directly on top of the roof boards and screwed them in place. A layer of OSB boards were then secured on top of the insulation.
The Hildegard Log Cabin is equipped with EPDM roofing as a standard feature. This synthetic rubber material is widely used in roofing due to its exceptional strength, durability, and ability to resist weather, chemicals, and UV radiation. Thanks to its capability to withstand harsh weather conditions and extreme temperatures, EPDM is a popular choice for flat roofs. With proper maintenance and care, this versatile and dependable material can last for many years.

Check out our blog for useful guidance and recommendations on how to install EPDM on your log cabin.


6. Treatment
Treating a log cabin is crucial to ensure its longevity, structural integrity, and aesthetic appeal.
Mark treated his Hildegard with some of our Carefree Protectant Timber Treatment in the colour “Concrete Grey”. He chose this based on the information in our help pages and commented on its superior quality.
“It is expensive and we used six tins at a cost of around £500 however I have no doubt this will protect the cabin for many years. It is very easy to apply and after just the 2nd coat provides a very hard finish to the wood…painting is not a very interesting job but the result is well worth the effort. This also seemed to prevent excessive swelling over the winter too as we saw maybe a 10mm rise in the blocks around the window and door frames (which are not fixed to the wall blocks), whereas we were expecting much more.“
Mark

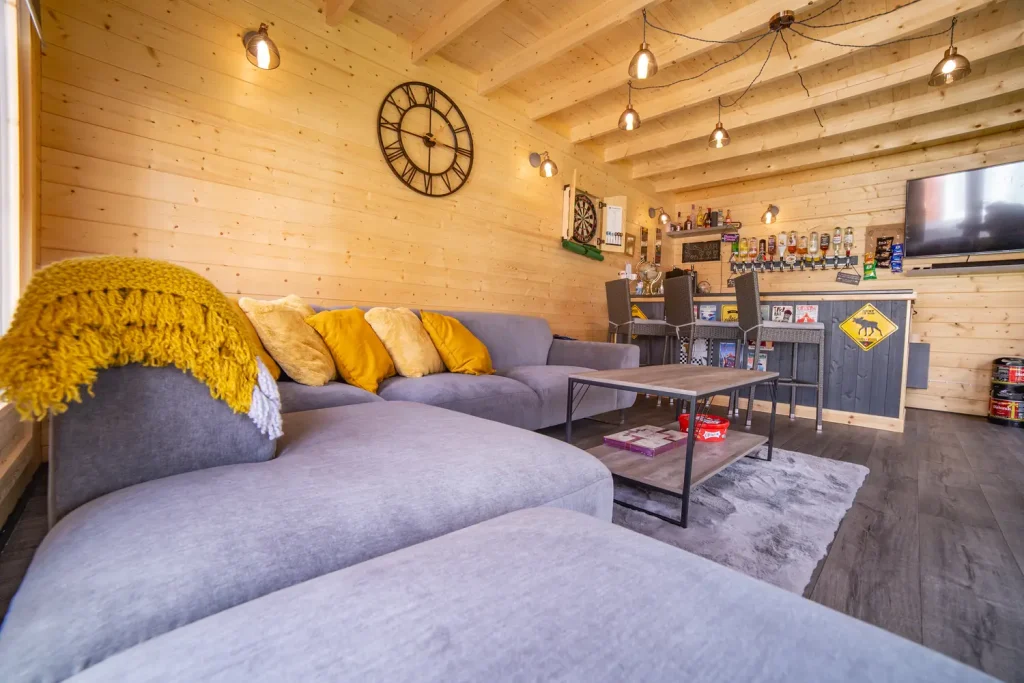
Lounge & Bar Area
Internally Mark decided upon a decent quality lino for the floor as this was hardwearing, easily washable, quick to put down and cheap!
He also built a fantastic bar and fitted an under-counter beer fridge which has proved very popular with friends and family.
A new sofa, Dart Board, Bar stools, TV and furnishings have finished off the cabin although he expects it to evolve over time. Future plans involve making an area available for a home office.


TUIN Log Cabin Style Bar
We also supply this fantastic Log Cabin styled bar table with matching display piece.
Finish off your Log Cabin with this spruce Bar Table- As trends are showing, the UK is loving transforming their Log Cabins into garden pubs. Gain the envy of your friends and neighbours with this two piece set.
This two piece set is made from 44mm (yes, the same logs used for the cabin) interlocking logs and includes the main bar counter as well as a back display piece. To give you the illusion of being in your local pub, as well as giving you plenty of space to show off your drinks collection.

Customers thoughts on his Back Garden Bar & Lounge Log Cabin…
How did you feel about the ordering process?
“It was very easy. We purchased the cabin while it was on a sale price and this was locked even though we did not have to physically pay until two weeks before delivery which in our case was around 6 weeks after the order was first placed. Prices do seem to fluctuate quite a lot although even this is explained on the website (price is dependent on the season, demand etc).“
MArk
Was the delivery of the item as you were expecting?
“Yes pretty much, although the size of the pallet was bigger than expected! The delivery driver parked at the end of our road (which is a cul-de-sac), and then brought it onto the drive on the forklift. It took 30 mins start to finish.“
MArk
Did the build go as well as you expected?
“The build of the actual cabin was if anything easier than expected. The structure including the naked roof took a single week-end, just my wife and myself slotting it together. I had unpacked the pallet and stacked the pieces together and also pinned out the instructions on a board and ticked them off beforehand (as advised on the website). As it was a warm summer the wooden blocks were very dry so slotted together without the need of mallets therefore all went up very easily. As the instructions are predominantly visual certain parts took a bit of thinking (the pieces that provide the roof graduation for instance), but once we had worked it out everything slotted together exactly as instructed.
The roof covering then took an additional two week-ends. The first was taken insulating and boarding the roof (purchased locally), and we followed the guidance given on the TUIN website on how to do this. We used 40mm insulation board and 12m structural board on top, all screwed to the main roof purlins. Again the video posted on the website was very helpful as the Hildegard comes with an EPDM sheet, this we unpacked to let it ‘sit’ in the sun then rolled it up, shifted it onto the roof and then stuck it down with contact adhesive. We had taken the video’s advice and banked up the sides of the roof to create a bowl effect as we didn’t want the water running off and through the edging strips.
MArk
WHat utility arrangements did you make?
“We ran armoured cable from the main electricity meter and fitted a consumer unit in the cabin. From here we ran all the cables for the sockets and lights around the outside of the cabin in plastic conduit as we didn’t want to see any cables inside. This took longer however the result is much neater. I also ran a tv ariel and cat6 ethernet cable although it turned out the wi-fi signal from the house was strong enough (with a booster), so we didn’t need the cable in the end (I should have checked this first!).“
Mark
Customer Review
When asked if he was pleased he chose TUIN for his Log Cabin supplier, Mark responded by saying:
“Absolutely. The attention to detail on the website is what stands out for us as this paved the way for a decent DIYer to build their own fully functioning cabin.“
Mark
And on if he would use us again:
“Yes. I will be replacing the shed in the near future and will certainly purchase another structure from TUIN.
and would you recommend us to friends and family?
“For sure. I have already passed your details onto friends that have seen ours and are interested in garden cabins and I keep saying the same thing, do your research and anyone with basic DIY skills can do it!“
Image Gallery – Hildegard Modern Log Cabin Lounge and Bar


Conclusion
Wow! What an incredible log cabin!
Mark and his family have created a wonderful space to relax and take a break from it all in the comfort of their own back garden. The sleek, clean modern cabin design of the Hildegard fits in compliments its surrounding perfectly. The space provides a perfect place for his teenage children and friends and is used frequently.
Here at TUIN we love seeing how our customers have transformed their outdoor spaces and how they’ve created new ones in their own style and imagination. This cabin certainly didn’t disappoint!
We are sure Mark and his family will enjoy their amazing cabin for many more years to come!
Wow, what a fantastic cabin! Fabulous attention to detail inside and out, may you, your family and friends spend many happy times there.
It’s great isn’t it! It was a real pleasure to photograph!