


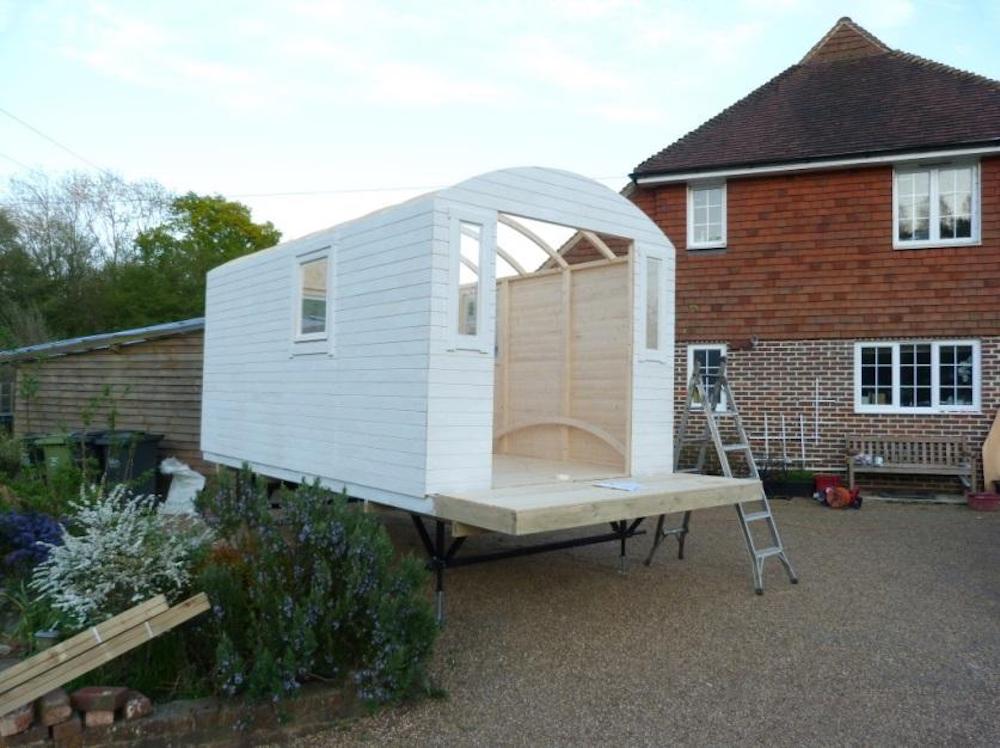
One of our customers, James from East Sussex, has been very generous in sending us his review of the Shepherd Hut Gypsy styled caravan and his process of installing them from start to finish- with plenty of pictures!
Introduction
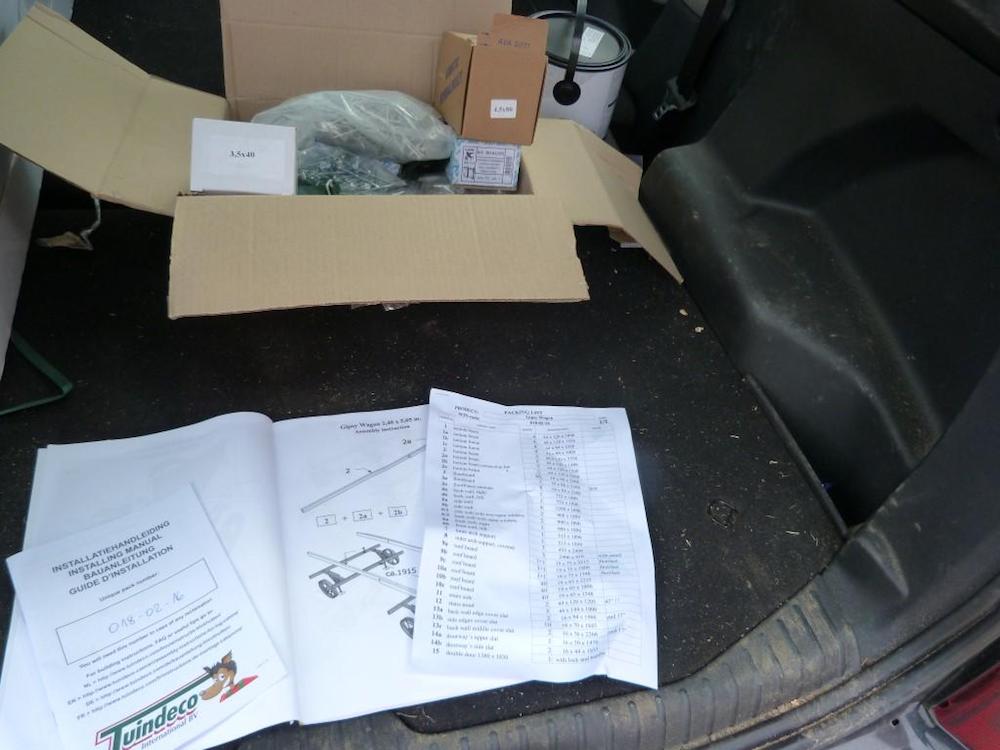
I ordered two Shepherd’s Huts before Christmas to take advantage of the generous discount. They were delivered in the first week in January. The delivery driver was superb and, though it was difficult and time-consuming, he managed to get both into one of our barns.
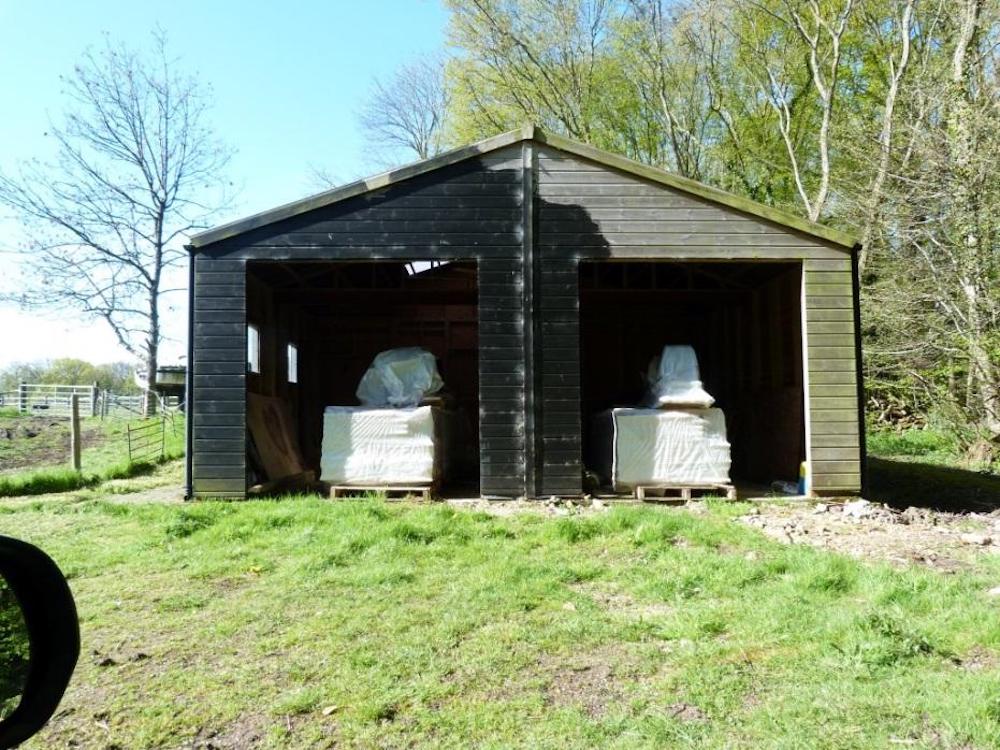
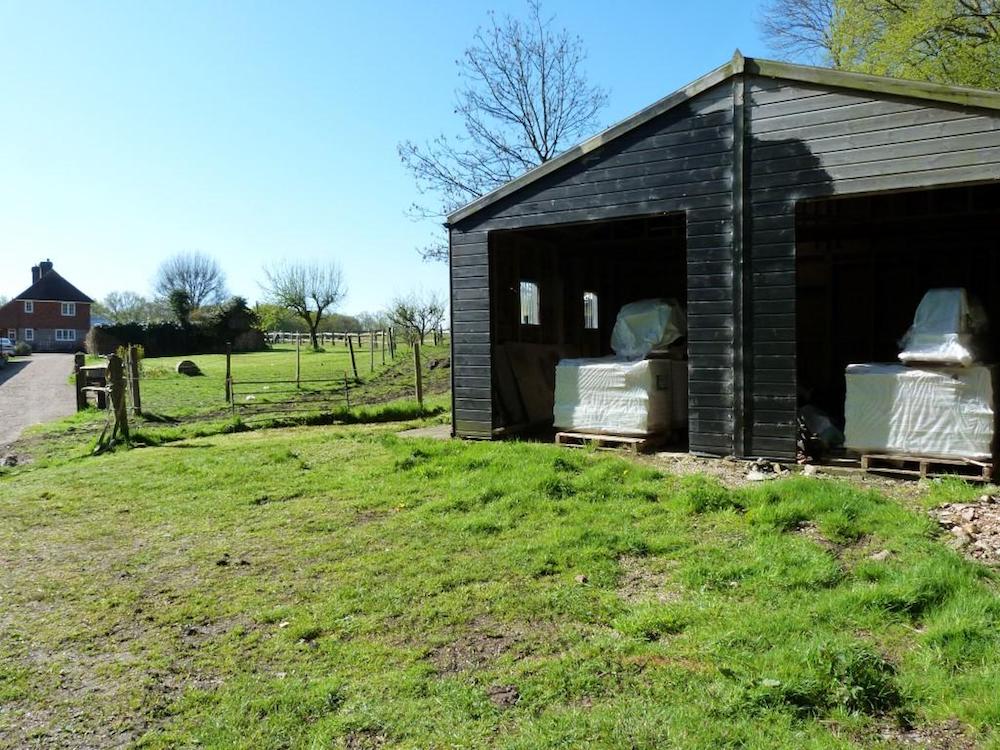
We debated where to undertake construction and in the end decided that it would be best right by the house, which involved some nice exercise to stroll up and down the drive when stuff was needed.
The Delivery
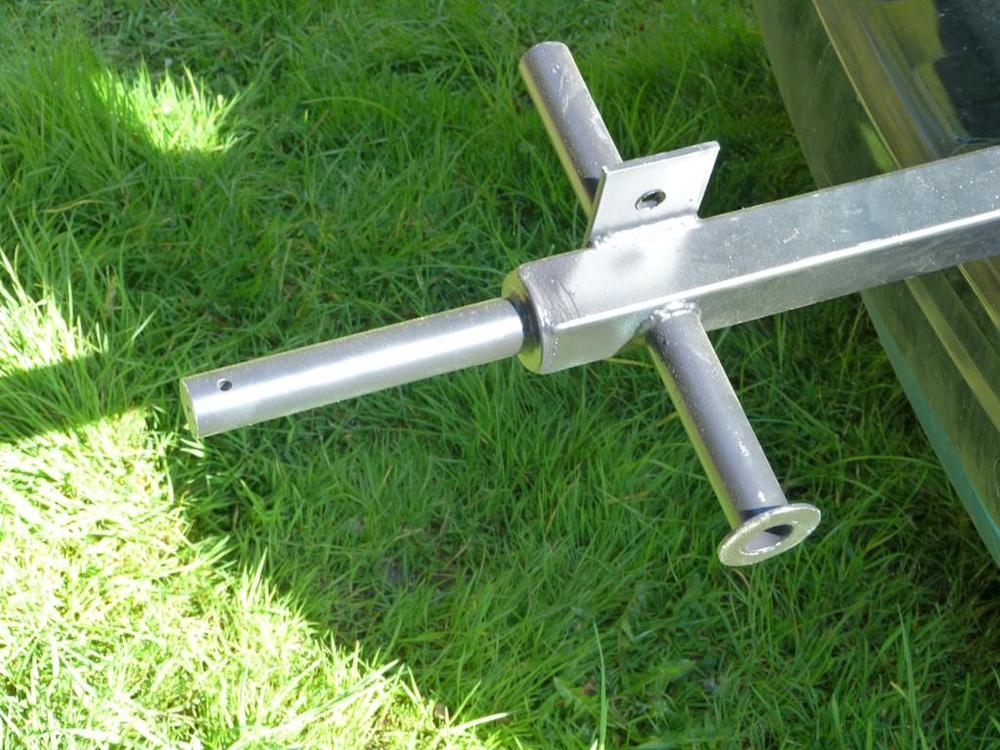
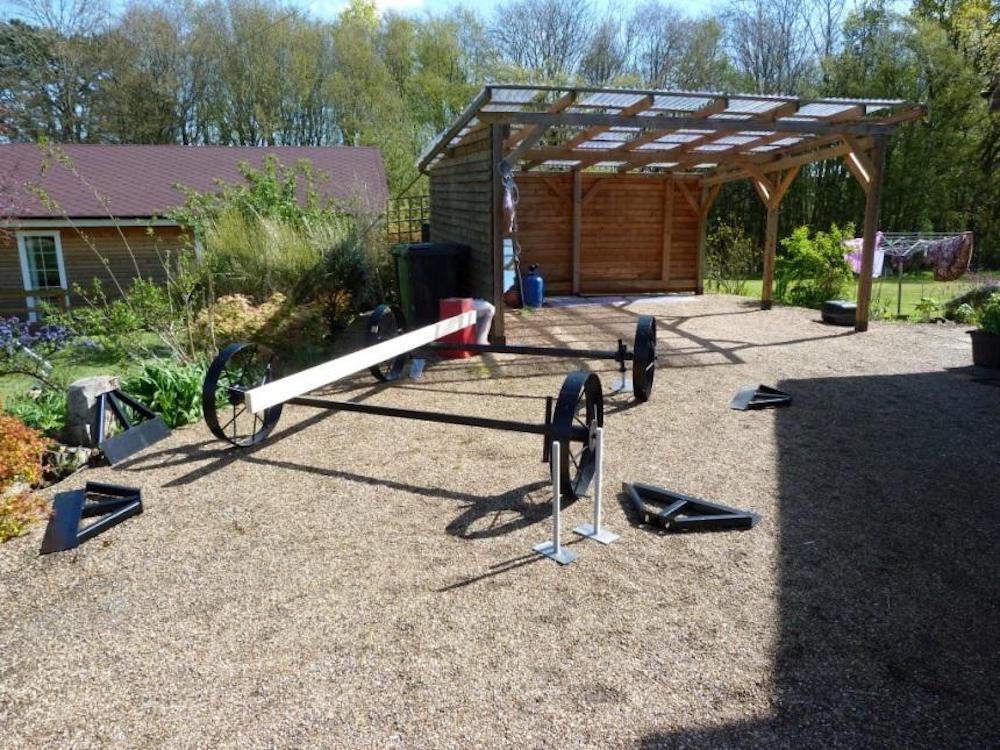
The kits were extremely well packed and there was no need to use additional tarpaulin or covering. They have sat there in the barn until today when I opened the first one. I used my car to haul the heavy metal chassis and wheels, nuts, bolts and other hardware up to the build area. I read a review about the axle being tube which broke when the hut was moved a short distance. We decided to get a blacksmith to beef up that component, just in case. The tube was cut off and solid steel bar was welded in its place for each axle.
Since all the metal work was on top of the kit, I kind of thought that the contents of the delivery would be packed in the order you need them. But that isn’t the case and it’s not a problem. So, after looking at the drawings and instructions and much head scratching, we opened up the delivery and had another round of head scratching.
-
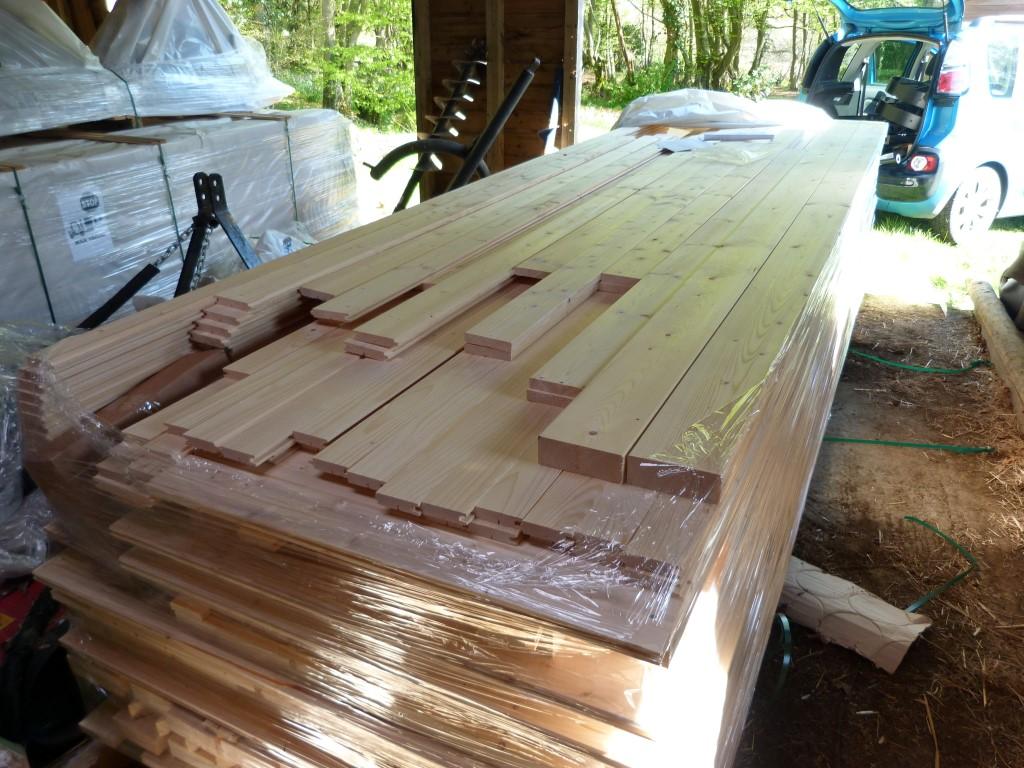
- This is what the sets look like with only the outer shrink wrapping removed.
-
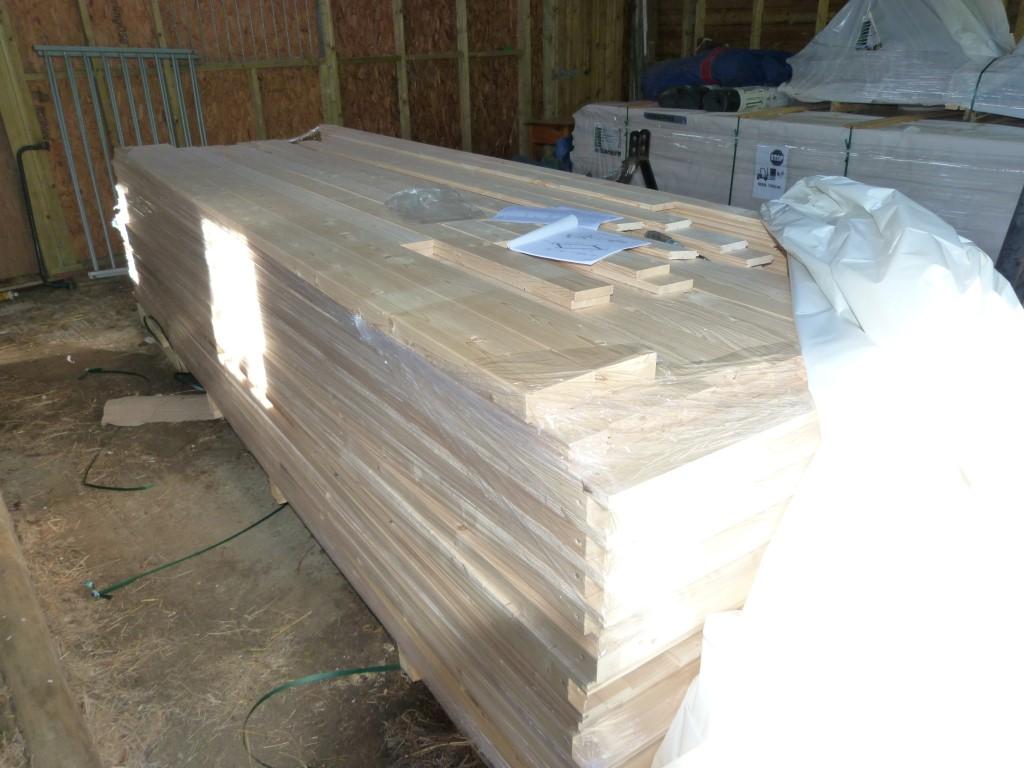
- This is what the sets look like with only the outer shrink wrapping removed.
Day 1
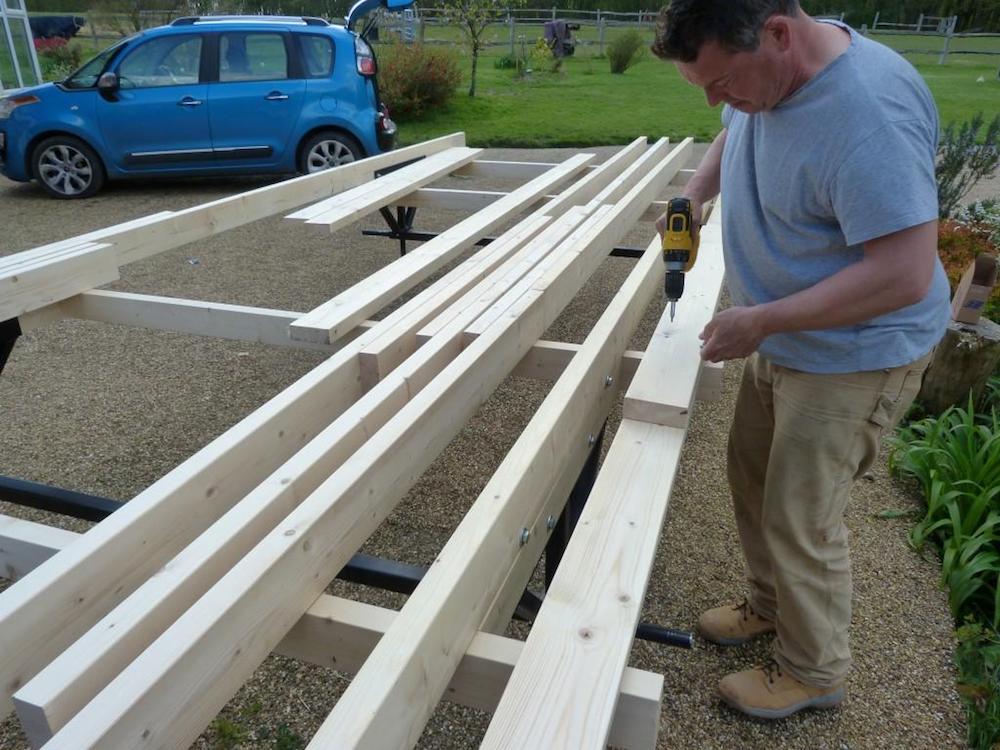
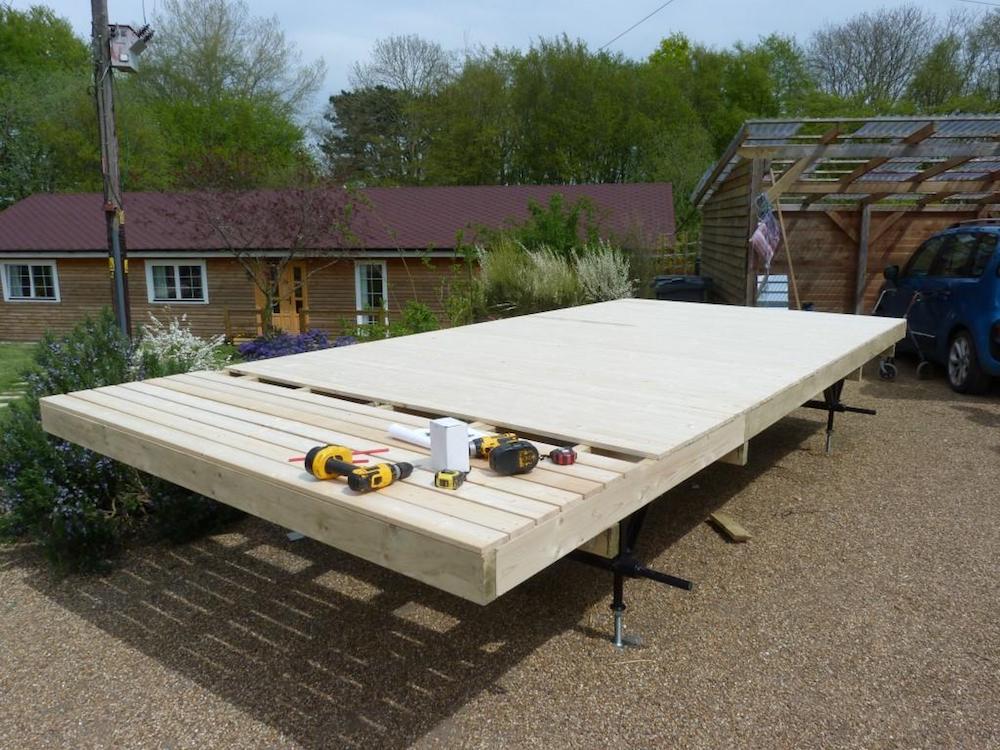
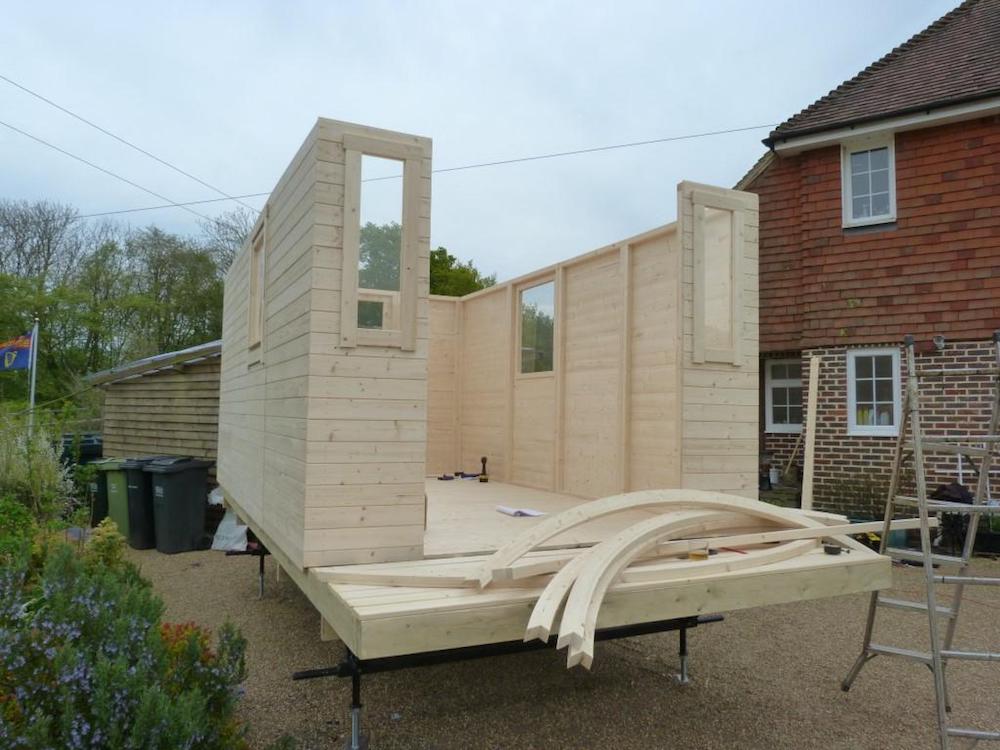
Our aim for today was getting the base done. I am building this with my friend who is a great deal more handy and adept than I am. We started at 10.00am and, unusually for me, we carefully studied the manual/building plans and decided we would just go at it a page at a time. So, first order of business was to build the chassis. The metal bit was easy and that was the starting point and first job to do. All we had to do was lay out the metal work roughly where we wanted to build the hut.
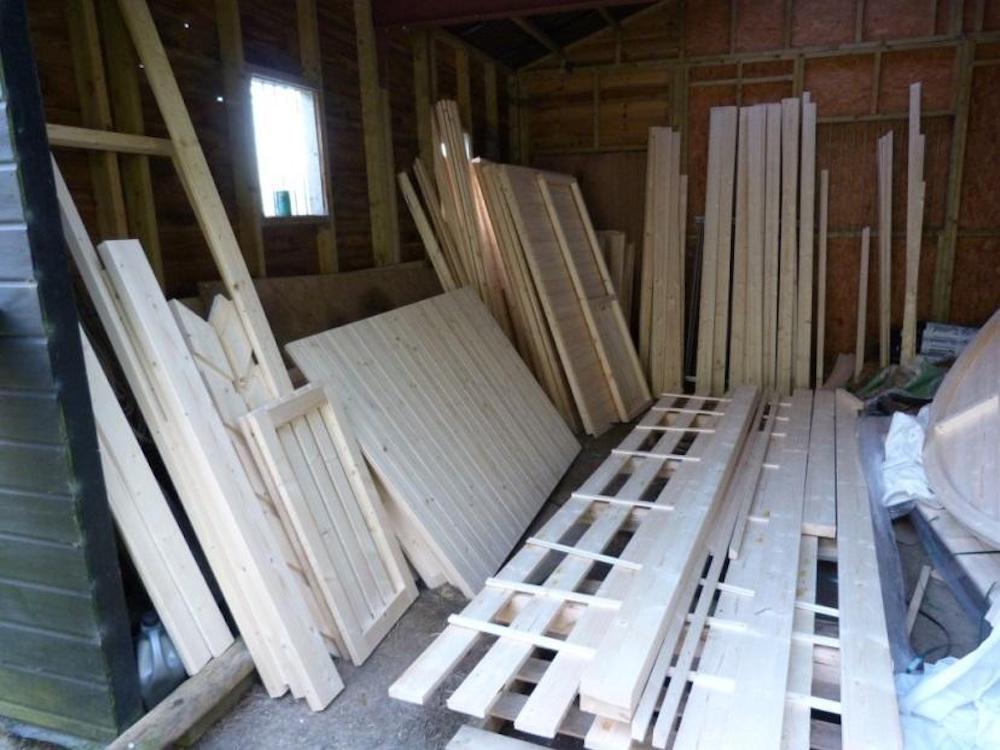
It was at this point that we realised we would need various lengths of timber from the kit and, when I opened it, I noticed that a lot of them were right down the bottom of the pallet! So, we would have to take everything off the pallet and stack it in vertical piles. That took a little while as we looked at various components and discussed them and where they would fit into the overall thing. I was very surprised to see that the panels that had windows actually had the glass in! OK, if you want to double glaze your hut you need to change that but it says something for the quality of the packaging and the way things are shipped that all the glass is in first class condition.
Separating the parts
Looking at the build instructions, and the separate parts list, the various lengths of timber, some of which look the same length. I had hoped would be numbered to correspond with their number in the parts list. They aren’t. It’s not a problem, but you just need to be careful to make sure you use a tape measure to check the sizes to correctly identify the various components.
For instance, you might just be able to make out below that to join the two chassis units, you need to make up a joist which uses one 2, one 2a and a 2b. 2a and 2b are not dissimilar in size but if you make that mistake… we did. You end up with a joist that is either too short by a few inches or too long by the same amount.
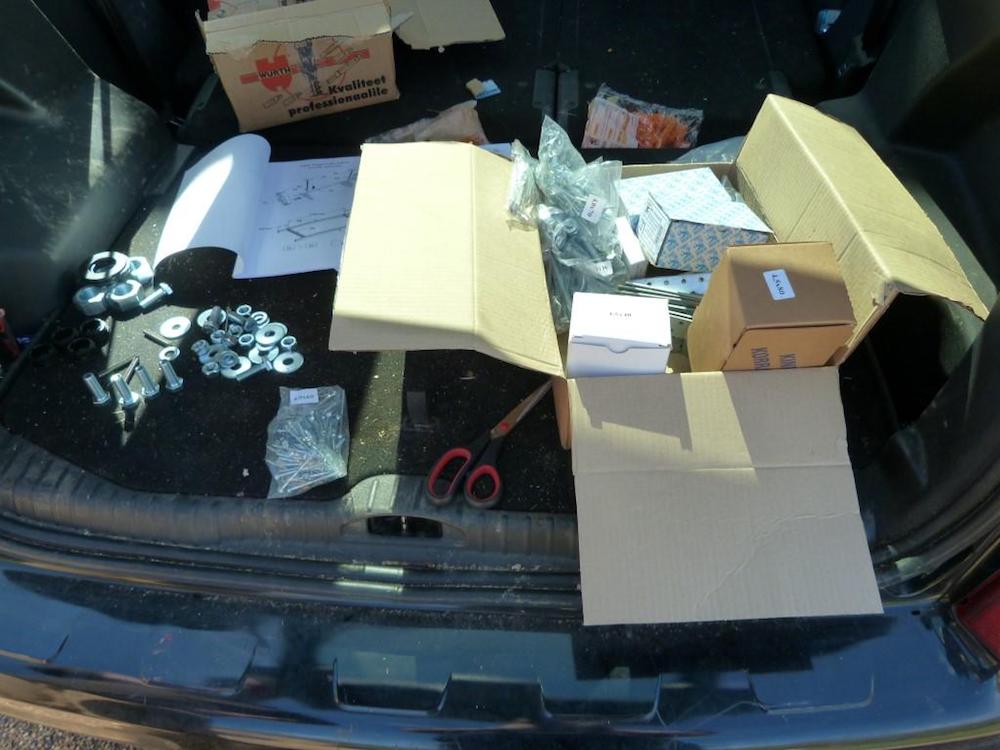
(As you can see, we get fed up of chasing the instructions down the drive. So we used the rear of my car as a bench instead.)
Attaching timber to the metal frame
The first task that involves wood is to make two items that bolt onto the metal work. We did these on the ground and then fitted them.


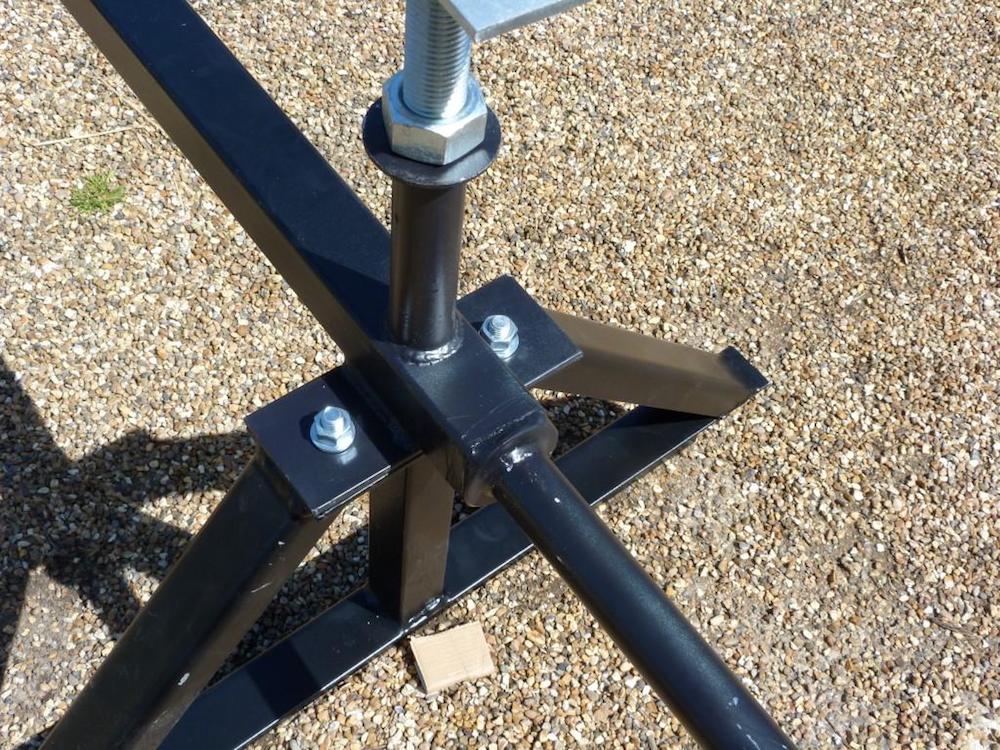
A point on the metal chassis. We did a bit of head scratching because what we had in front of us didn’t match the drawing. It was obvious that this assembly had been beefed up with two additional bolts but not reflected in drawing. Still, you would want to be fairly uptight to worry about it. I am certain that the additional metal and bolts are an improvement.
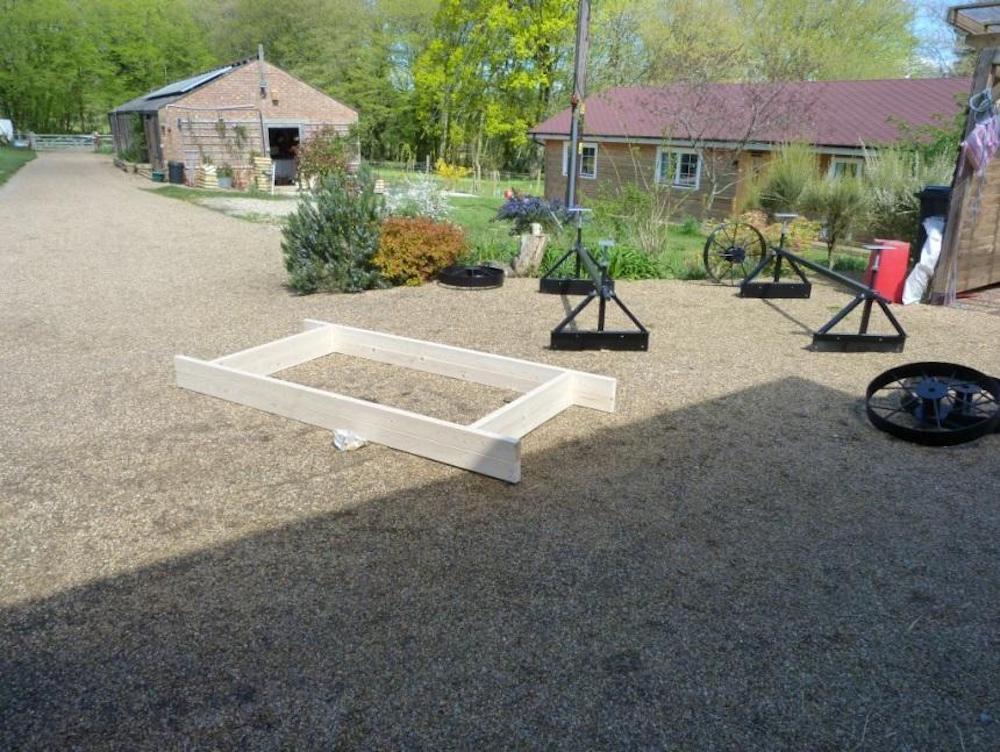
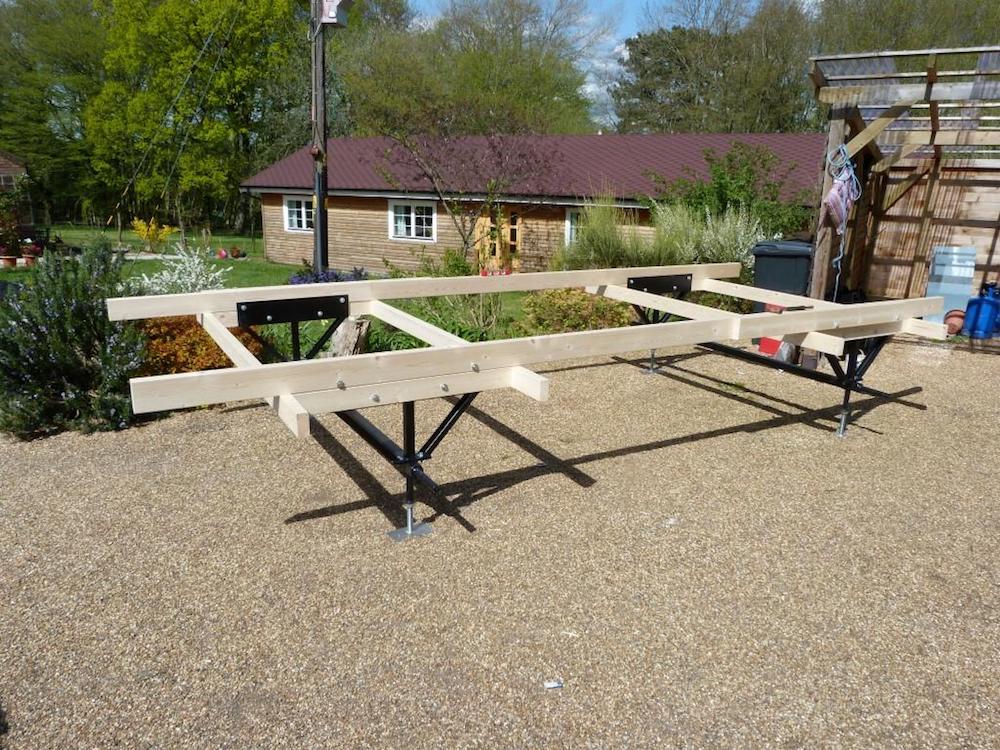
Getting on with the frame, we built the first two long joists (the 2 + 2a + 2b) that bolt to the metal frames on the ground. Then it was just a case of positioning them accurately, drilling holes and bolting to the metal. This fixes the length of the unit, and it’s big!
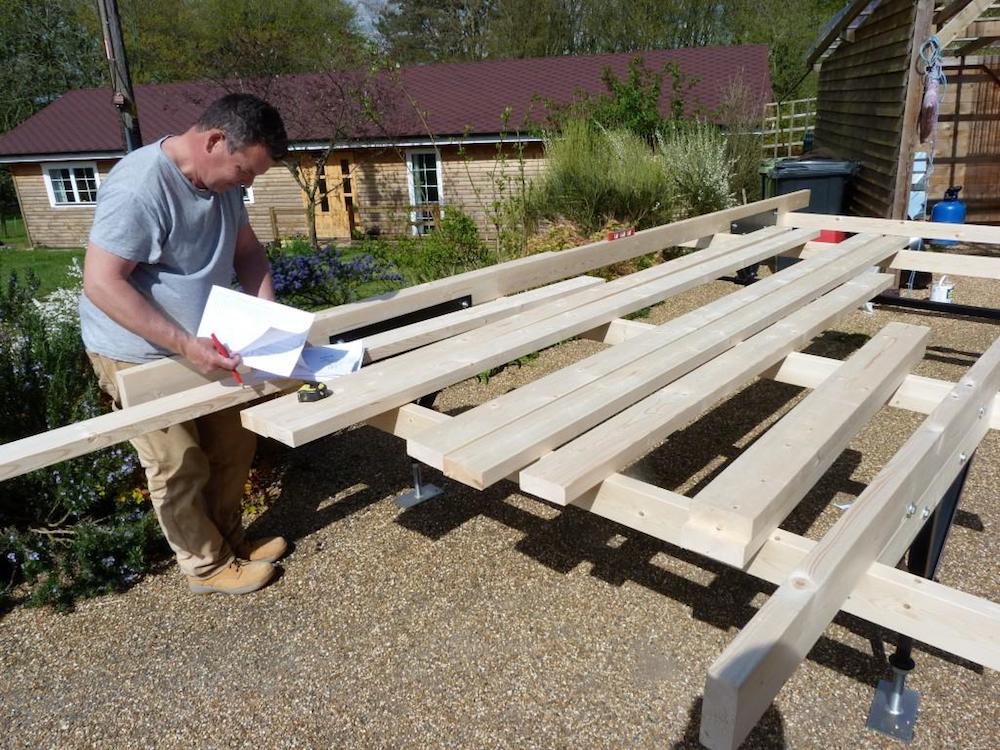
Adding the rest of the joists
From here, you need to assemble the rest of the joists, another five. As mentioned, each one is made of three pieces of different length timber. There was a whole lot of head scratching trying to get the right ones together. Basically, we put all the possible pieces on the part-built base, which is a great work bench, and then worked out what went with what. You just need to take your time and things click into place.
Underlining the point that the Shepherd Hut base is a very handy workbench at exactly the right height, in the image you can see James making up one of the three-component joists.
Extra tips
The Tuin hut is a quality item. As we were working we were having some thoughts about making sure it lasts. The base we are working on, the underside won’t show, unless someone crawls underneath. The wood is untreated and, as it goes through its life, while rain can’t get under there, dew and damp, over time, could. So we decided that we would not fix any of the joists for the moment. That’s because I am going out tomorrow to get some really good wood preservative. It’s a lot easier brushing on preservative when I can turn the joist over to get all sides.
Also, I am going to apply a coat of preservative to the underside of the floorboards. The ones that will be open to mist and moisture from beneath. So this is as far as we got on Day 1. All the joists are ready to be screwed down but they will get a coat of preservative before that happens.
In terms of time, what you see above is not a day’s work. It took four hours work for two guys from start to finish, and that included a fair bit of time at the beginning getting familiar with the kit, instructions, components and how to read the drawings and specs, looking at parts and figuring things out. Most of all, we want to enjoy this build so we are not rushed. Tomorrow is preserving day. At this stage we are delighted with everything and though we have had the offer of whatever support and advice from Richard at Tuin, we haven’t felt the need to avail ourselves of it.
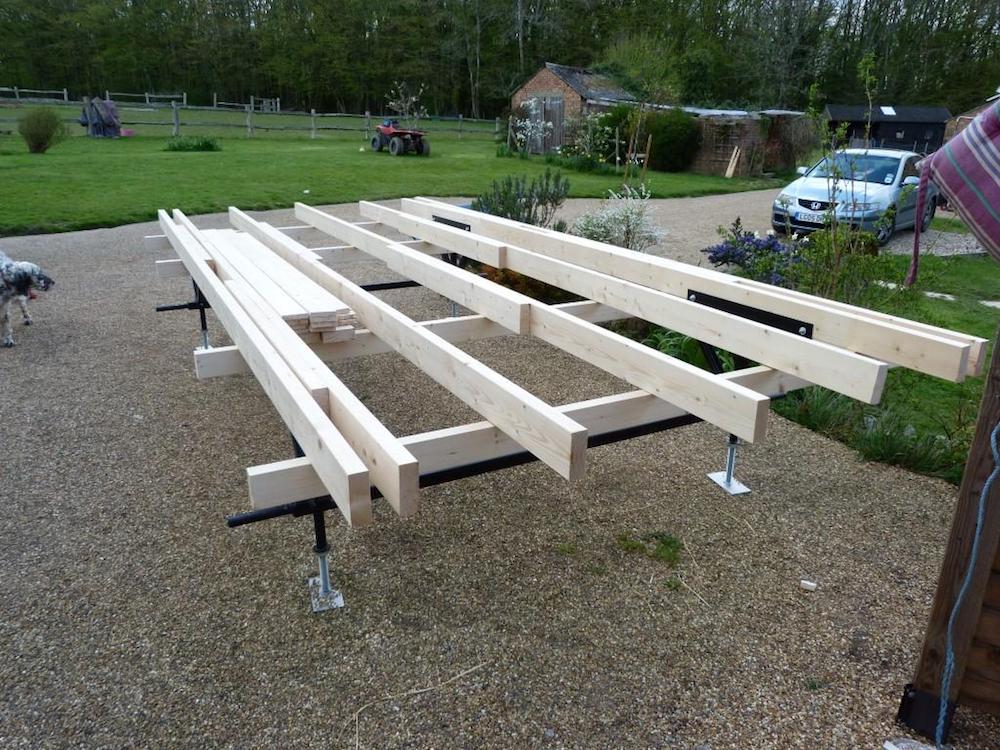
Day 2
Day 2 is a misnomer. I treated everything with a preservative/sealant against moisture. That included the floor joists and all the underside of all the floorboards. I stacked the made-up joists on the axles and used the hut base to paint on the preservative to the floorboards and then I left them there and covered the lot with the tarpaulin.
Laying the floor down
We cleared the deck and positioned the five joists. It was at this stage that we discovered a length discrepancy in two of them. One was a bit short while the other was a few inches too long. Clearly we had made a mistake and we figured out we had used the wrong three components, as indeed we had. It didn’t take long to figure out where we made the mistake and we switched over components. However, it underlines that you need to take your time and make sure you identify all the components and put a pencil mark on them so that in the heat of constructing things, you don’t mistake similar sized and shaped lengths.
The joists have to be positioned accurately and we did that and clamped them in position while we screwed on the metal brackets. There’s 20 of them so, even with two of us, it still took time. I guess, from unwrapping things, getting the joists positioned and putting the brackets in, with a stop for a bacon sarnie and a tea. It took us nearly three hours to get everything ready. After that, things began to speed up in terms of seeing real change and progress. I think it only took us about half an hour or so to screw the floorboards to the joists and suddenly we had a platform and we could look at putting up the wall panels.
We decided to offset the side windows, looking over the timestamps of the images I was able to work out that it took just a few minutes over one hour to get from the first image… To the last one.
Gallery – Start to Finish
-
- This is what the sets look like with only the outer shrink wrapping removed.
-
- This is what the sets look like with only the outer shrink wrapping removed.
-
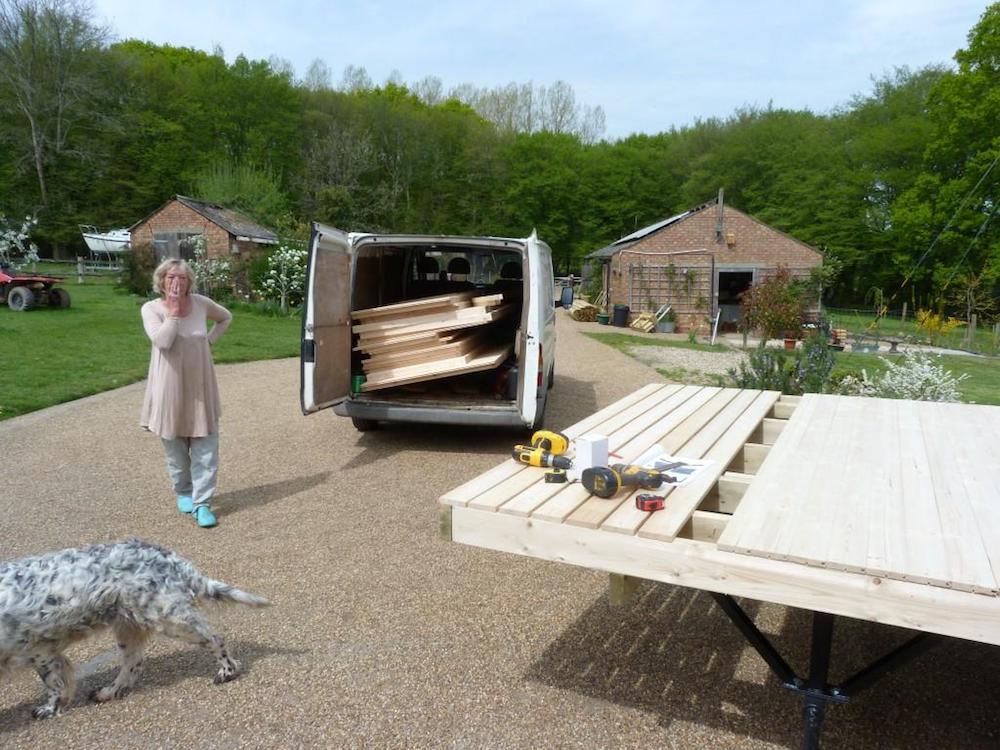
- As you can see, we used the van to transport the heavy panels to the base.
-
- We then identified the positioning of each panel and set them around the base.
-
- As you can see, we get fed up of chasing the instructions down the drive. So we used the rear of my car as a bench instead.
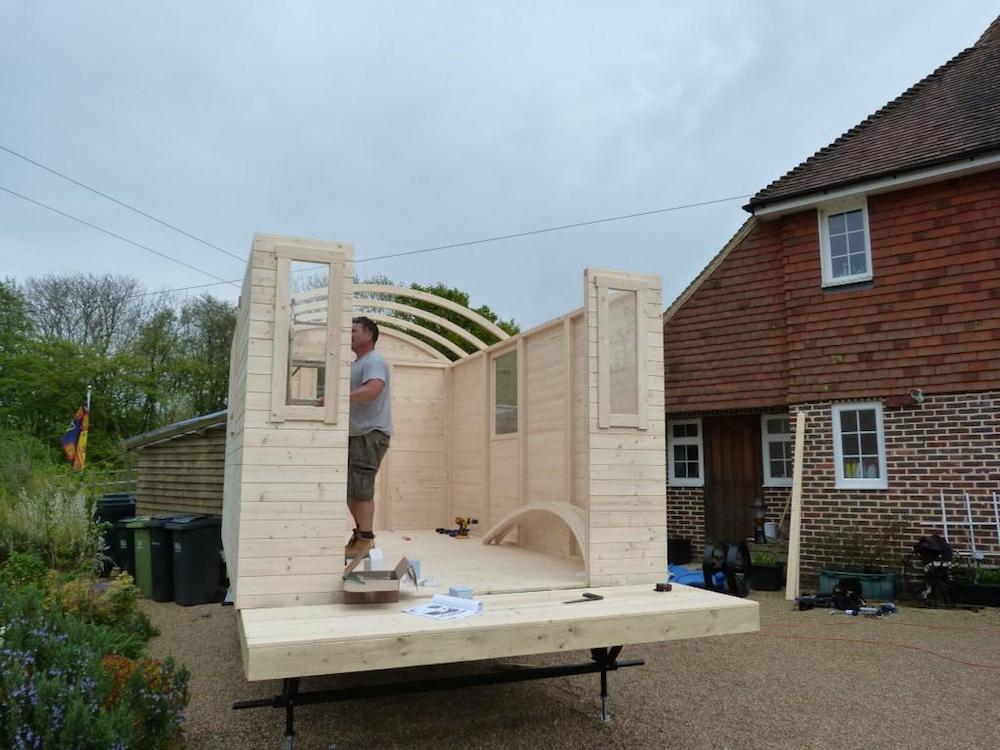

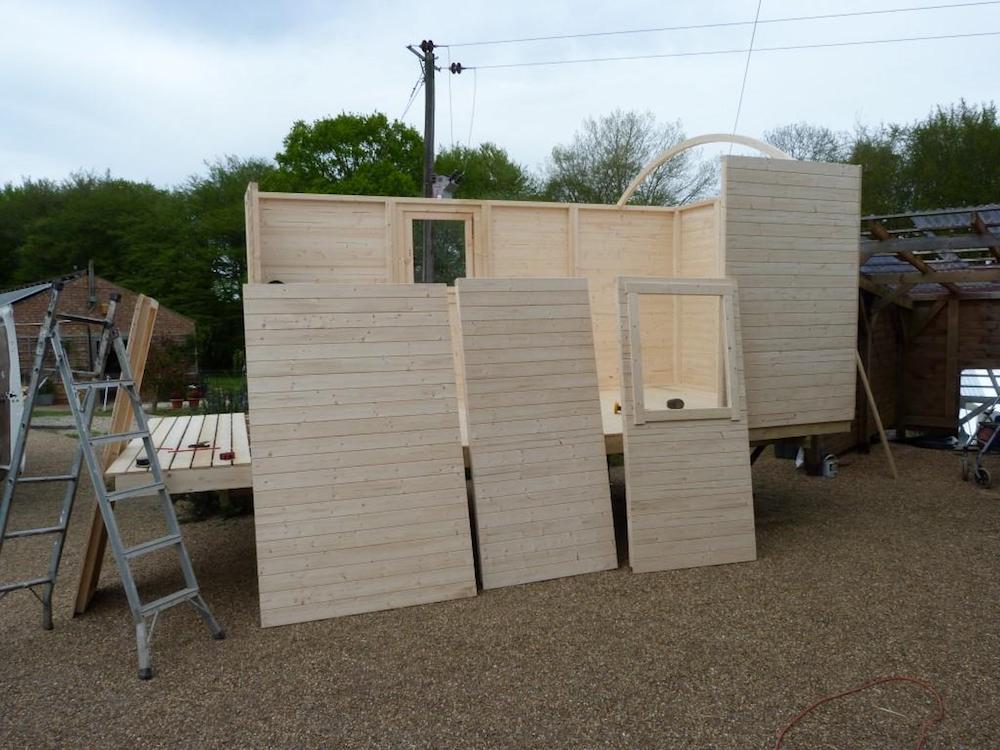
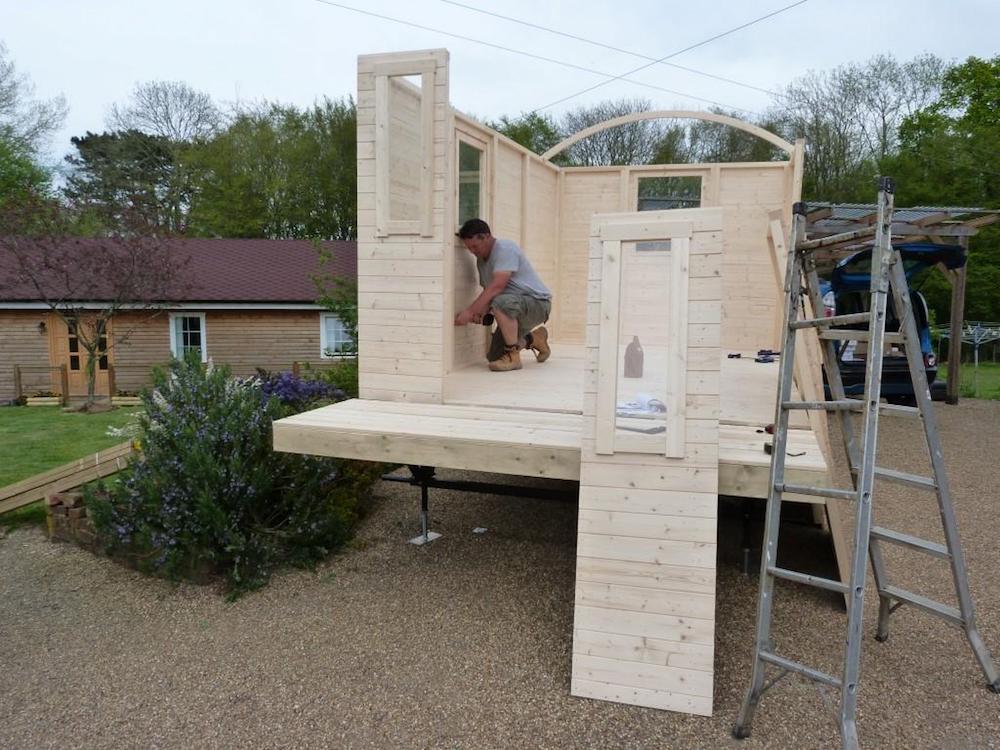
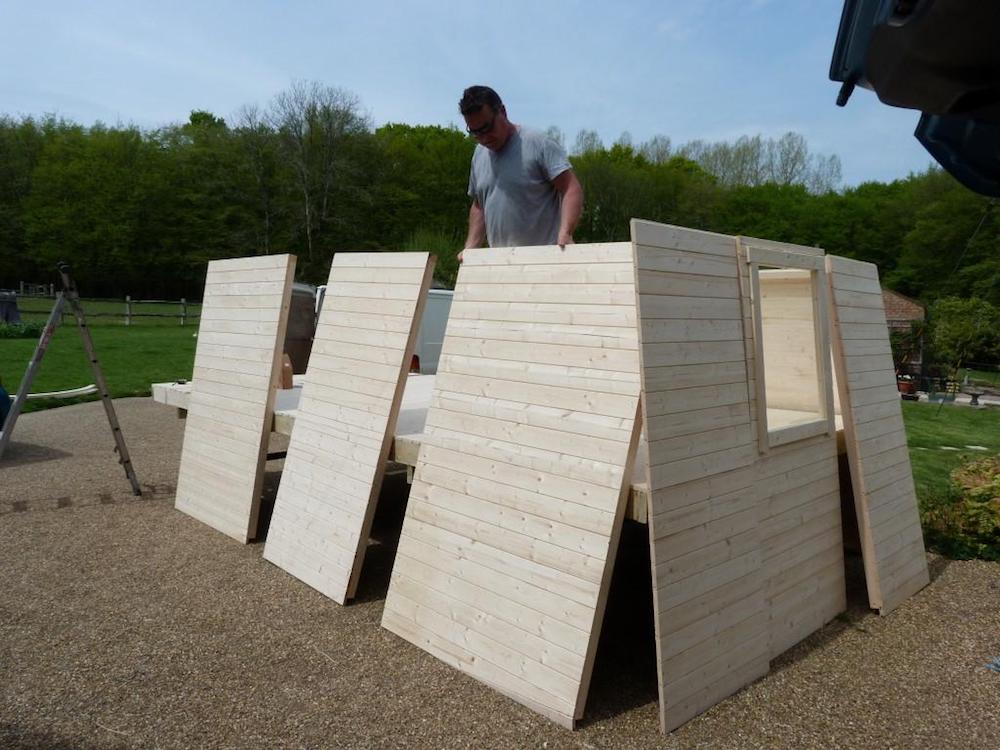
Wall panels
It is definitely a two-man job but not a difficult one. Up goes a panel and while one holds it in place and pushed tight against the base and its neighbour panel. The other then screws it bottom and sides to the next panel.
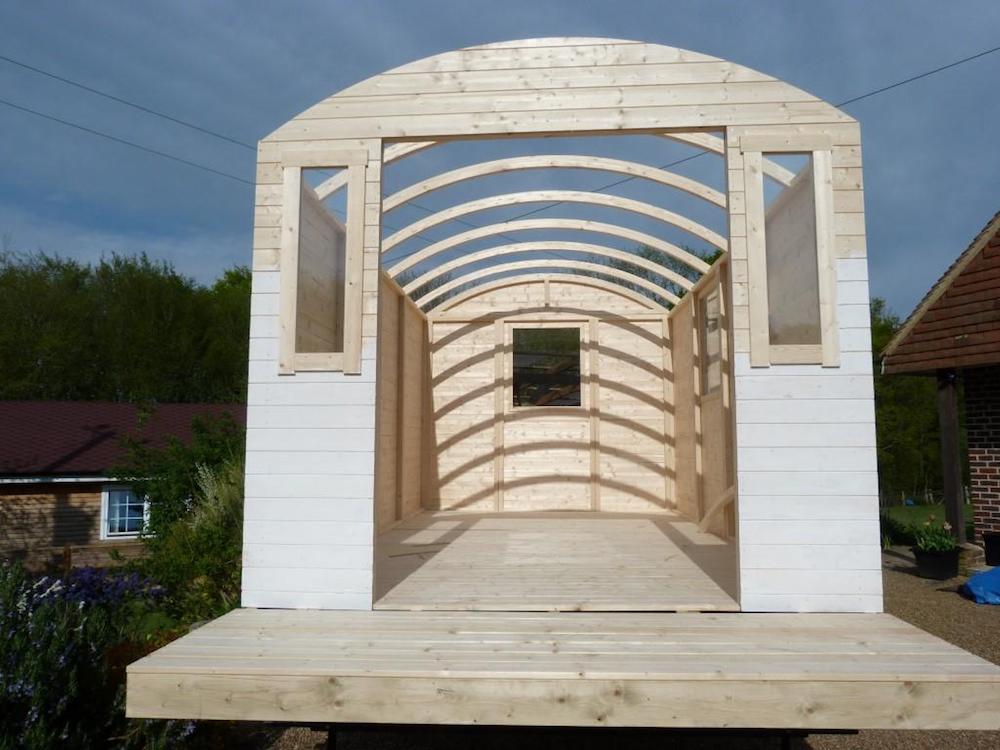
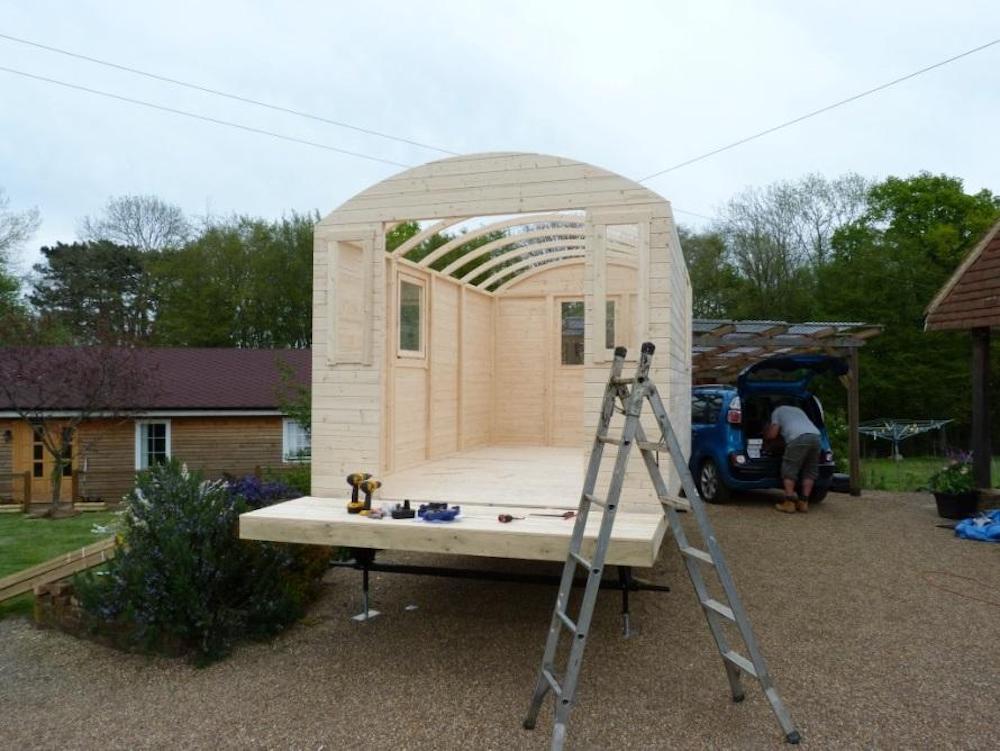
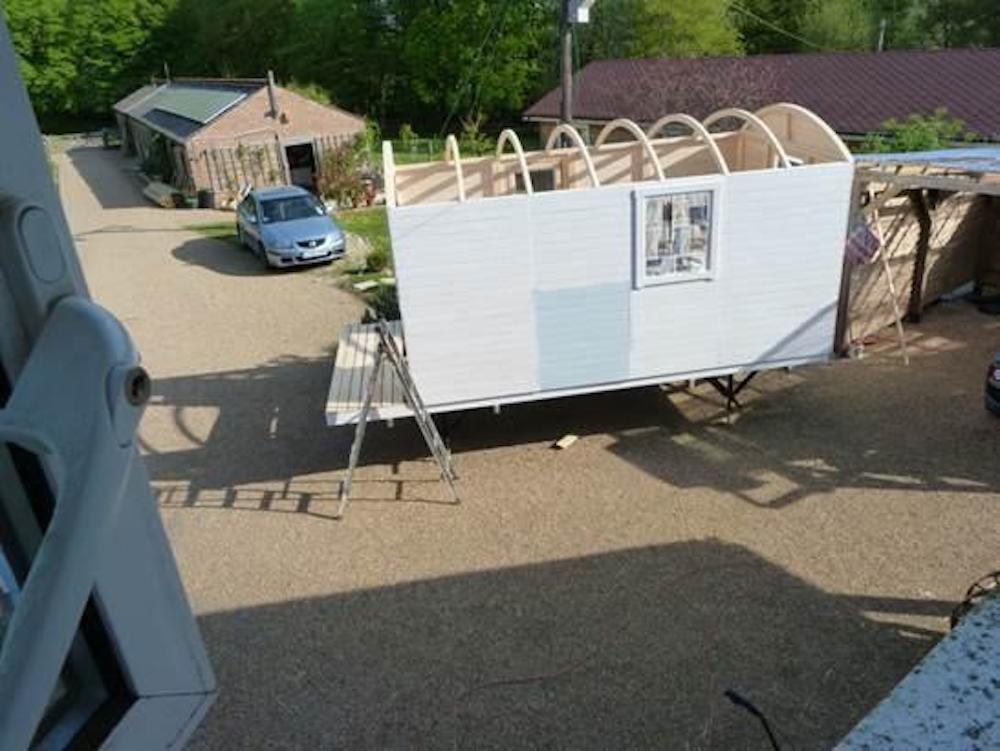
The next task, attaching the curved roof timbers, was a slower job because they are attached at each side with small metal brackets using fiddly little screws plus being up a ladder. But from start to finish, and in all of this construction work we were not in a hurry or rushing things, it took over an hour to fit all of the curved roof timbers and the two end sections.
So below is where we got to by 4.00pm when we decided to call it a day. Tomorrow we need to complete the roof pieces to cover the porch area, and then apply the tongue and groove roof boards.
I decided it would be pleasant and relaxing to do at least one side with the primer undercoat I had bought from Screwfix that comes very highly recommended. It’s a job that needs doing, so why not get a bit of it done. And, in the way of these things, a couple of hours later and I had done the whole lot.
And so, construction Day 3 looms and the forecast is for it to be very hot and sunny all day.
Day 3
Today’s forecast was for the hottest day of the year so far and they didn’t get it wrong. It was in the 70s with not a cloud in the sky. I was up early and while having my first coffee of the day. I tried a patch of the blue I have selected for the exterior to check the colour. It will need another coat but I like the light blue.
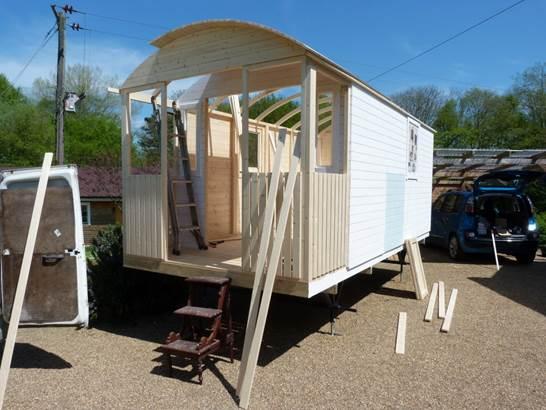
I was probably jumping the gun last night by priming/undercoating the build so far because we added on the porch today which will need to be primed. But what I have done certainly wasn’t a waste of time. We started work before 9.00am and we used the van to move up all the roofing boards. There are three sizes that make up a length. As we looked at things, we discovered a slight error in one of the roof beams. We were about 5cms out. So we did a bit of remedial work to get that set up perfectly.
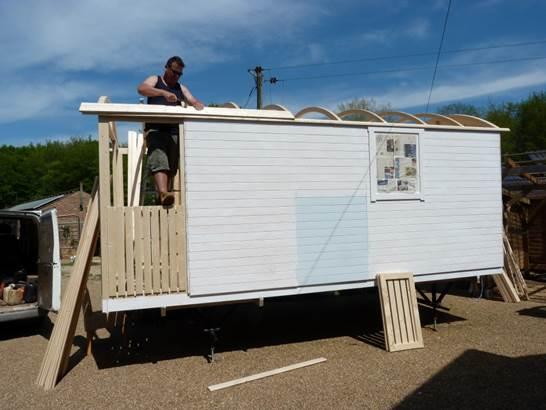
Adding the porch
Then we built the porch which went together well. We had some head scratching because we hadn’t noticed that we needed a little batten up top on the outside of the porch upright at each side. Once we realised that, it didn’t take long to find the two bits of board and get everything properly lined up. Now we were ready to start work on the roof boards.
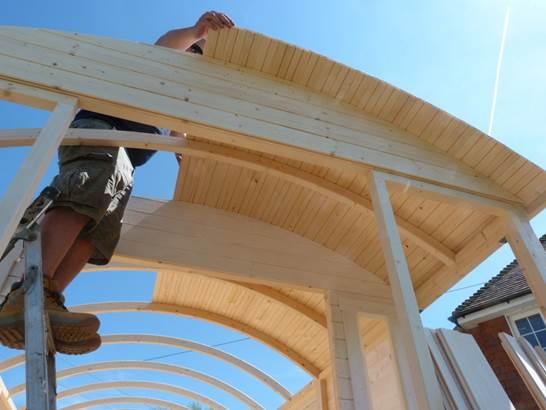
Curved roof installation
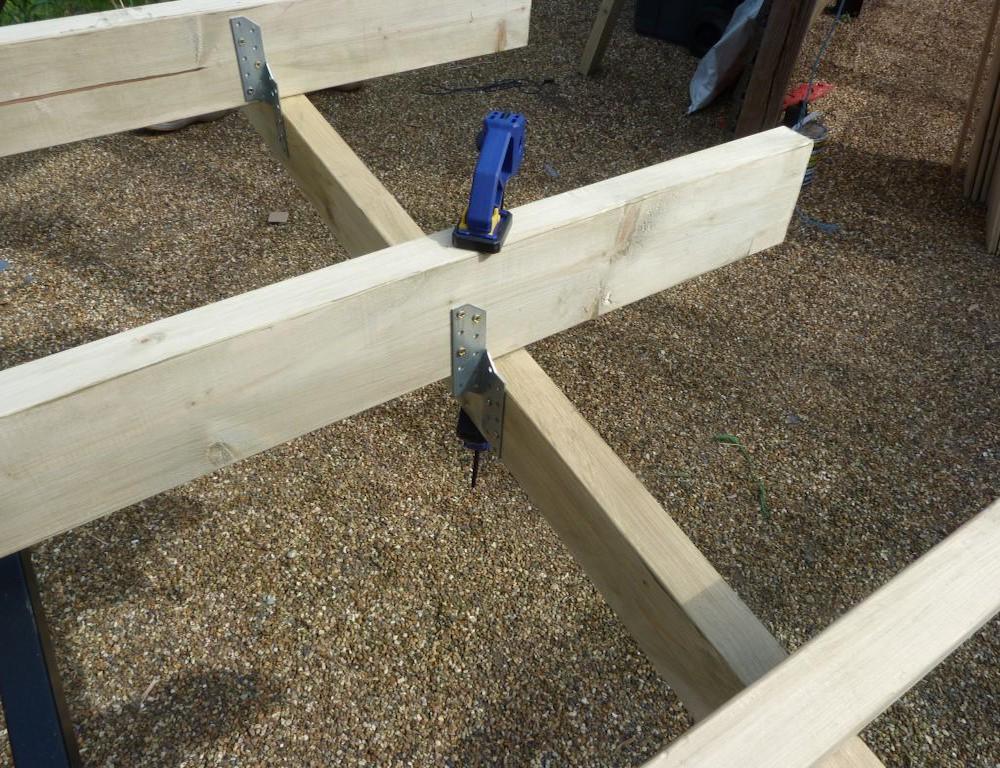
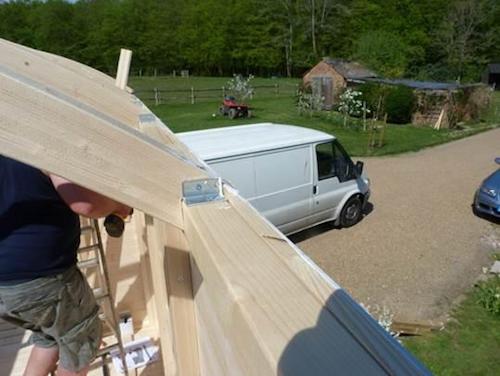
A word of caution on those curved roof beams. They are held in place by a little bracket which you can see in the photo below. It stands slightly proud, and we couldn’t see a way of avoiding that.
We worked out a way. Bash down the metal edge that is protruding and leave the board above loose while you fit the final board, then nail them both down. But it would be good if a nick could be taken off that bracket in manufacture. Or maybe we should have positioned it further inward so it didn’t stand proud, but that doesn’t look right as you can see from the second shot.
From the time stamp on the photo, I can see that we started work on boarding the roof at 12.00. It was really hot so it was sweltering doing the work but we got it all done by 3.25pm, which included about 40 mins for lunch.
calling it a day
By the time we had roofed the entire hut, we were tired and decided to call it a day. We haven’t quite made up our minds about the roof. Use the felt supplied or go for a corrugated roof with insulation beneath. So we will have to leave things for a few days while we earn a crust so we decided to cover the roof with a tarpaulin. It is not big enough but I have a bigger one that will go on before the rain arrives tomorrow afternoon.
Extra bits
After my friend James left, I was still in the mood to just potter about and do a little more. So I fitted the doors and the door frame and that was a fairly easy process. I just needed my wife to hold the components steady while I screwed them. We got the doors hung after a bit of messing about trying to put them on backwards!
Then I decided to fit the little gates things at the end of the porch. I was hot and tired and not at my brightest so there was an awful lot of head scratching and trying to figure out these strange hinges. I have never seen anything like them in my life before. On the left, that’s just one hinge. Iknow they are special and let the little gate thing swing either way and open back out of the way. I couldn’t figure out how to fit them, so I left that for another day when I am less tired and hot and bothered…
I contemplated getting out the primer and doing the new pieces we had fitted, mainly the porch. Also the underside of the interior roof but it was still very hot and I decided instead to make up the steps which was a fairly easy task.
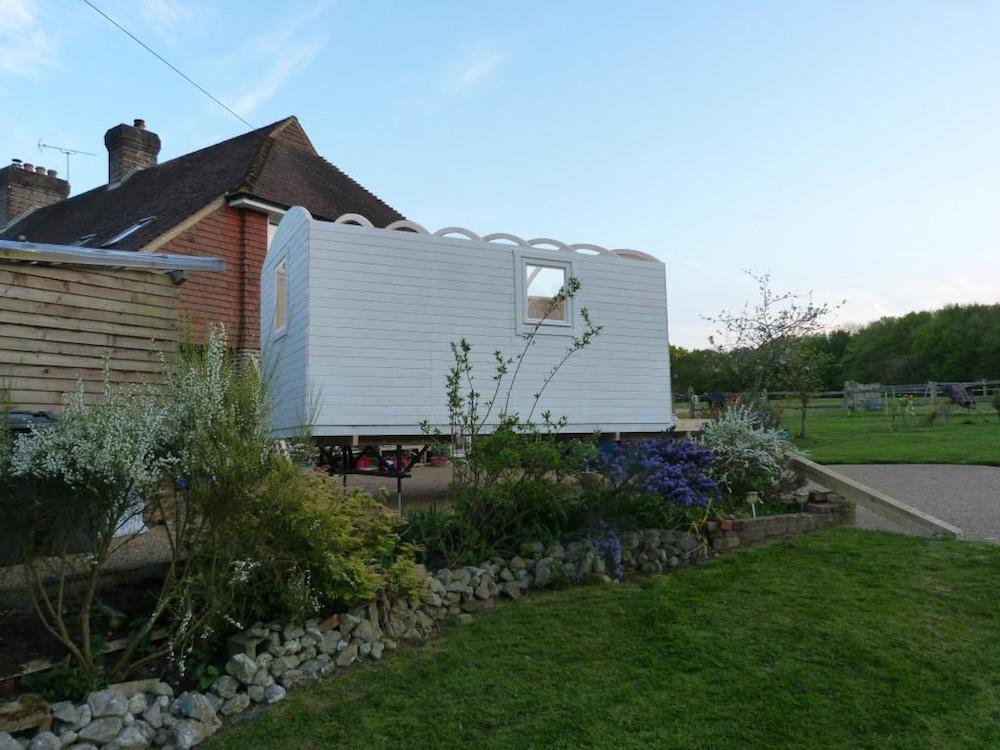
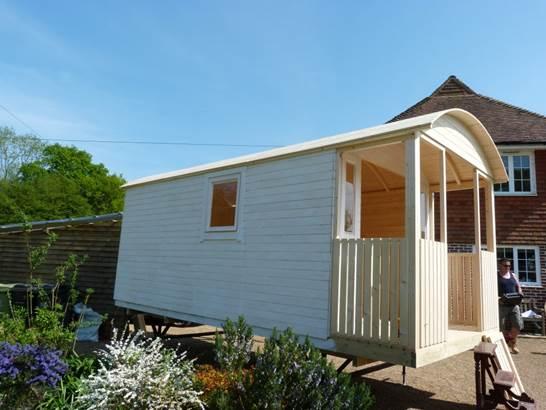
The Finished Shepherd Hut… For Now
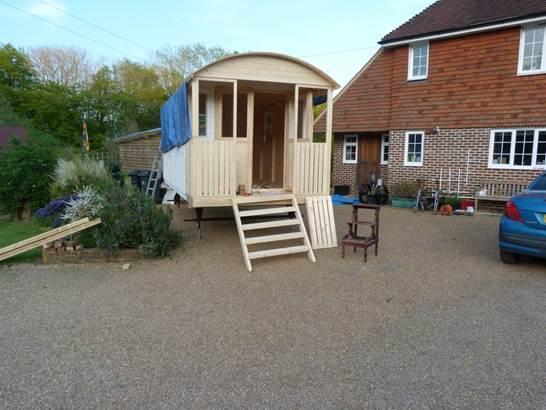
So that’s it. There is more work to do. That being the roof in whatever material we decide to do it, but other than that we’re pretty much there.
There’s the fitting out to do. Prime and paint the rest of it; add the exterior trim, run some electric cables inside for lights and power. Insulate inside and then panel the walls. Then lay an oak laminate floor; general painting and decorating and “dressing” the hut, etc.
I’ve bought a sofa bed from Ikea specially for it and a few extras that will look the part. But that is an ongoing fun element which we will do over the next couple of weeks. We are in no hurry.
As I was reading customer comments on building one of these, it was suggested you can build one in a weekend. Of course the devil is in the detail. At what stage do you determine it is built? If you look at our timings and what you see in the photo above, then certainly. Two averagely handy guys, working at a steady, unrushed pace, got this far in a long weekend.
Final Thoughts
If we were building the other one, I think it would be quicker because we did a lot of head scratching. There are no written instructions in terms of describing that you need to do this, then that, etc. and how you do it. The manual is made up of about 18 pages of drawings that show you what is needed. It shows you what screws to use and where necessary, there are little exploded drawings for key details.
It is easy to miss something or confuse two pieces of the jigsaw so double check everything. That is not to criticise the instructions. What we realised is that we weren’t familiar with following this kind of instruction booklet and at times things didn’t make sense. And then the penny would drop and you would see what was required and it was easy.
I think, most of all, I’m happy with the attitude we approached the build with: this is going to be fun. Let’s enjoy this. We certainly did despite the head scratching., We turned another page until it sank in what we needed to do.
Thank you to James for your article. We appreciate the amount of detail and passion you show in both your writing and your images! I send my best wishes for when you build the other one and modify it. We would love to see images of the interior design when you’re finished!
Other customer experiences, build articled and ideas can be found here: Pictorial Tuin Reviews.