


I’d just like to start this review off with a thank you to Mrs S for sending this in! Her review includes plenty of images and information on how she turned the Meaghan Log Cabin into an ideal music room/office!
I’d long wanted a cabin in the garden and had considered it last year but put it off as the summer came to an end. I’d often perused the well-known cabin sites and had pretty much made up my mind if I did get one I’d go with Tuin. Their reviews were always so good and particularly in the area of service and delivery and in my book customer service goes such a long way. Coupled with the quality of their buildings and Richard’s blog it was an easy choice when I finally decided to take the plunge.
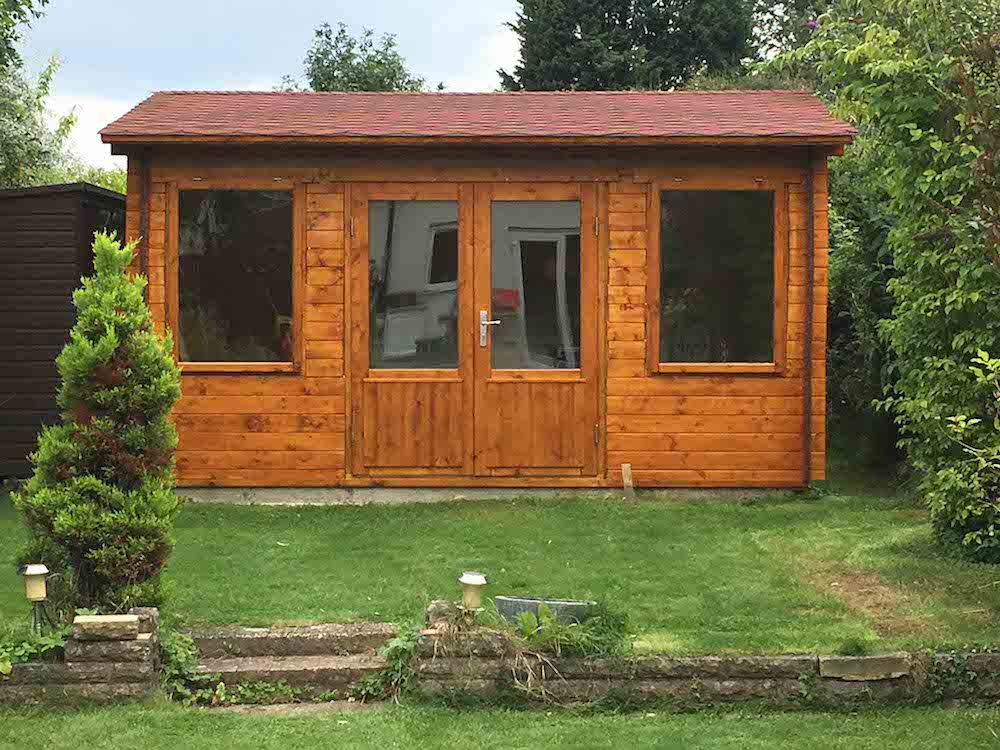
I’d been a keen reader of Richard’s blog so I had a good idea of what I wanted before I began. In order to ascertain the best size to get, I visited a local supplier and had a look around some buildings in their yard. I opted for the Meaghan cabin (4.3m x 4.5m), which was new and didn’t have any reviews but it suited my requirements for a medium sized cabin with decent wall thickness and double glazing (due to sound properties rather than heat retention). So I trusted in the reviews of the other Tuin buildings and placed an order.
Concrete Base
I went for the concrete base that is to the footprint of the cabin as described on the blog as I didn’t want to have water, splashing dirt up the sides of the cabin. I also opted for steel reinforcement within the base, damp proof membrane both within the cement and on top. Later on, I used damp proof course around the perimeter prior to the build.
Delivering the Meaghan Log Cabin
The cabin arrived on a huge truck on 27th July as planned. The communication with the delivery company was excellent. The poor driver had to unload just as it started pouring down, typical. The package was easily deposited on my front drive. As described by others, the size of it is quite daunting!


Constructing the Cabin
I had a ‘team of friends’, I’ll call them Groundforce, who had offered to assemble the Meaghan Log Cabin for me. As a busy Mum of young twins, I was on childcare duties and in charge of checking the plans and various videos available on the website whenever we were unsure of how things should go.
Groundforce was very organised, working in pairs, one delivering the parts from the front to the back of the house and the other sorting the parts and referring to the instructions.
The initial squaring up took some time and care but once this was completed the cabin quickly began to take shape and Groundforce were slotting in windows and door frames before we knew it. Once they got to the roof, there was a need to email Tuin’s out of hours service for a call back. Despite their prompt response, Groundforce had it sorted so we let Tuin know we didn’t require assistance after all! It’s fantastic being able to contact them at any time during installation.
There is plenty of help available on the website and also the youTube videos are very helpful and I regularly referred to these as required but I think it also helped that I had watched all of these prior to beginning the build and therefore had a firm idea of what I wanted to do and how it should be done in relation to insulation, flooring and everything else.
By the end of day one the building structure was up and 1/3 of the roof boards were in situ.


Fixing the Roof
On day two, due to other commitments our team of four reduced to one. Team Mick soldiered on alone and managed to complete the rest of the roof boards. There are a lot of boards and so it was deceptively time-consuming to complete with just one person doing it.
Once he’d completed the roof boards, Mick was then able to begin insulating the roof. I struggled to get insulation boards at short notice as there was a bit of a shortage at the time of the build so I didn’t exactly get a bargain but I haggled a bit and was able to sell on the couple of bits I had left over.
We used large washers and screws to fix the insulation in place and it seemed to work really well. We took a lot of advice from Tuin around the roofing, as we weren’t sure about insulating straight on the boards and then putting the shingles straight on top of the roof but it turns out it’s perfectly fine to do this.


Shingles
Laying the shingles was fairly straightforward once Team Mick got started. I helped him with a few of these. The biggest challenge was laying them straight as when you’re on the roof obviously it’s tricky to see if you have a straight line when you start off, we ended up using a string for this. We used three 65mm clout nails in each strip and they went in a treat. On the overlap at the apex we used 70mm clouts. We also used a bit of the leftover wood to act as the barge board so as not to damage the ones that would eventually be finishing the edges.


Further Work
Team Mick return, following a short holiday, and finished off the interior of the cabin by laying some joists. Insulation was then installed between the joists. We used OSB board on top. Mick made a great job of this, countersinking the screws and so I’m going to stain it with Bona Mega and see how it goes just having this as the floor. If it doesn’t work out I will probably install some vinyl floor covering.


Painting the Meaghan
After doing some reading around the best paints to use I opted to go for Sikkens in Light Oak. I knew I wanted to retain the natural look of the wood rather than go for a painted colour. Safe to say I wasn’t disappointed. I managed to undercoat the cabin between looking after the children and I did the entire outside plus the inside of the doors and windows. By this time it was getting darker of an evening and the thought of doing a further two coats with limited time available was off putting so I found a local painter to come and finish it off for me.
He applied it with a roller, laying it off with a brush afterwards, which was much quicker than applying with a brush as I had done. Still, he said I’d made a good job of it. The finish is excellent and it looks weather proof… time will tell. Finishing touches here were to add the barge boards. I just went with the ones supplies rather than purchase extra timber as I wasn’t worried about them hanging down below the insulation level. They completely cover the ends of the insulation and made for a very neat finish. Finally we nailed up the diamonds!


Fitting the Electrics
I didn’t have any electrics to the outside of my house so I needed quite a bit of work here. I found a local electrician and he was great, discussing the requirements and returning to complete the work soon after. As a result, I opted for two coach lanterns on the outside of the cabin as I like the traditional look they give. With these I went for dusk to dawn bulbs so they come on when it gets dark. I also went for two additional lights in the garden to light potential access, these are on a sensor that triggers them at dusk.
Inside I went for two LED strip lights which give good light as a friend told me they had just a bulb and were planning to switch to this lighting, as they didn’t find it bright enough. I went for eight double sockets around the cabin due to its potential usage a a music room and office. I was really pleased with the lighting installation, it’s very neat and tidy and everything works perfectly.
The Finished Meaghan Log Cabin… So Far
The Next Step
I’ve just ordered the varnish for the floor and plan to do this as soon as possible. Then I can start using the cabin. It’s taken longer than expected but I haven’t rushed as I wanted to take my time and get things right and also not to stress and worry about it.
I’m really happy with my choice of Tuin for the cabin and the end result is high quality. I have had quite a few compliments on it. I’m looking forward to making good use of the cabin and I’m sure it will serve me and the kids well over the coming years.
Projects such as installing a Log Cabin is always more enjoyable in a team! You all did amazing work with installing your Meaghan Log Cabin– We hope you continue to enjoy it as well as your gift for many years to come!
For more reviews such as Mrs S’ go to: Pictorial Customer Reviews.