


[no-toc]
Winter 2017 (update at bottom of page for Winter 2019)
As I’m writing this it is January 2017 the log cabin treatment is relevant as you read this post. Occasionally we will receive pictures asking for advice on log cabin treatment when something has obviously gone wrong with a log cabin. We can also receive complaints about log cabin treatment that has been applied to our log cabins from customers who have used our own treatment or other log cabin treatment we have recommended, and things can go wrong.
Please see this page for our advice on the treatment of log cabins with our recommended treatments, ours and also others.
When Treatment Goes Wrong
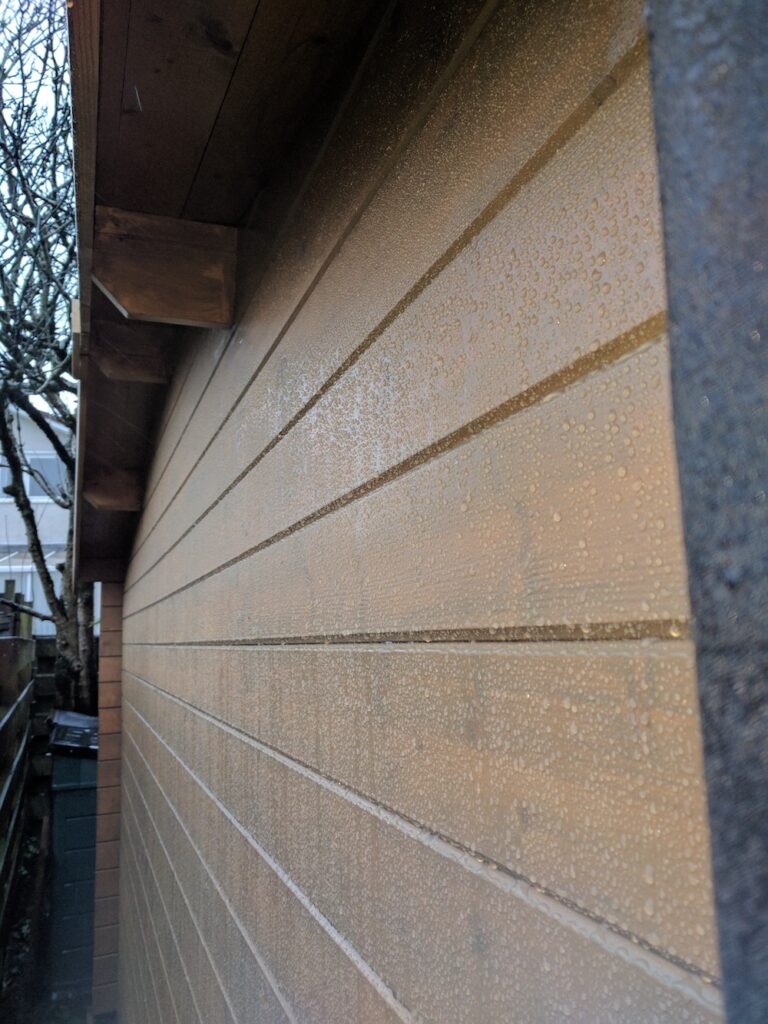
We will receive pictures such as these which do look rather awful and the poor ol’ log cabin is starting to look really sad. We usually receive pictures such as these during the late Autumn and Winter when there is a lot more moisture in the air, more rain of course and snow, generally pretty rubbish weather.
This will be when the treatment that is applied is really tested.
Here’s some examples of what will happen when it all goes wrong and your lovely log cabin starts to get some horrible problems.
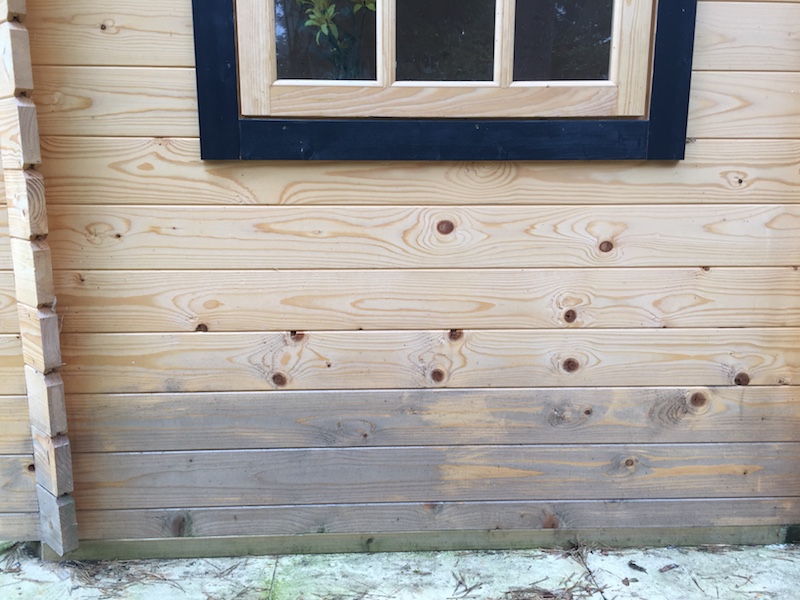
Bad staining is forming at the bottom of the cabin.

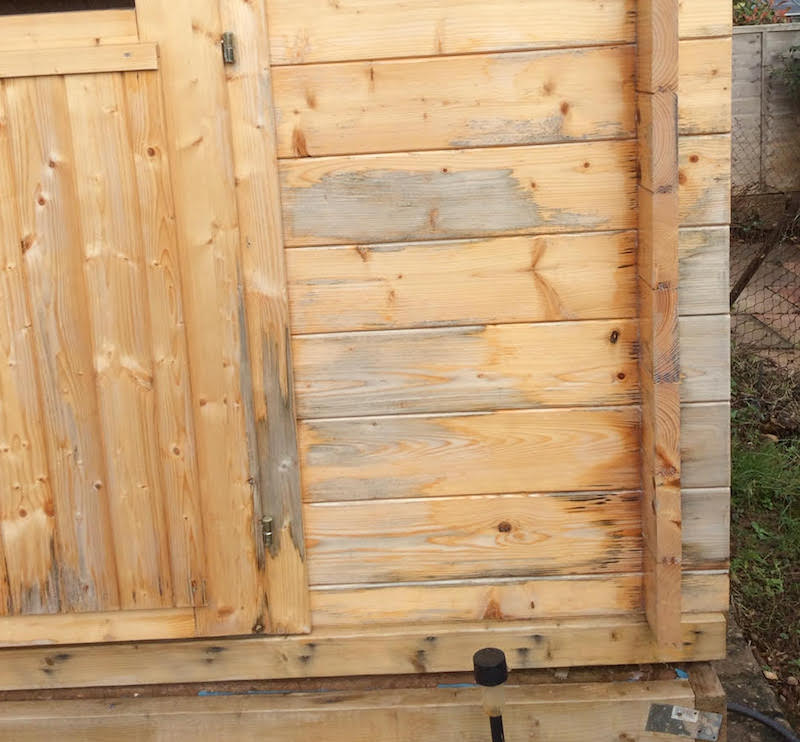
Door trims have started to discolor.
Discolouration and marking of lower logs

Marking and possible spores forming on the door.
We also get sent pictures such as this which are a bit of a fib, you can see that there was a lot of discolouring before the treatment was applied. Perhaps there was a problem before hand?
A bit of a fib, you can see that the discolouration and marks are present under the treatment.
This winter we also received this picture.
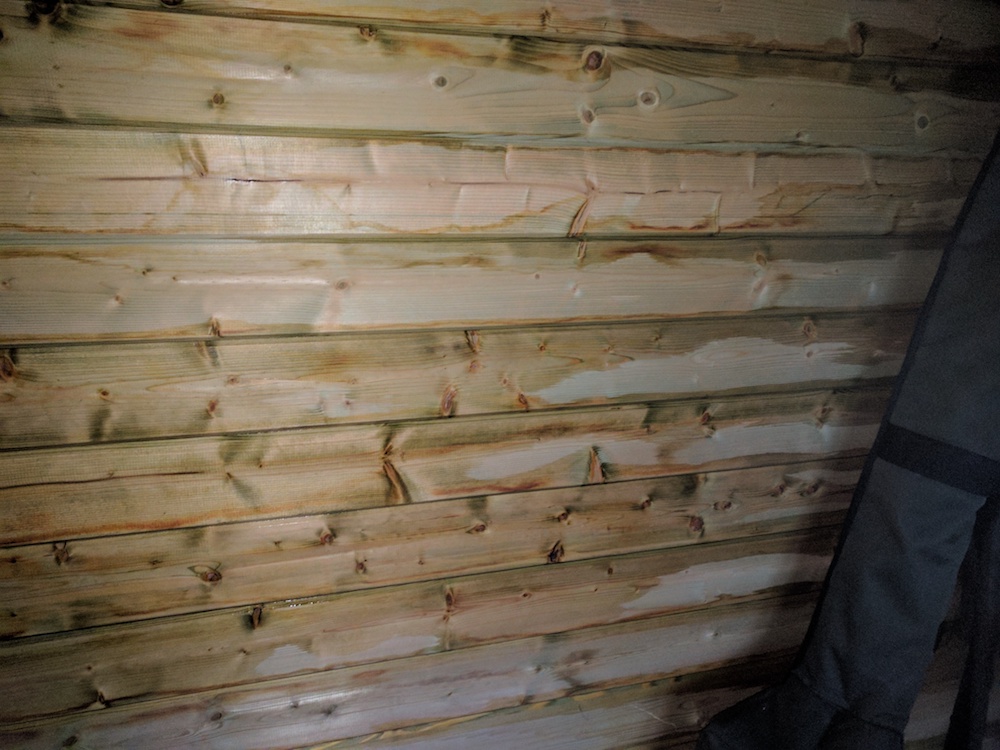
A picture of an internal wall sucking up the weather and resulting discolouration of the inside of the logs that are still wet. Wood is a sponge unfortunately!
All of the above problems are NOT caused by the treatment, they are ALL caused by:
- Application of the Treatment
- Amount of the Treatment used.
- Depth of treatment applied – Basically the number of coats applied.
Please see this article where I talk about specifically about the depth of treatment and moisture content in a Log Cabin
Treatment Experiment
Every year I expect to get complaints such as the above, we get pictures and very occasionally we get arguments that the treatment has been applied as we advise or the manufacturer has advised.
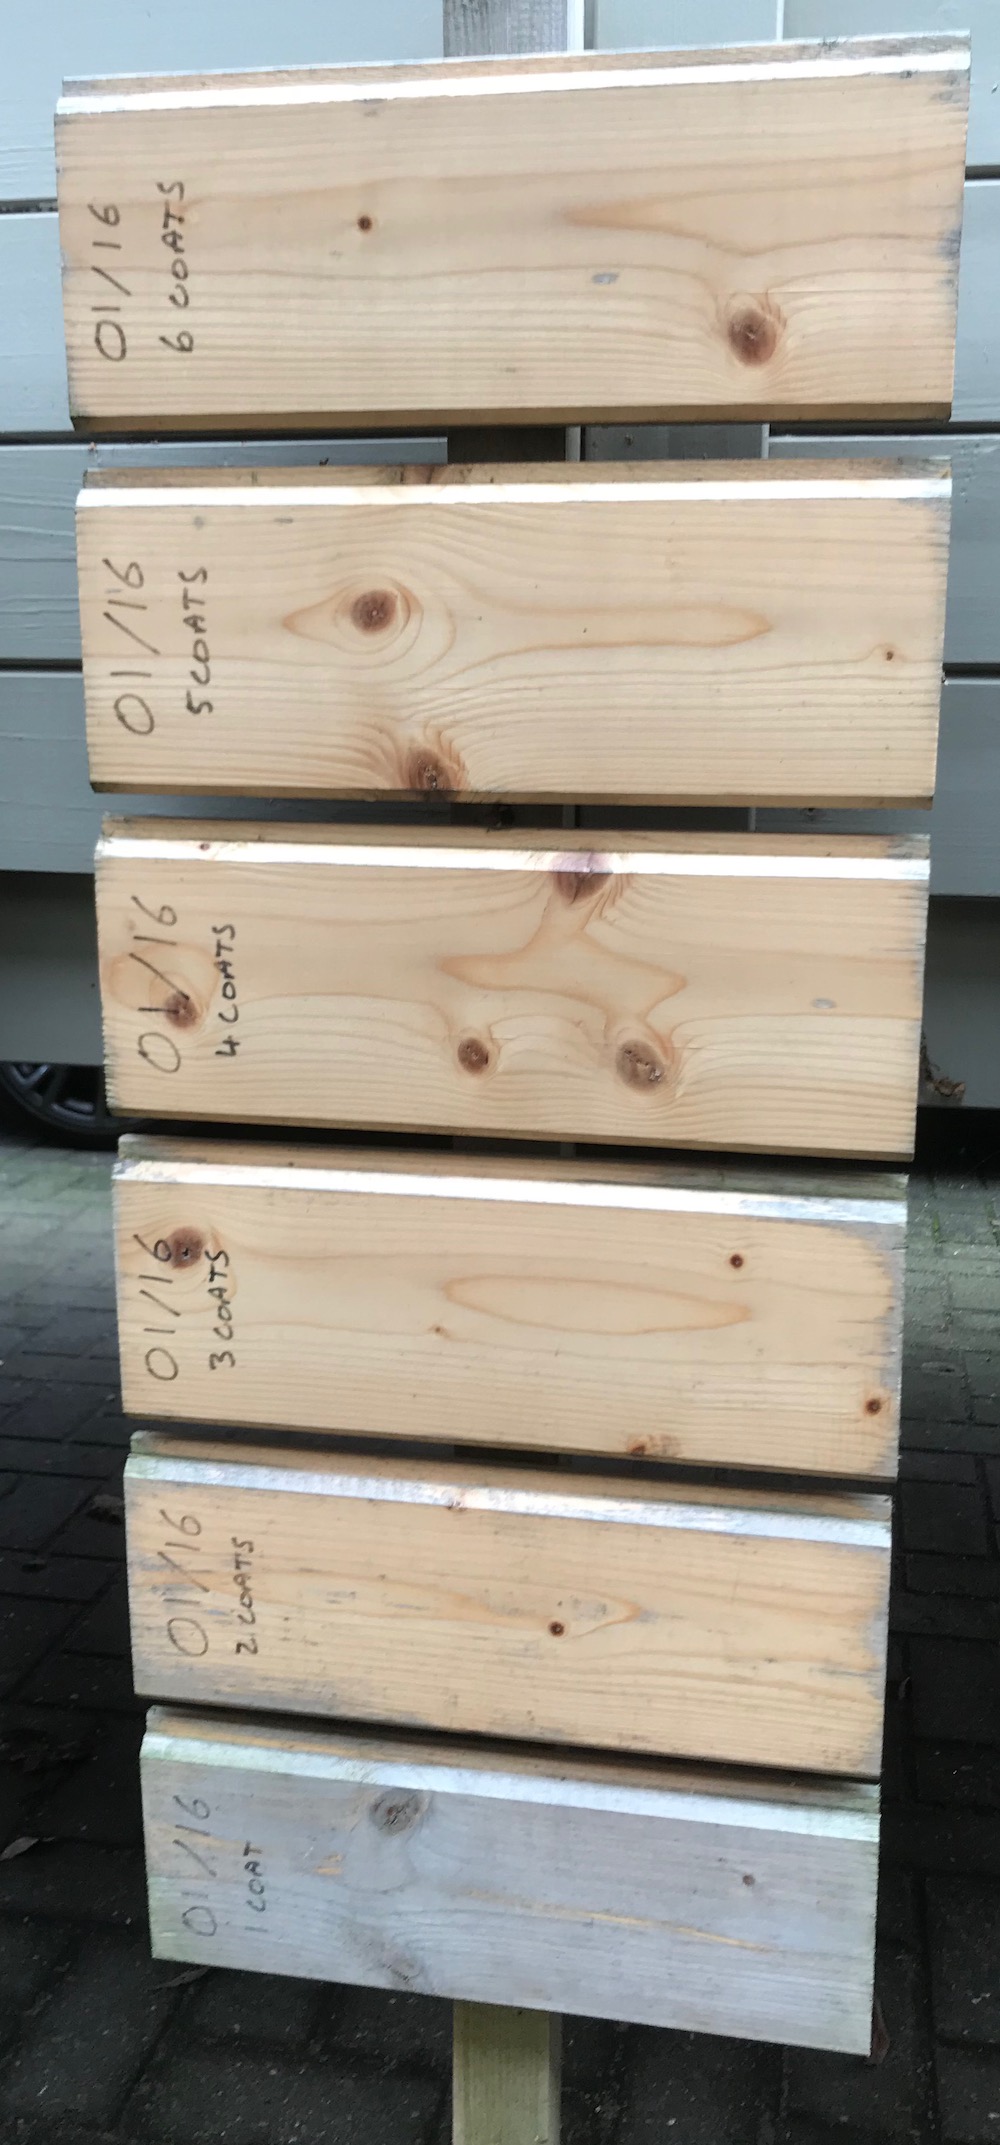
January 2016 I made an experiment board so I can be sure of my advice and to give examples. Here it is:
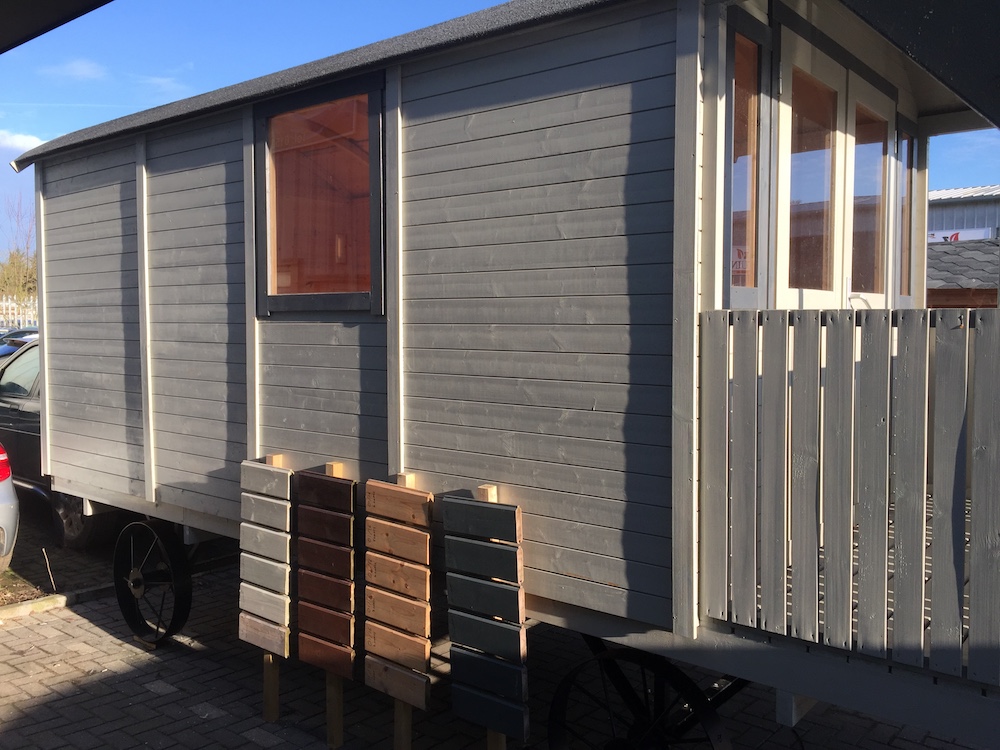
These are my logs I painted and fixed to the side of our Shepherd hut display, in front of this is a garden veranda to make sure the logs are not in permanent sun light, I was trying to reproduce a sheltered position.
I dated these in January 2016 as a reference and started with no treatment, one coat and all the way up to six coats of treatment. I only used our own supplied treatment which was:
Now a year later this is quite interesting and does show quite clearly what happens with the various coats that have been applied.
Now I can actually see this rather than rely on advice from my own experience, the treatment producers and experts have given me in the past, this is starting to show up where the faults may lie, now I can actually see what is happening and confirming what the faults in a treatment could be:
- Application of the Treatment – how well and how carefully has it been put on.
- Amount of the Treatment used.
- Depth of treatment applied – Basically the number of coats applied.
No Coats
My experiment started with no coats of treatment at all.
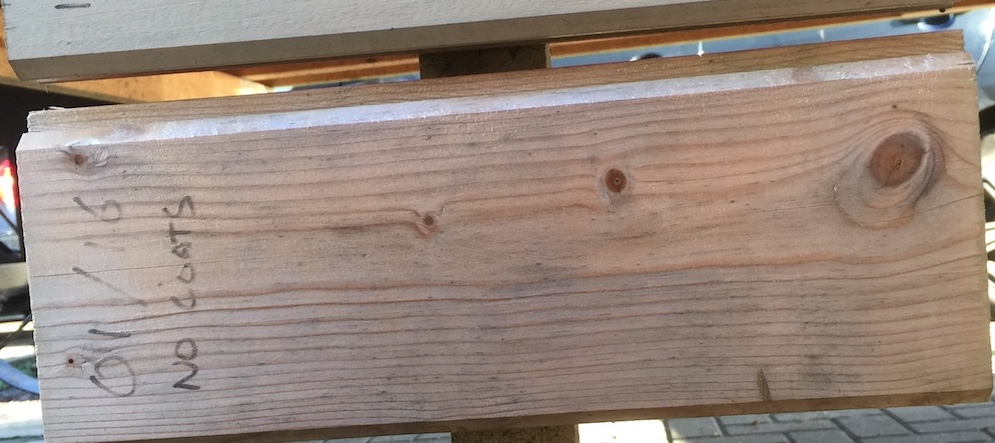
No coats of treatment have been applied, this is completely bare wood.
As expected the wood is discoloured and not looking great. This though is of course not wood rotting – wood does not rot if allowed to dry out naturally. You can see though that some fungal spores are starting to form within the structure.
If you don’t ever treat your cabin you can expect the whole building to look like this. Treatment of log cabins
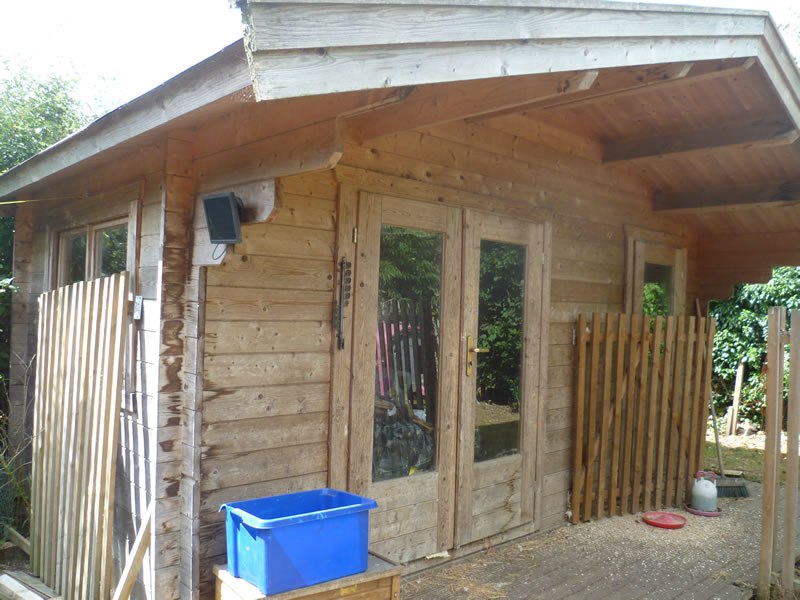
Completely untreated log cabin. This one is now very old but is still not rotten but it doesn’t look great.
Please see my advice on treating your log cabin, you really don’t want this happening to yours:
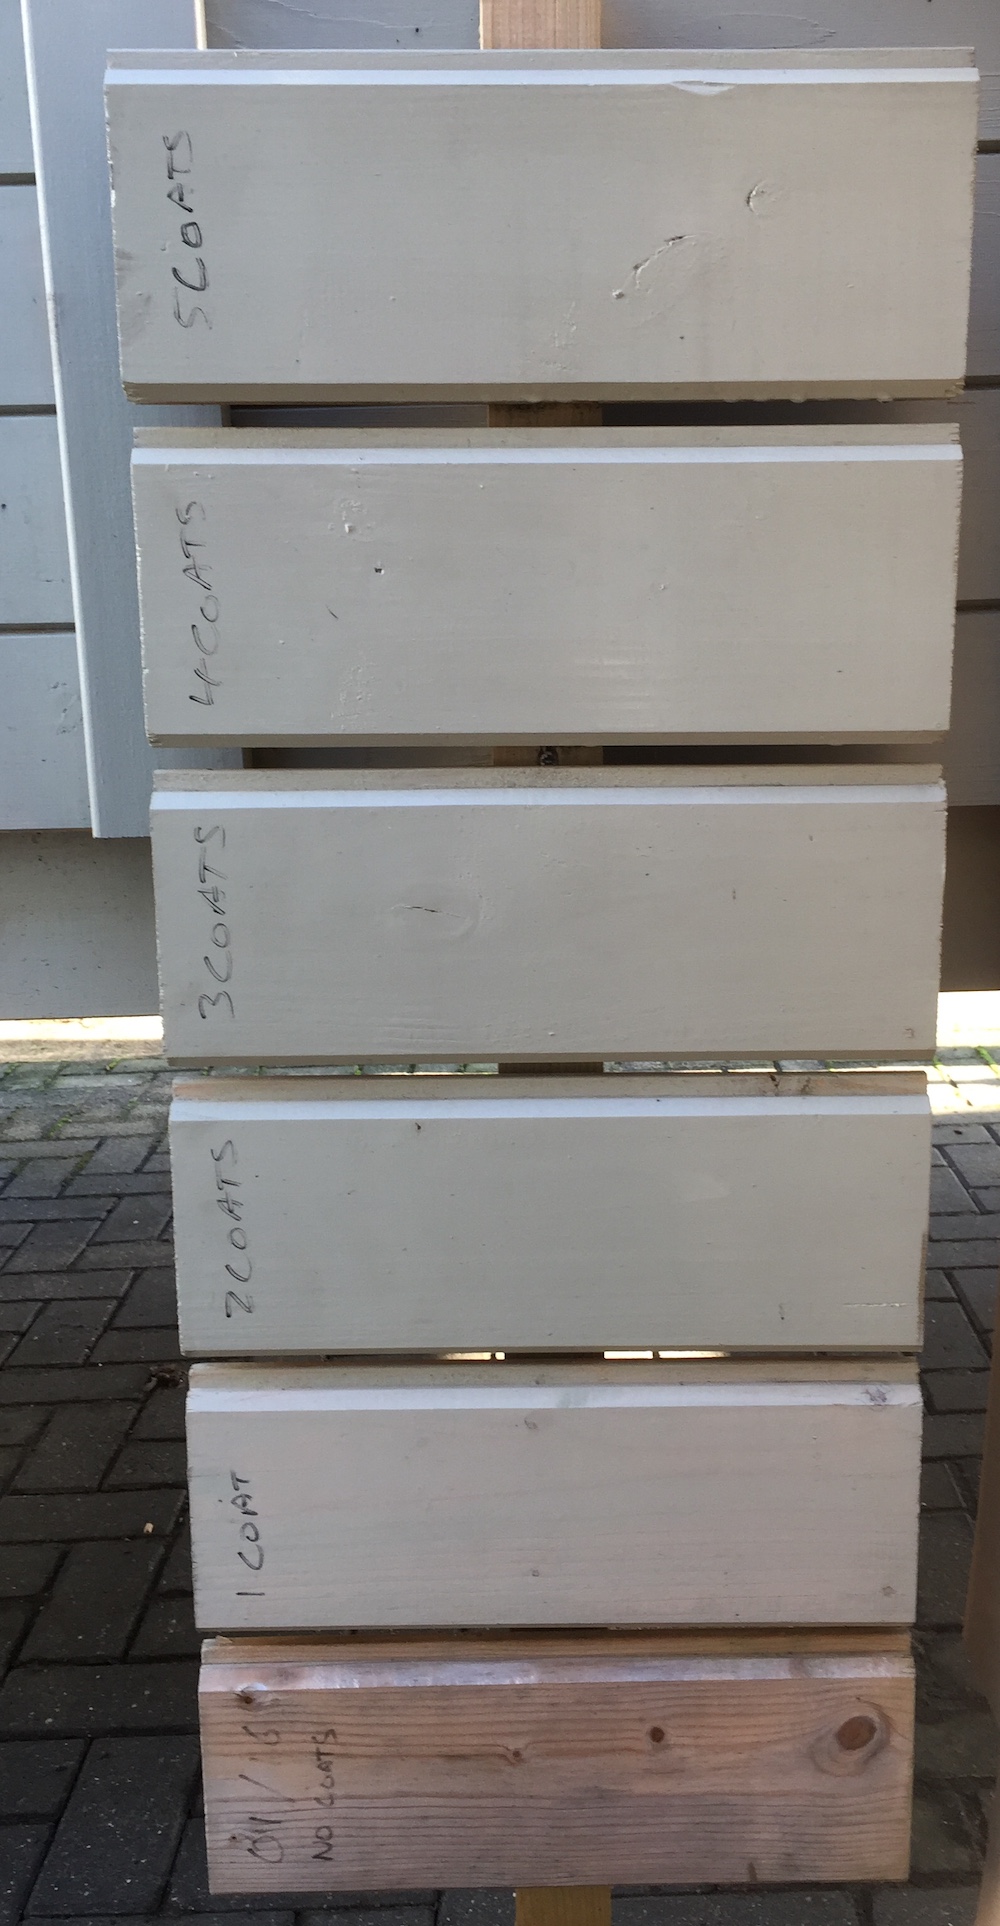
Carefree Protectant Timber Treatment
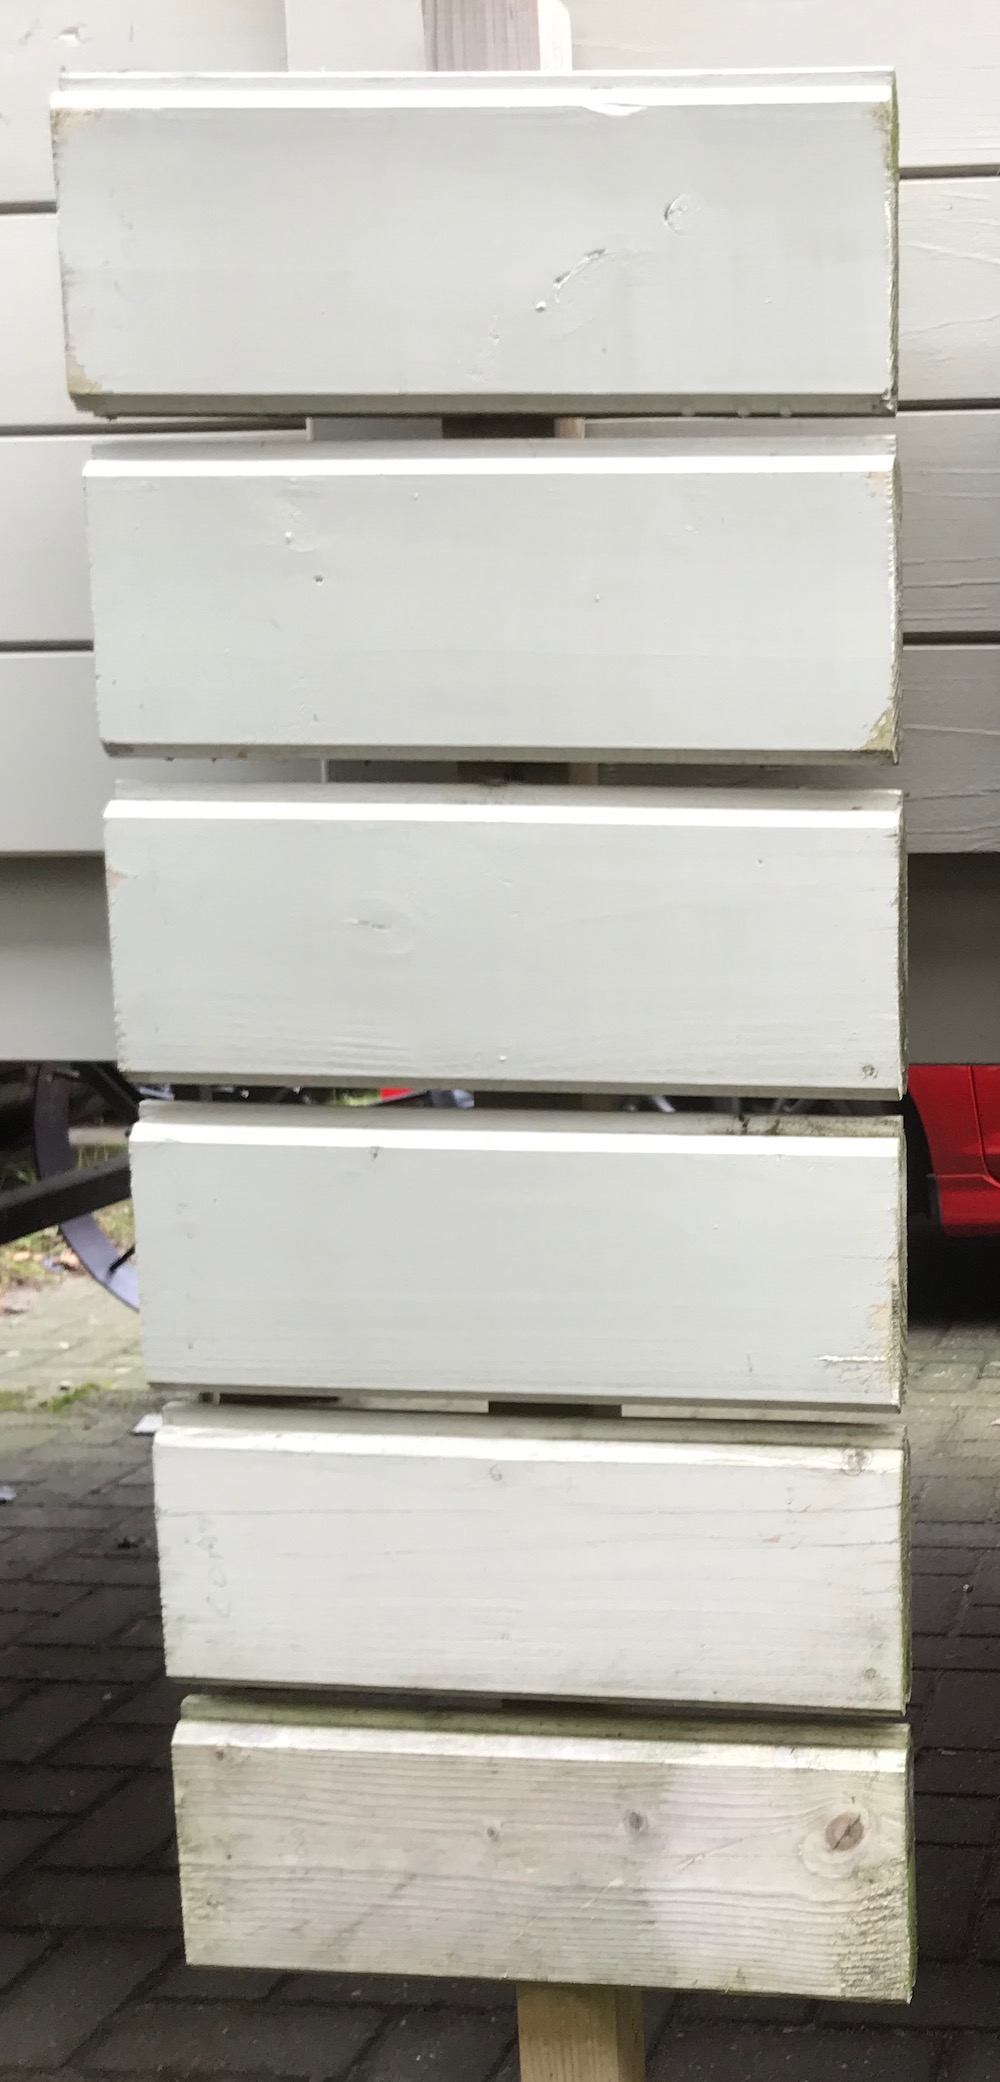
Here’s my experimental board using our Carefree Protectant Treatment
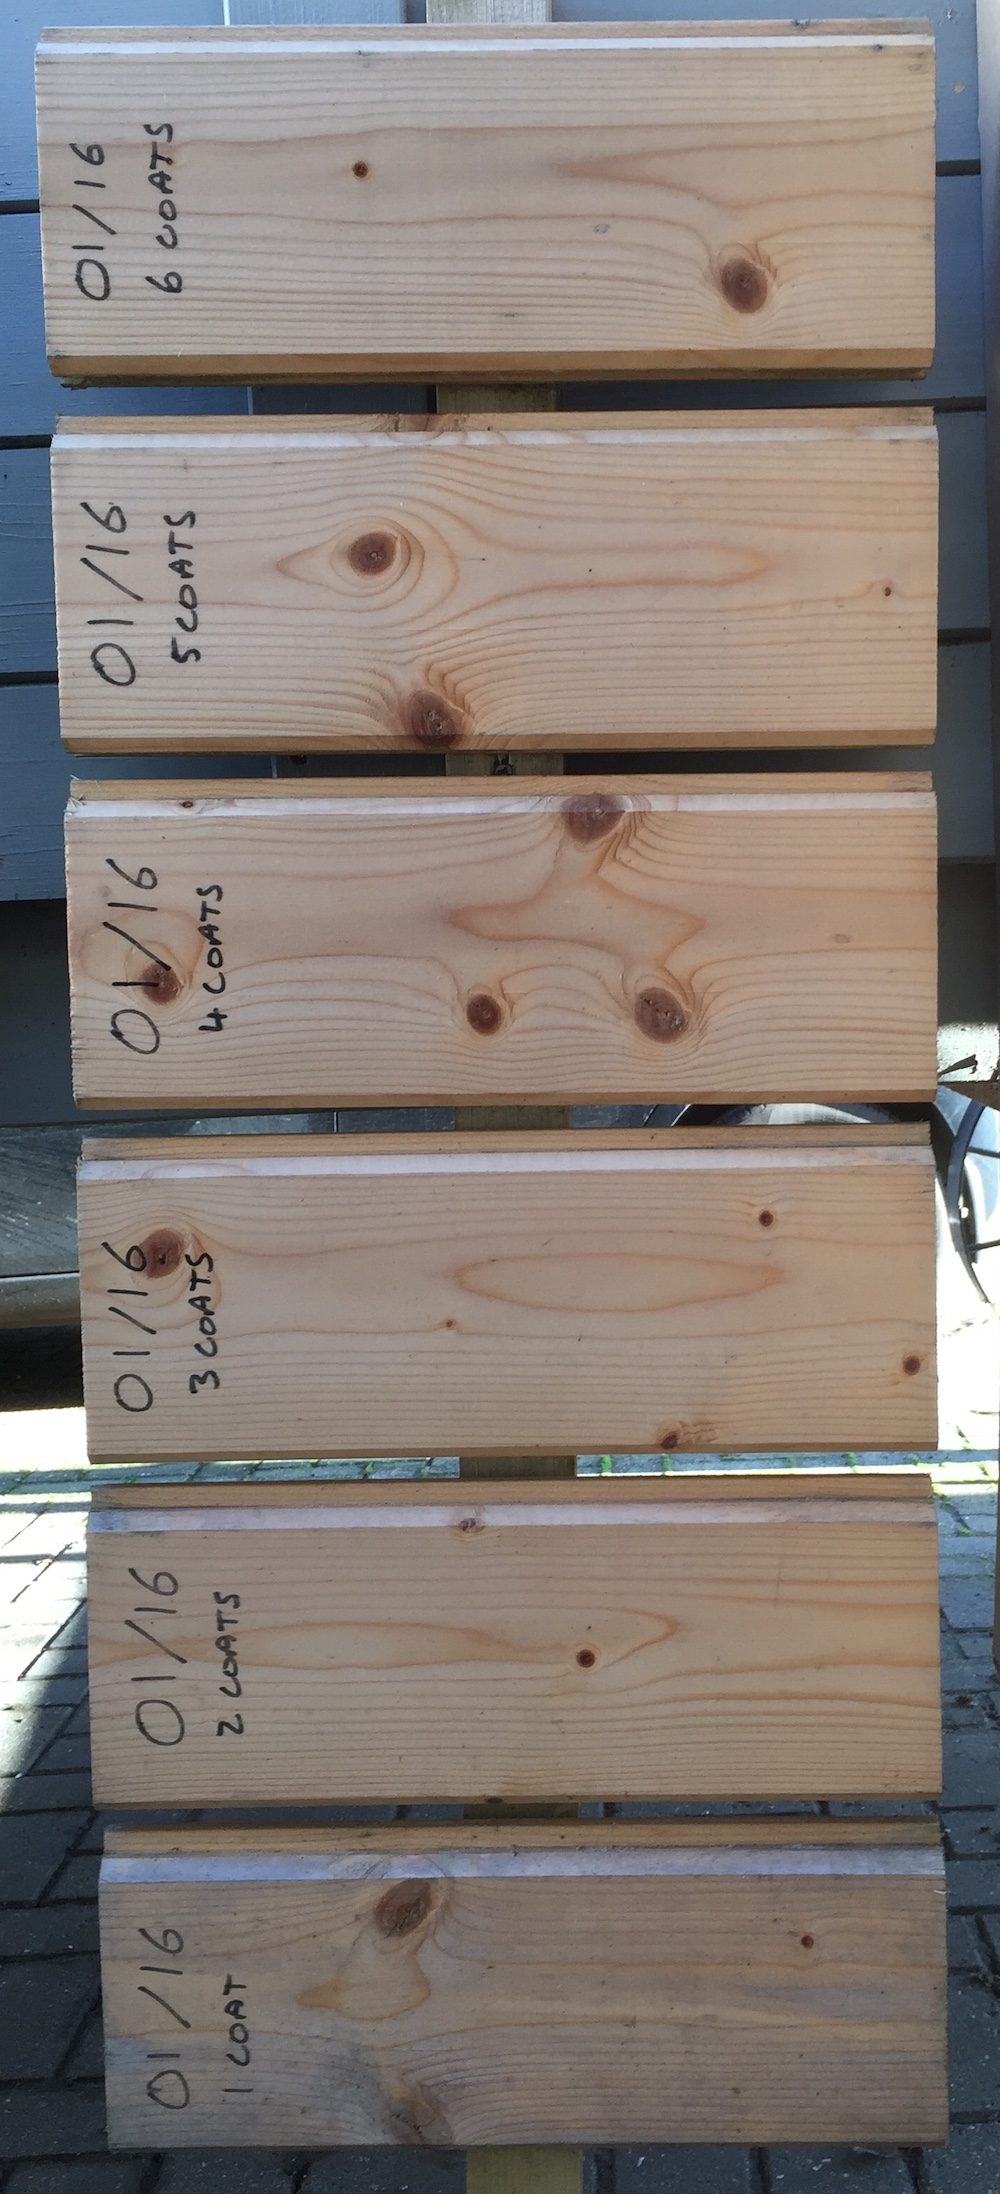
You can see what happens with one coat of treatment, it simply is not enough. We recommend four coats of this treatment. Actually it only requires two coats but PROPER coats and this is always the problem with a totally clear treatment, you cannot see the damn stuff, you have no idea where you have treated! It was easy for me with a small log as I am pretty sure I coated it correctly.
Please note the ‘one coat treatment’ and compare to the pictures at the top of this post. Similar?
Now look at the ‘two coats’ log, you will still see some discolouration, mainly with the tongue part which has borne most of the weather and maybe also where I was a little thin in my application.
Then again look at the third log, it’s better but finally look at the fourth…. now everything is well covered, we know even on the parts you are missing which is happening with a clear treatment you will be getting at least two proper coats on the log.
This of course doesn’t just apply to our own very clear Carefree treatment but also to other producers of treatment.
A clear treatment, in my experience is the WORST to apply as you cannot see where you have been and that results in problems such as those shown in the pictures above.
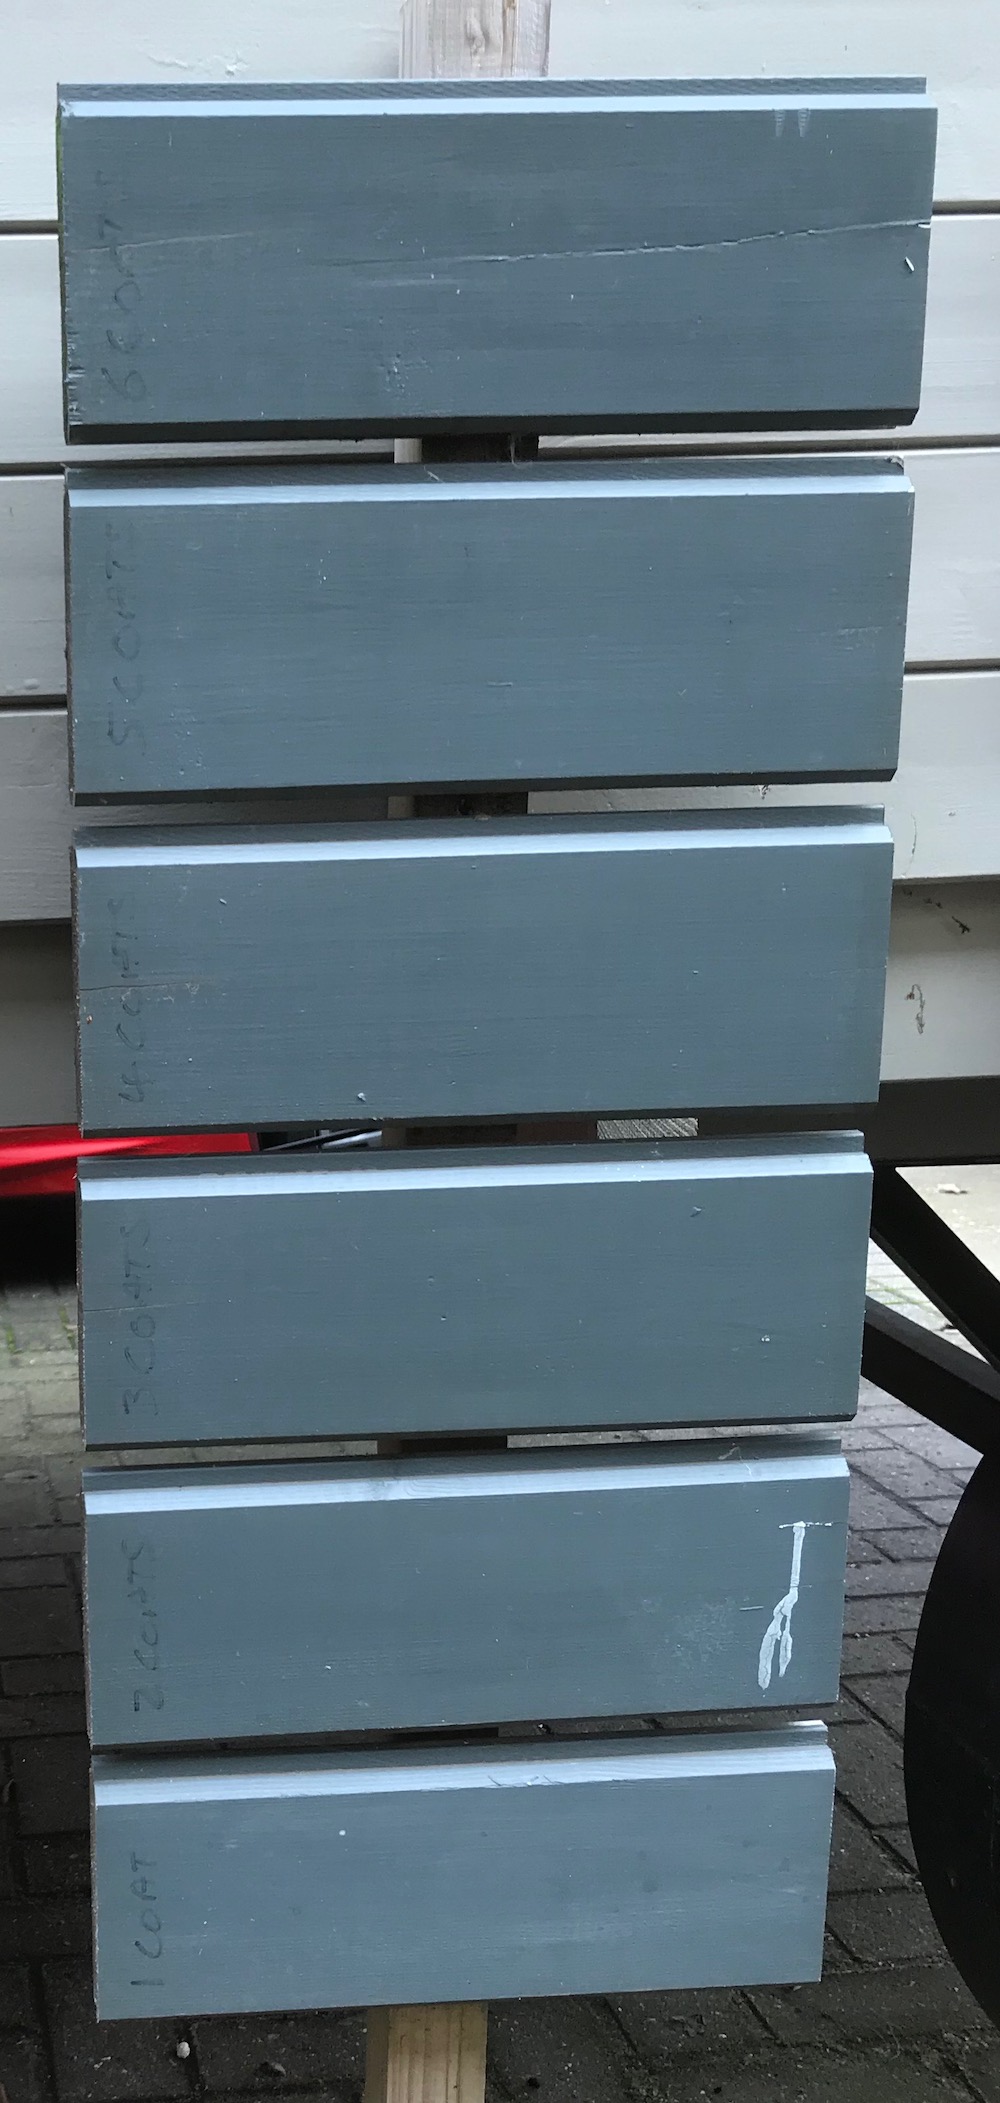
Embadecor Timber Stain
Here’s my experimental board using our Embadecor Stain Treatment
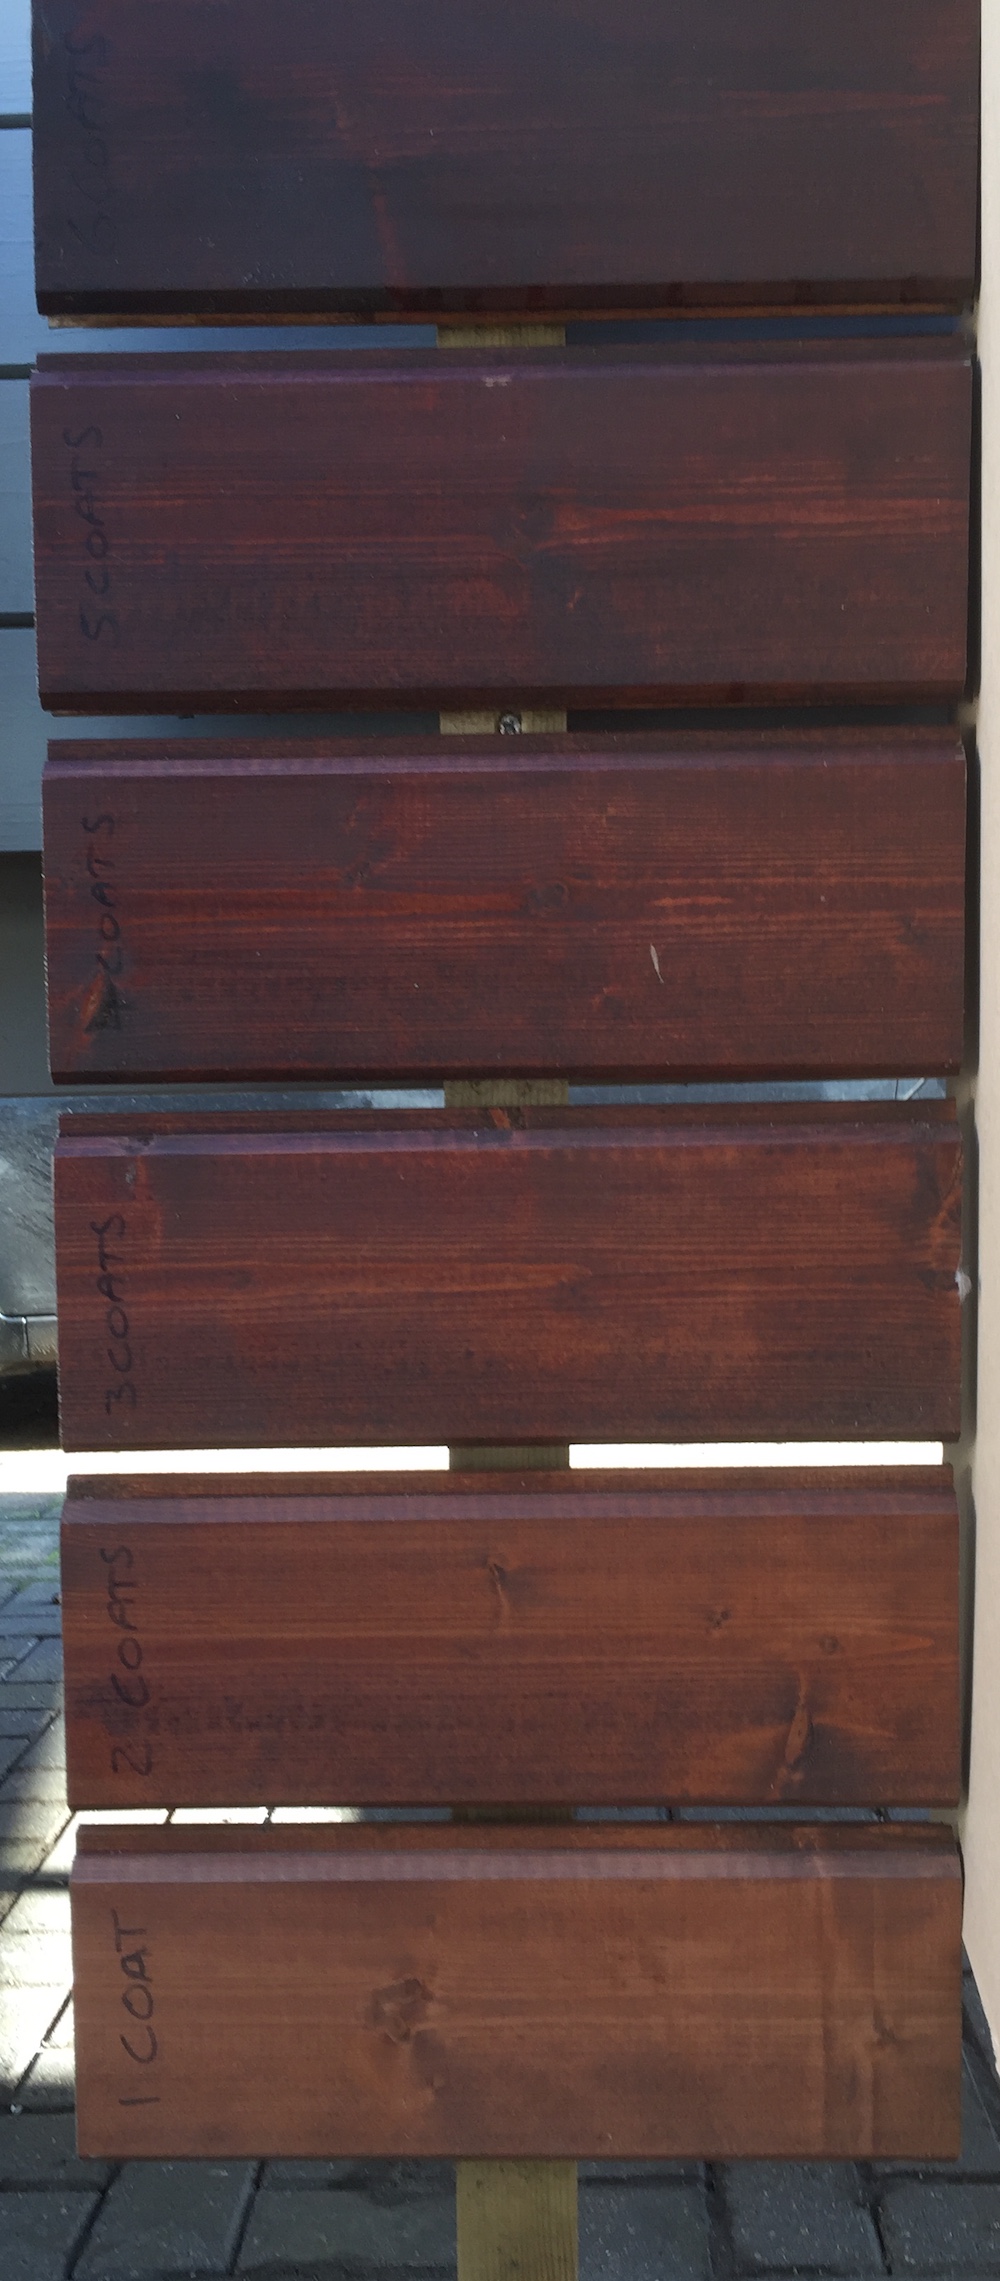
A stain or a paint is a lot easier to apply properly as you can see where it is and how you applied it. This has worked very well and I am not seeing anything bad here. But there are big differences between one coat and three coats. Please see the previous articles on advice, three coats will at least give you the depth your require to keep your log cabin from problems and absorption as shown in one of the pictures above.
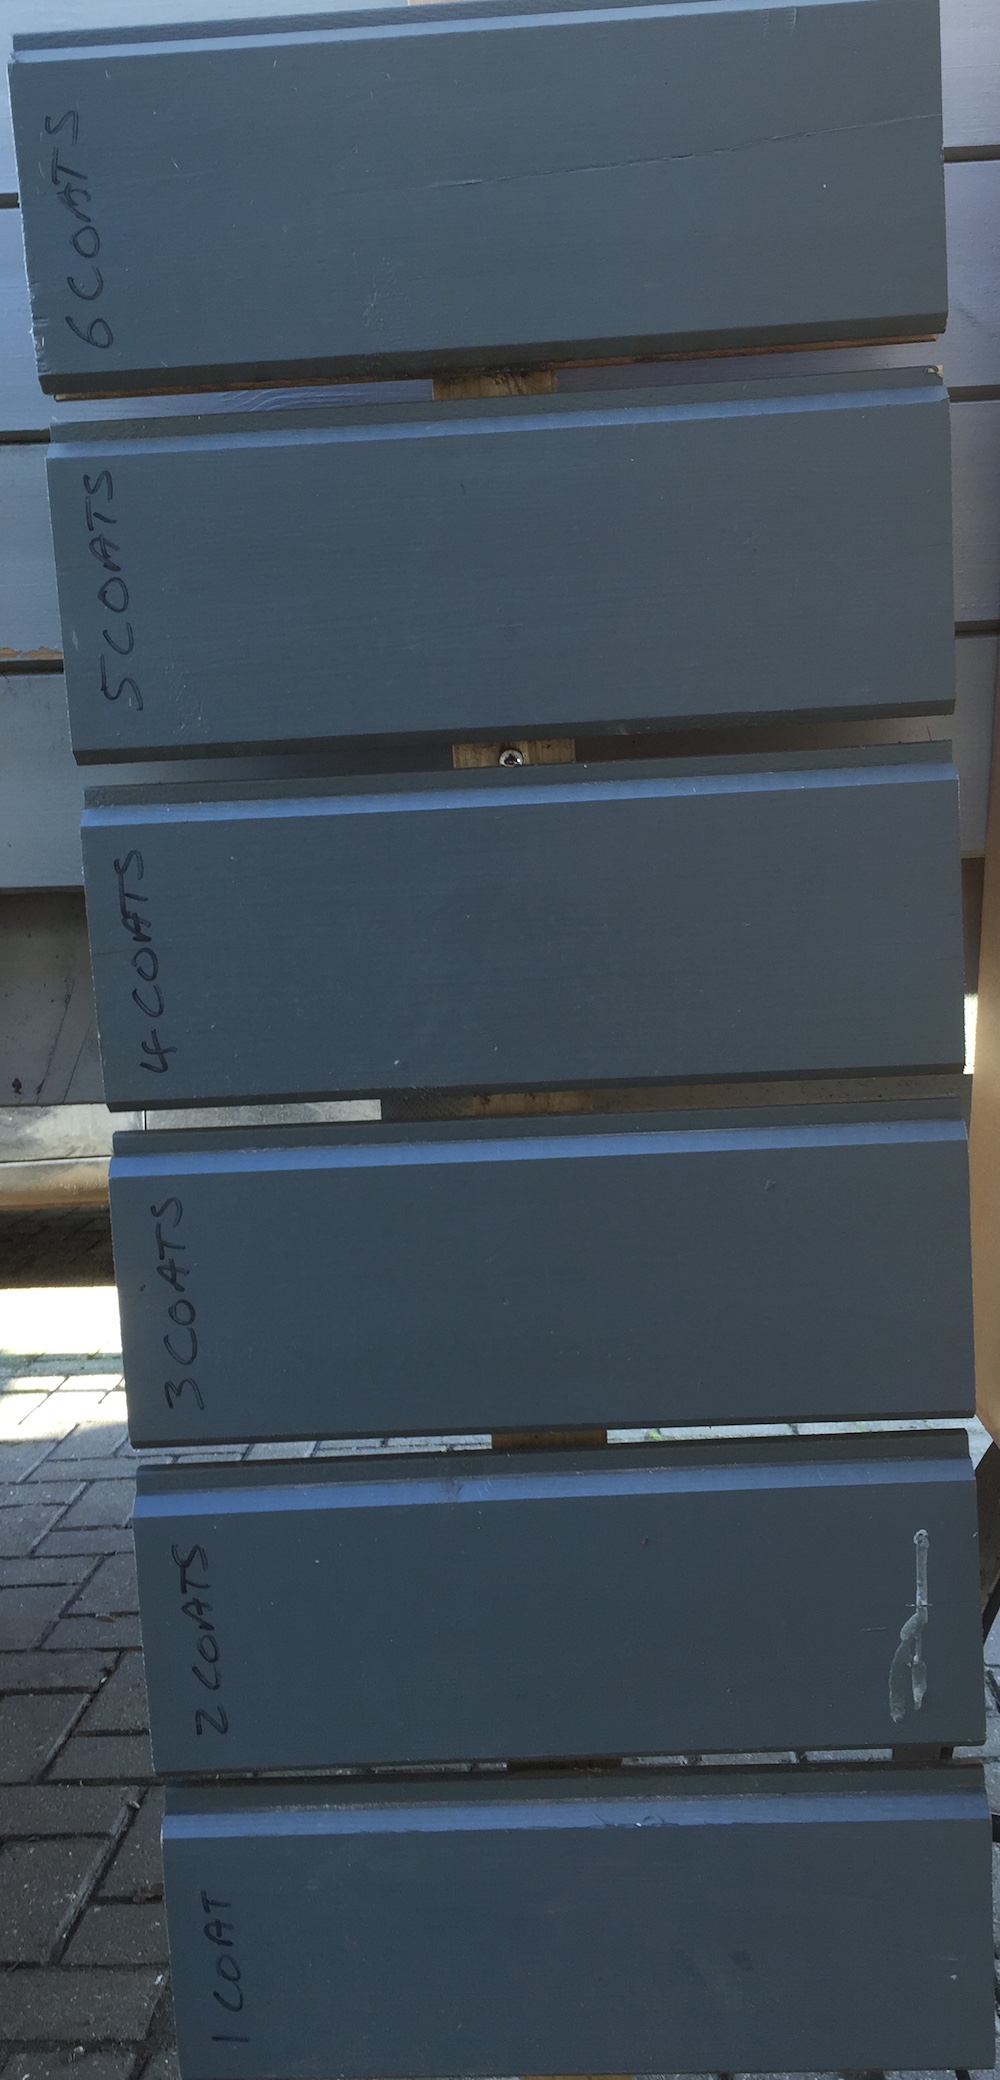
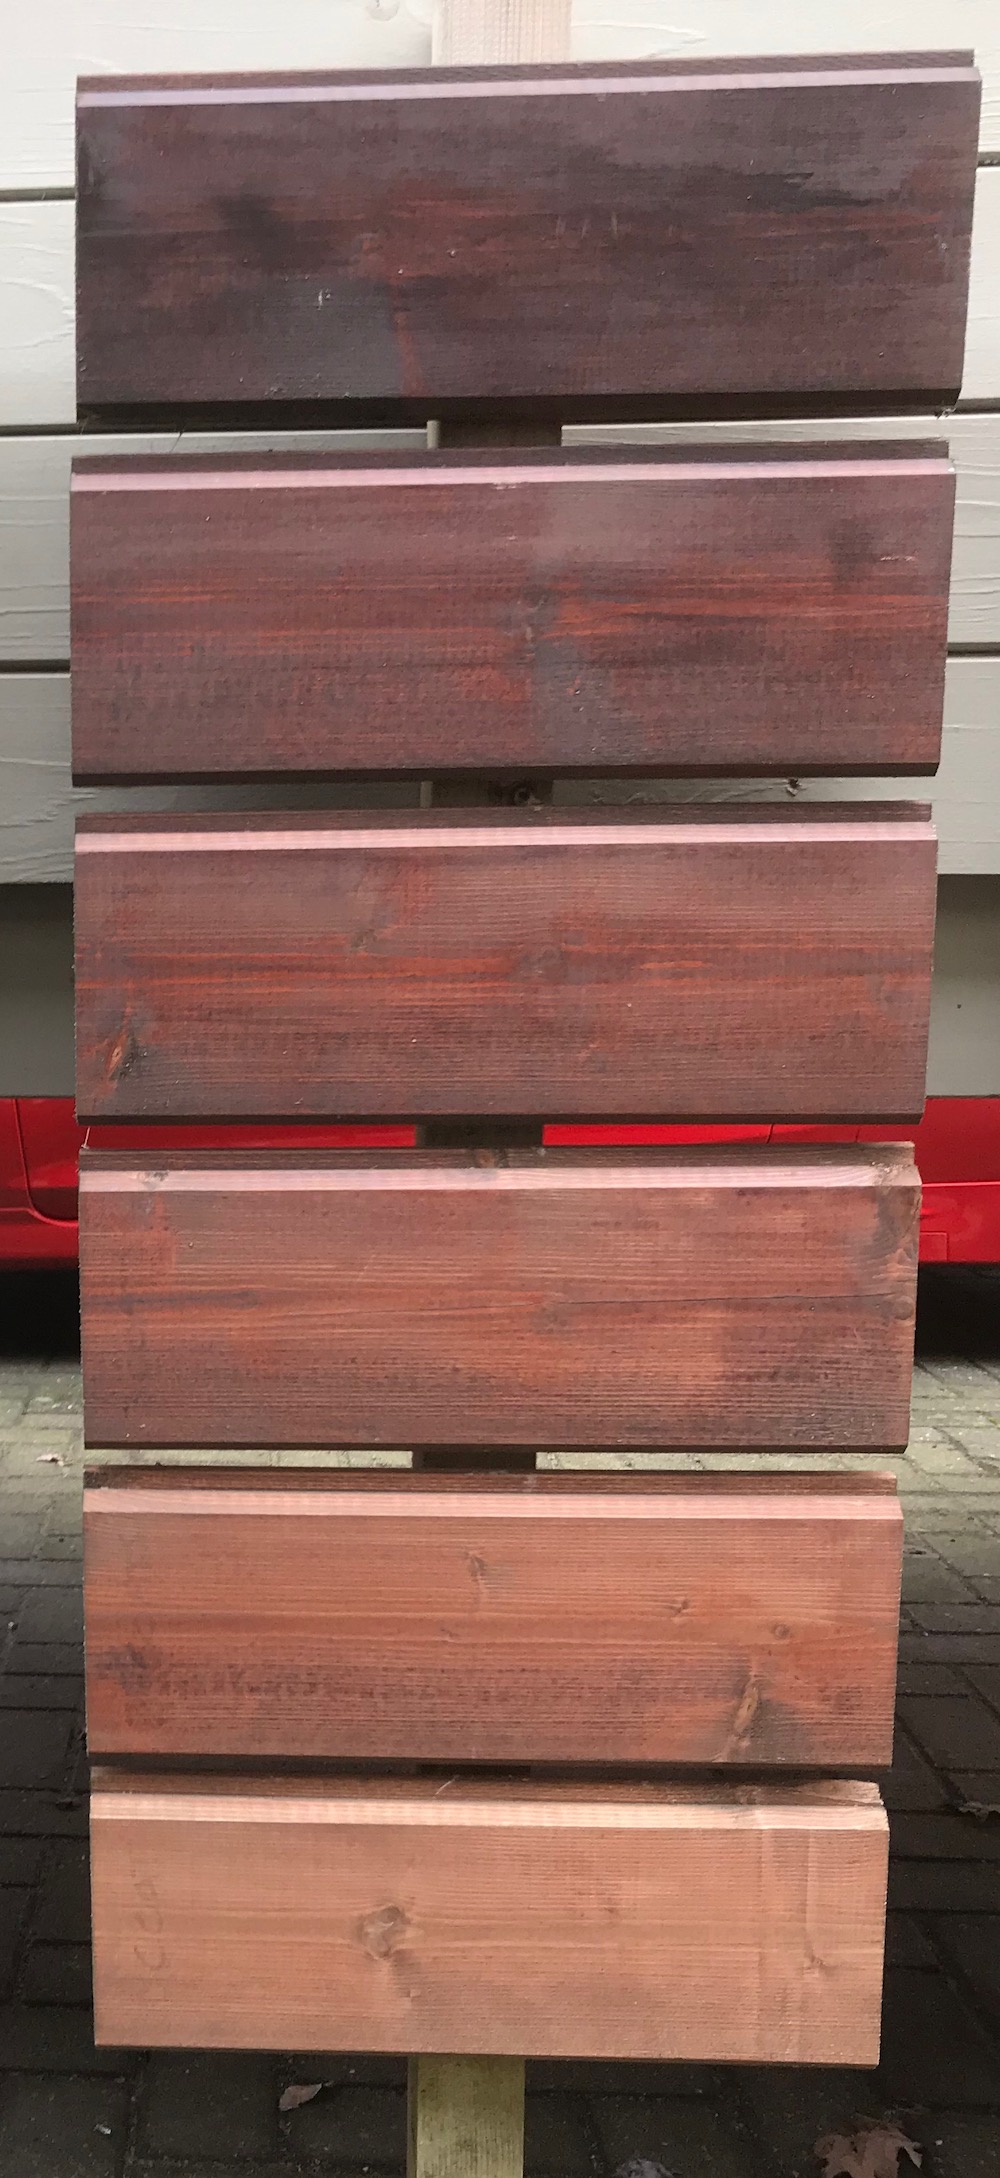
Embalan Timber Paint
Here’s my experimental board using our Embalam Paint Treatment
I was really pleased with the paint, it went on well, I tried a further experiment one that was as standard:
With one costs you can still see the grain coming through, maybe like one of the ‘fib’ pictures above? Three coats is working well (most paint suppliers will recommend three coats and often include an undercoat) Four and five are perfect!
Then I tried mixing, we wanted a darker colour for the highlight on the doors and window of the Shepherd Hut:
Maybe it was due to the colour but this worked really well, yes there is a difference in the coats, maybe four seems to be the best?
Treatment Recommendations and Problems
With my experiment I think I have shown what happens. I’m going to leave the logs out for another year to see how this develops and follow up in 2018.
My advice …. is …. please follow my advice and avoid some horrible problems happening with your log cabin … oh and don’t cheat or fib ….. the Autumn and Winter will decide how well you have treated your Log Cabin.
Also, please watch out for:
- Application of the Treatment – how well has your coverage been applied?
- Amount of the Treatment used – Have you applied the right amount of coats?
- Depth of treatment applied – Basically the number of coats applied. Have you applied the right amount of coats according to recommendation?
- MAKE sure you treat the door and window trims and quadrants / beads- These are often missed as it is close to the glass and hard to do and you maybe applying a thinner coat?- Maybe consider removing the glass for better coating.
- Be careful at the lower levels of the log cabin. These four or five logs get the most weather, treat them accordingly.
- Be really careful when using a clear treatment to thoroughly cover the log.
- Pay extra care to lower logs any ledges / tongues.
- Thoroughly coat the corners and any joins.
UPDATE – Winter 2019
My experiment continues with the treatment boards and it’s still pretty interesting what is happening 3 years on.
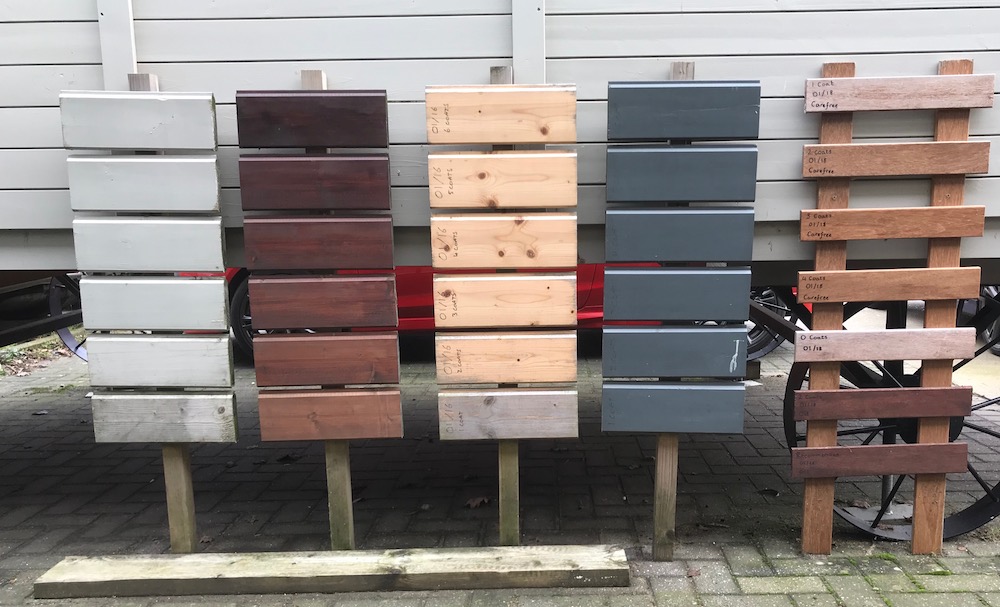
My timber treatment experiment which I started in 2016 as a way to see exactly what can happen.
The embalan paint if still performing well. The board right at the bottom received no treatment at all, it’s interesting to see there is no rot whatsoever. We’re proving well that three coats and above is giving the best protection. I’m also proving that timber, when allowed to dry naturally does not generally rot.
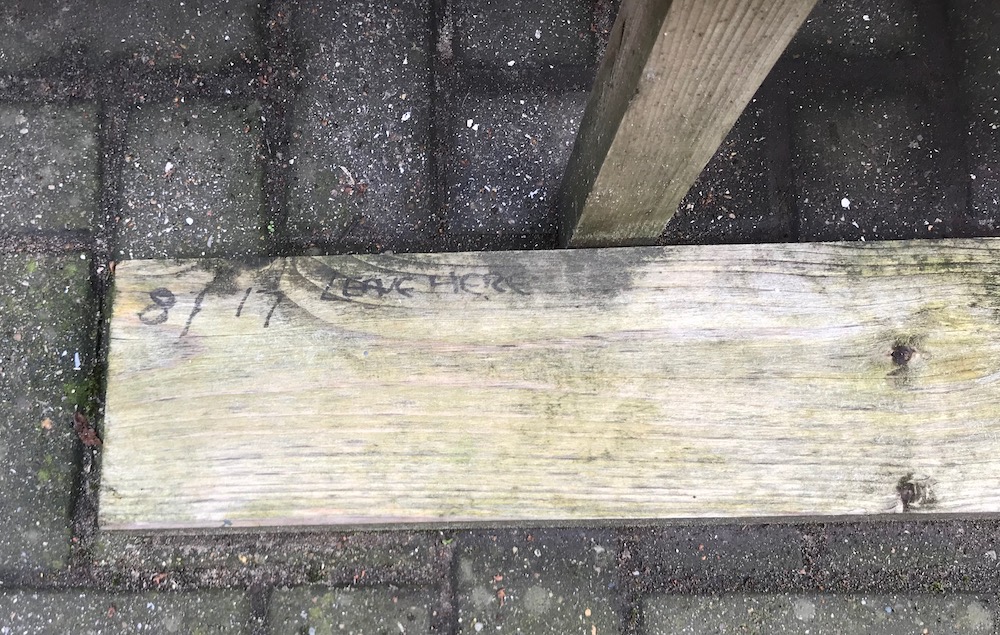
I did also start another experiment in August 2017 just to see what will happen to a log in constant ground contact. I’ll come back to this is August 2019 to see what, if anything, has happened.
The mix of Embalan paint is also doing very well, the three to five coats are still almost perfect.
The Embadecor stain is doing the best and even with one coat it is still looking very good. Again thought, three to four coats is performing the best. However, bear in mind a stain is just that. Ideally it needs a top coat of a sealant such as the clear embadecor or the carefree. This ensures the wood is sealed, especially in the corner and joints.
My favoured treatment is also still doing very well. You can see though that as it is a totally clear treatment it is essential to make sure of coverage. I wish I had painted the ends rather than just the surface. You can see how the weather has pushed in. Again three coats and above is most effective.
Would you recommend Everest Barn Paint? I would be applying with a spray gun.
Hi Tim
Thank you for your message, Im afraid we cannot recommend it. We have never tried and tested it
Sikkens, Sadolins and kingfisher are the ones we can which can be purchased locally
Also of course, our own range of Tuin treatments
Hope this helps, Ben
Can anyone recommend a decent stain that comes in a dark grey? Don’t really want to paint it. Already applying a clear preservative also.
Hi Andy
Thank you for your message, Sikkens, Sadolins and Kingfisher are brands we like and recommend for our log cabins. I know they have a decent range of colours to choose from
Hope this helps, Ben
I have really nasty black staining on bottom 2 boards on summer house, used yacht varnish to seal, any tips how to get rid?
I am still confused about the amount of treatments. There are confusing messages being given unless I am being thick. Basically how many coats of which liquid is advised? Impregnation fluid, Carefree, stain and paint are all being mentioned. I was thinking I had to go for all four after the e-mail I had from Tuin, but then I see comments like 3 coats of paint or 2 of undercoat and two top coat……help!!!
I am sorry I could not reply to your comment today as I was on site and had no time to write a good reply. I did forward it to the main office who hopefully have answered you.
However, you do have a point, I have not been concise in my advice when using our treatments. Within this blog I try, where possible, to remain impartial giving recommendations of other suppliers products that I have used. The main website / brochure pushes quite well the Tuin ranges with lots of information, the team are very experienced and should be able to assist.
From your comment and a few others on this blog, I have tonight written this post solely on the Tuin Log Cabin Treatment range. I hope this helps, please let me know if this needs further clarification.
Thank you, this is a lot clearer to me now. I was going to purchase all of the products including care free, but your clarification now is most helpful. I look forward to building the cabin next weekend.
Ah that’s great, I’m sorry for not being clearer in the first place I hope the post helps and I’m sure others had the same questions so thank you for bringing it up. Good luck with your build next weekend, please see the Log Cabin advice page before you build, this should help you greatly with it. If you run into difficulties please let us know by emailing outofhours@tuin.co.uk.
During normal working hours info@tuin.co.uk gets the quickest response.
Very informative and concise! I have been doing my homework on all aspects of owning a log cabin, I would like to take this opportunity to thank you for sending me your fine brochure. One of the things that worried me with your cabins was the fact that they were not pretreated, but I’m glad that I’ve just seen your artical on different after treatments, the new product looks good, I had rather hoped to have a cornflower blue cabin, but now wonder if that will be possible, or, if your recommended treatment could be ‘done’ first then the cheaper preservative, beginning with ‘C’ could be applied after for the ‘look’ that I’m hoping for? (Going to cost as much as the cabin at this rate) lol… though it no doubt will look better and last longer for the extra time, trouble and money.
We can offer pretreatment if you would like it with our buildings, we offer either a paint or immersion treatment. Certainly you can use your chosen colour on top of a top quality treatment, we’ve found that Brewers is a great place for advice on compatibility with different treatments.
Hi, I want to know if it will be ok to put two coats clear stain or varnish, then paint 2 coats of my favourite colour? Compare with only paint , which one is better protection for cabin and looks good? Many thanks
Ideally you will use two undercoats and two top coats, this does of course depend on the manufacturer of the treatment. Please make sure that whatever treatment you are using as undercoats are compatible with the top coats by referring to the manufacturer’s instructions.
Thanks for another informative and helpful post. This, together with your post “DON’T PANIC…” post. has both set my mind at rest and helped me work out what treatment I need to use.
Great advice. My cabin has been up for a month and is still untreated due to the weather but what can I do? Hopefully I can get 2+ coats on it ASAP.