


I’ve written this to give as many tips as I can to help YOU install your log cabin. This will include more information over time, but hopefully what I have done so far will help you and give you some confidence.
This post is aimed at customers who would like to install a Log cabins on their own but are a little worried or inexperienced. Before we start – Remember: fitting a log cabin is EASY and very rewarding.
It is also for customers who have an installer lined up but want to know how it is done properly. There’s a few hints at the beginning to make sure they are!
Introduction
I really do encourage the fitting yourself. When I was a fitter and sub-contracted to lots of companies I would spend all day maybe two days fitting. When I had finished, after the customer had watched me do it all, they would then tell me he had paid a ton of cash for the fit (some upwards of £1200) and tell me “I could have done that”
Customers will often tell me the instructions with the cabins are not enough. (See some of our reviews) You will often see them say the instructions were terrible but the service and product was great etc. This is after they have installed the cabin though. They must have been OK to actually install it and then say how terrible they were.
OK, maybe they are not great as some things are missed out but with this post and videos most questions should be answered.
Fitting a log cabin is straightforward – mostly, you need to be able to follow a plan and have some general DIY skills. You or your fitter need to understand what you are dealing with. My golden rules are
Golden Rules
- Don’t think about it too much or panic over all the bits and you will! When you unpack it – Don’t panic!
- Don’t think it will ‘just slot together’ other cabins might, ours have tight joints for very good reasons. They also have wind and water-tight connections you may not find elsewhere. These are there to make sure your cabin does not leak in years to come when it is out of any warranty.
- Don’t worry about anything you weren’t expecting.
- Every Time a 100% flat and level base in all planes. This is the start of the build, get the base wrong and there’s a ton of problems. Check your installer has correctly chocked any discrepancies in the base with treated wood and the logs are fully supported. Tips on Bases for Log Cabins
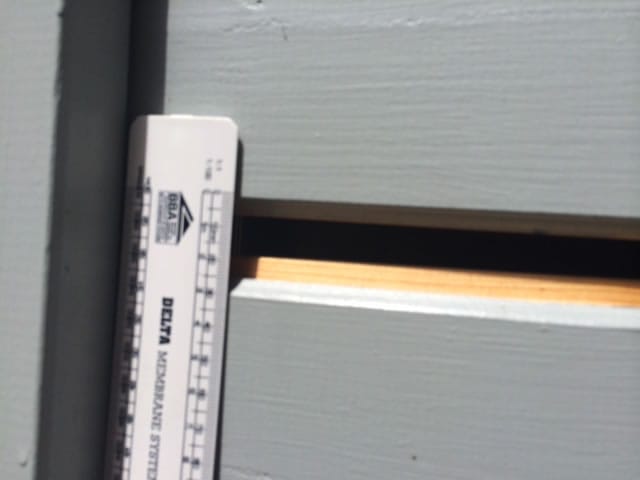
- IMPORTANT – The GOLDEN rule is that a log cabin moves! Understand this. Tell your fitter DO NOT fix anything to the wall logs without allowing for movement. Ensure a fitter is aware of this: do not fix door or window frames to the logs in ANYWAY except the bottom of the frame.
- Understand there are expansion gaps to the top and sides of the windows and doors which are hidden by fascias. These have to be there.
If you are after a quote from an installer no log cabin under 4m x 3m should take more than a day. Over this size is two days.
Our biggest – The Edelweiss log cabin is three – four days. Longer than this and the quote is wrong!
If you are installing yourself please read on and allow an extra day to the times quoted above.
I’ll try to give some hints and tips that will help you. I prefer all our customers to install themselves, it saves the comment at the end of the install and a ton of cash spent of ‘I could have done that’
PART ONE – Easy
We used to offer a fitting service but with VAT and company profits it was getting a bit expensive at £950 a day. Instead we now recommend independent installers who can fit for you and are far cheaper without VAT and company profits on top of wages. Some customers such as the government, councils, military and those customers who like to keep a everything in one place will still use us in some circumstances. We can pass the details of these fitters to you.
OR
Fit yourself and avoid the disappointing comment of ‘I could have done that’ after you have watched them install it.
The average cost of a fit with a self employed team is about £350 – £450 a day. A fit can add substantially to what was an economical purchase. A great number of people when considering purchasing a cabin are often phased by what they presume is a complicated fit and are often put off the idea. So with that said, my first tip:
FITTING A LOG CABIN IS EASY
Yup, I’ve said it again, fitting a log cabin is definitely easy, even I can do it. Of course you will have asked for the fitting instructions and maybe you’ll have been furnished with the plans (follow the ones WITH the cabin though). You’ll have looked at both of them. Most of the time one of the first thoughts that goes through your mind is ‘oh hell’. Perhaps not that but usually it’s an expletive. Keep in mind though my first tip: ‘It’s Easy’.
So lets look at the instructions, all of them are pretty much the same. All log cabins follow the same design process ignoring the doors and windows for a moment though (each supplier has a slightly different take on these).
We produce a generic instruction booklet and this is sent with each log cabin: Generic Log Cabin Fitting Instructions to compliment these I have written a very large online guide this includes lots of information and in depth videos which is being constantly added to.
Have a quick read through them, it’s fairly straight forward but is it still a little daunting?
The instructions generally mean nothing though without the plans. The plans will show you and tell you everything and are the most important document used during the fit. The plans will be INSIDE your log cabin package when delivered.
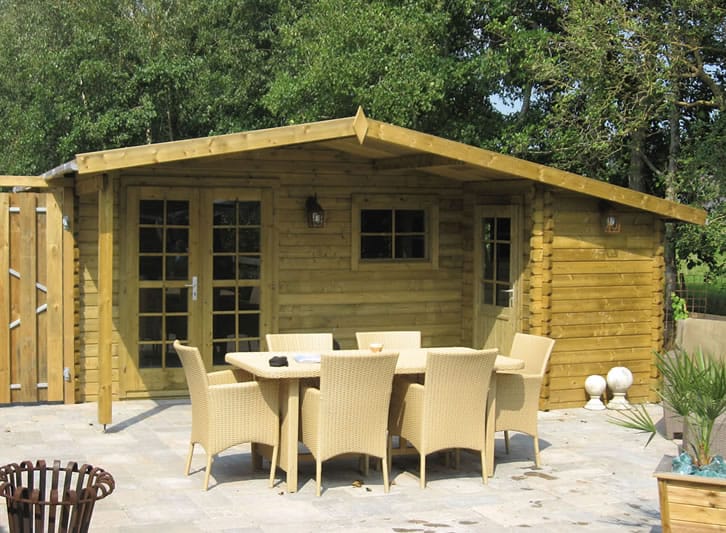
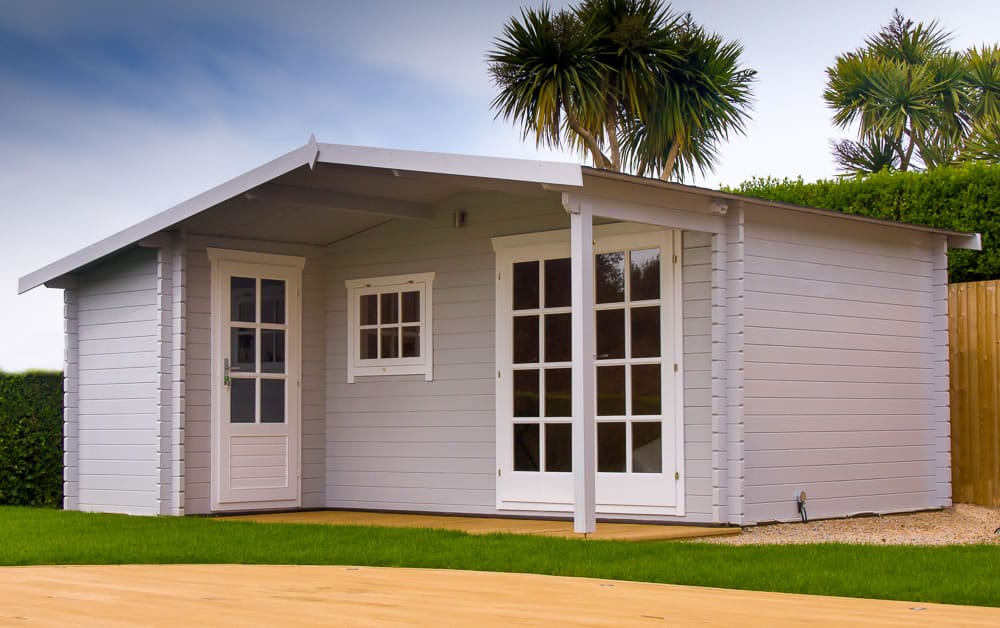
The ones we shall look at during this series of posts will be the Wolfgang Log Cabin.
This is one of our best sellers and could be construed as complicated, it really isn’t, remember; ‘It’s Easy!”. So lets have a look at the plans, use this link: Wolfgang Log Cabin Plans. and have a look at what you can expect.
Fitting a wolfgang log cabin is Easy!
If you are inexperienced or not used to building projects these plans may also appear to be a little daunting. Keep in mind that it is easy and work slowly through them. The first page shows a ‘consist’ These are all the parts that will be found in the pack(s). All log cabins supplied by us or other manufacturers will always have a consist list and this will be referred to often.
Page two and three shows the elevations of the building, Holland call them ‘wands’.
These are scale drawings and show the exact components used. The final page shows the floor plan and clearly shows the elevations (wands).
These plans are hugely important and construction cannot be successful without carefully following them. Usually I put them in a plastic folder to keep them clean and pin them close. I refer to them constantly and so will you during the installation. I ‘count logs’ constantly during a fit. It’s a bugger to put too many in and then have to take logs out so count constantly and refer to the plans.
In summary for this section:
- Fitting a log cabin is EASY!
- Where possible, pin up a copy of the plans close to where you will be installing the cabin. Refer to the plans constantly.
- Carefully look at the plans and identify half starter logs and other featured logs.
- COUNT – Count always against the plans, be careful not to put extra logs in. On site I will do this a lot to make sure I am not going to high before a window or a feature.
PART TWO – Delivery and the Weather
So a quick recap, we spoke about the fact that it’s a simple process and that the plans are massively important. Look at them constantly and count logs as you fit them
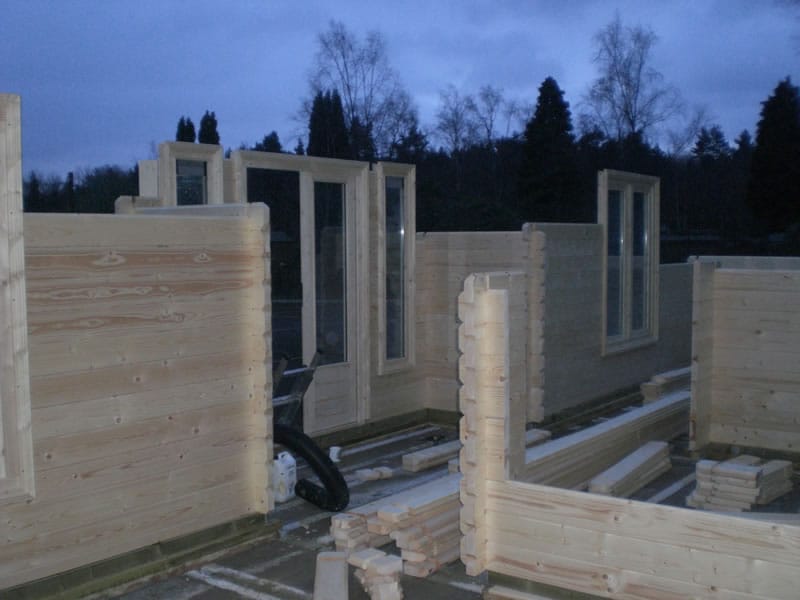
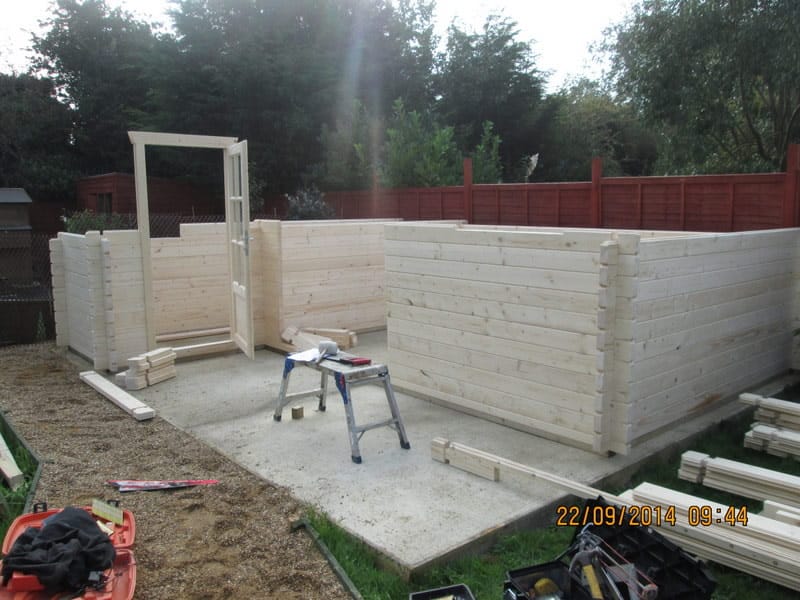
We’re still going to continue looking at the plans for the Wolfgang but the pictures I’ll be showing are for an entirely different building. It’s a bespoke building which I built at a nudist camp …. another story completely!
So lets look at the packages and how they will arrive. The picture below shows how most log cabin packages will look, remember though this project was quite sizeable so we had several packages.
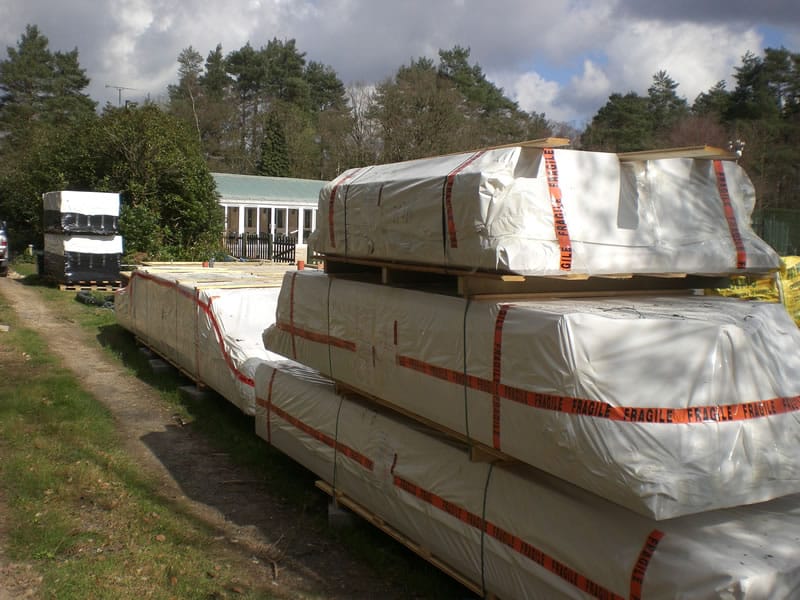
A log cabin generally arrives in packages such as these and are protected from the elements with plastic coverings.
All our cabins are transported via an articulated lorry with a demountable ‘moffit’ forklift similar to this.

All good suppliers of log cabins will use one of these to delivery your building
These are brilliant things. It means we can deliver a large number of cabins (usually 10 – 15) in one ’round robin’ on a huge lorry making delivery very economical for the customer and us. It also means we can be very manoeuvrable with large packages, sometimes which can be up to 6.0m in length. (your package will be the longest wall log). From a fitting point of view make sure your delivery is being made with a demountable forklift otherwise you could find that the delivery man cannot get your packages where you need them. This then means unpacking and moving prior to a fit when you are not necessarily ready to install. It’s always a good idea to check the delivery method with you supplier. We ONLY use moffets but others may ask you to off load yourself which can be a bit of a pain
Back to talking about the packages your log cabin will come in. Depending on the size of the building will depend on the number of packages and the size of them.
A Wolfgang log cabin comes in two packages and one measures 4.80m in length by approximately 1m x 1m. Normally the package is going to be the length of the longest single log. Refer to the plans before hand or ask us so you know what you can expect.
The packages serve the following purposes:
- To protect the cabin from the weather be it sun or rain, they should be sealed in plastic and securely banded to a pallet.
- To protect the cabin during transportation. Packing a log cabin is a recognised art and many packers are head hunted from factory to factory and can command very good wages. To cram that much into a package is a skilled process. Each component is tightly packed to form an extremely robust and rigid block of timber.
- The tighter the package the less likely damage will occur during storage and transportation.
So, my tips for part two of series, remembering the above:
1. Don’t assume parts are in order! Many people expect the cabin to be packed in order, in fact some slightly dodgy companies will tell you they are: They never are as they are packed for economy of transportation and not installation. So with that in mind, be aware that you will more than likely have to unpack all the components prior to installation. Depending on the size of the finished building a lot of room can be needed when unpacking. If you can, try to stack the logs in the various sizes and on top of each other not side by side.
2. Warping! One of the reasons cabins come packed the way they are is to prevent warping of the logs. As soon as you start unpacking you need to be very aware of this. As the components are removed you must make sure they are kept straight and level.
I always make sure I have spare timber. Often I use the ‘packing’ pieces to lay them on and so the surface they are on is as flat as possible. This is very important especially if the fit is going to take a few days. When sitting in strong sun the logs can warp which will make it a little harder when installing.
However, don’t let the rain, snow or sun or even a huge storm put you off installing, I’ve unpacked and done an install in all weathers and even the most warped log is not a problem and can alway be moved into position, such is the beauty of wood.
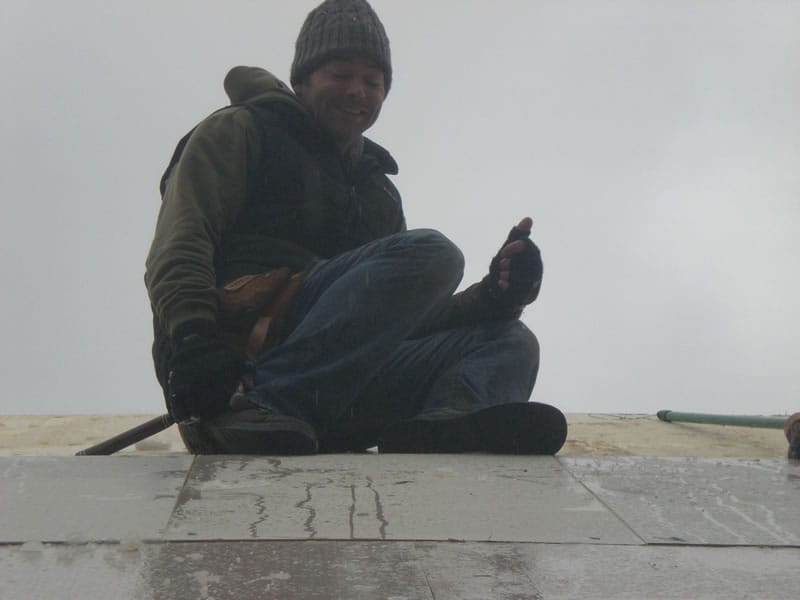
The joy of a log cabin install in the wet. I remember this morning well, we had to remove a layer of snow off the roof and then it rained all day while installing the insulation and roof shingles. Don’t let the weather stop you from installing, I’ve done them in storms, hail, snow …. it’s all fun! Just look at the joy on my colleagues face …. you too could have this much fun!
So, in summary for today’s tips:
Don’t assume the parts will be in order, be aware that a lot of room maybe needed.
Be careful and aware of how you store your wall logs. Keep them straight and don’t worry about the weather conditions. Except the very hot sun, try to cover the logs to protect them from the direct heat.
You can install in any weather. You do not need to wait for a ‘Window’ no amount of rain or wet will affect the build, all it affects is you!
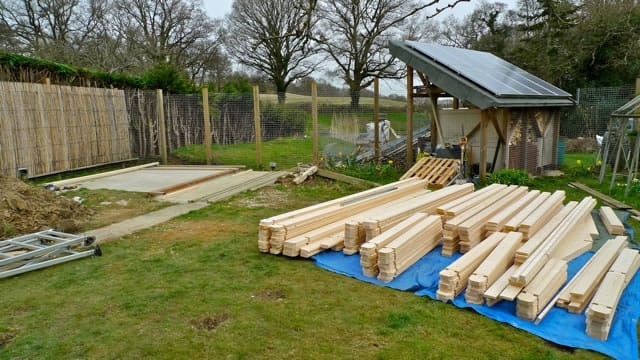
A good way to store and sort your logs with one on top of each other to avoid warps, bows or twists and laid out nicely so you can see all the sizes necessary for the build.
For the famous Nudist camp log cabin we were very tight for storage and we had to position them on the base roughly where they were going to go.
Storing the logs as best we could but always flat on top of each other.
Here’s another one, logs on TOP of each other to help stop warps, bows and twists.
Log stored flat and on top of each other to help stop the formation of bows, warps and twists.
PART THREE – How Long does it take to fit
This is an extract from another blog post. It’s extremely relevant at this point and is still focused on the Wolfgang install:
I was sent some interesting pictures from a kind customer and it reminded me of all the times I’m asked. ‘How long does it take to fit a log cabin?’
This is a bit of a tough question really and I think it all comes down to trust. Whether you trust Yourself, the Plans, the Product or the Company you are buying from. Also the advice and help you receive from them.
No trust at all
- Yourself – If you are worried about yourself, your ability to read the plans and the confidence you can identify a log it will take longer.
- Plans – If you second guess the plans or question what they are showing you too much it will take longer
- The Company – If you don’t entirely trust the company or you are looking for faults in the product it is going to take longer as you will be worrying, you’ll be going over every small detail, counting every possible part over and over again, worrying you have one roof board too few or wondering what this piece of wood is, or where is that piece and where it’s going to go. This is going to take you a lot longer to build your cabin.
- If you don’t trust the advice you’ve been given it’s going to take longer. You wouldn’t believe how many times I’ve had to argue with a customer. (normally a builder or a carpenter). There are expansion gaps for a reason and that you don’t fix the doors or window frames to the logs.
Without trust in all of the above or at least a few of them your build will take longer.
Trust
If you are going to buy from us or others I’d like you to have some trust at least in some of the above.
- Yourself – Identify the parts as you unpack and make a mental note of them. Trust that you can read the plans. I’ll had some advice at the bottom of this post with some quick identification hints.
- Plans – Follow the plans that came WITH the building. Try not to second guess them or disbelieve them, follow them exactly.
- Trust the advice given to you. I don’t know much about other companies support these days but we try to give you as much information as possible. Personally I spend a lot of time writing and updating these blogs with help and advice. This advice is also transferable to any ‘Good Make’ of log cabin. Some of it won’t work with rubbish – watch out for cabins when you have to screw the logs together or a roof you can’t actually work on as the purlins are so small. Worse still if you don’t have wind and watertight connections then ignore all of my advice as you have bought rubbish and I can’t help you.
How long Does it Take to Fit a Log Cabin?
The pictures Mr C sent to me are further down the page, what I loved is that they are date and time stamped which shows quite clearly how long the build took.
The building is a Wolfgang Log Cabin, we’ve been talking about a pretty daunting structure for most customers with two rooms and an odd shape. Before you look at the pictures from Mr C, honestly ask yourself how long you think this build would take you.
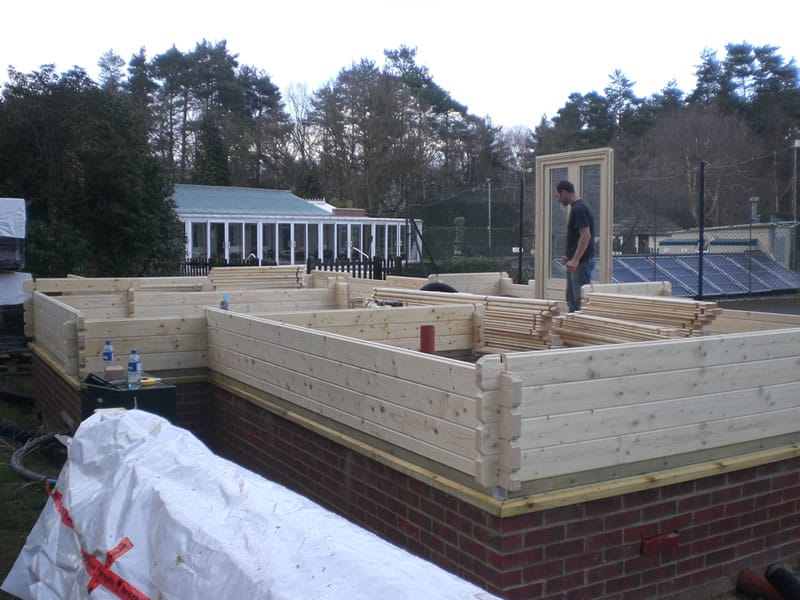
The Wolfgang log cabin which is 5.3 x 4.5 with an attached shed and porch. How long do you think this takes to install?
How long did you think? I bet some of you will be thinking four or five days, maybe more? Here’s Mr C’s pictures and notice the time stamps on them.
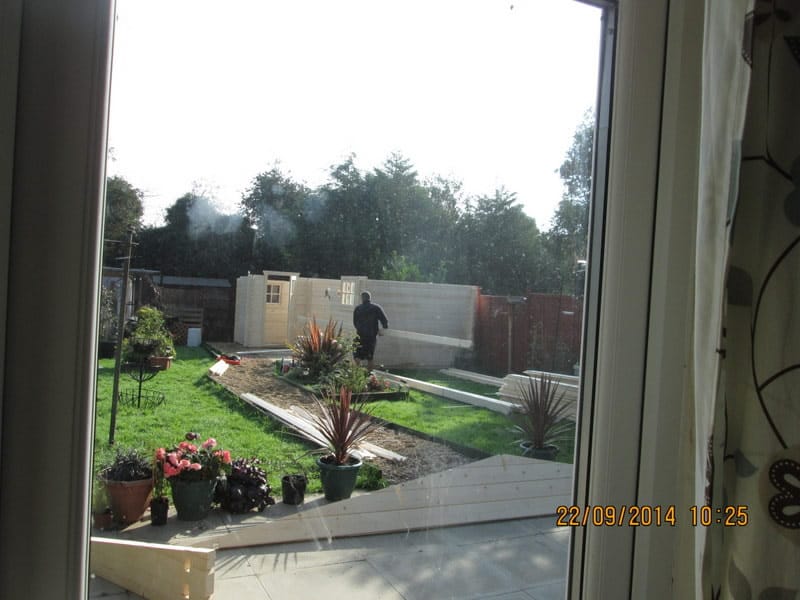
Now at 10:25 and the doors and windows are in and they are almost at the eaves height.
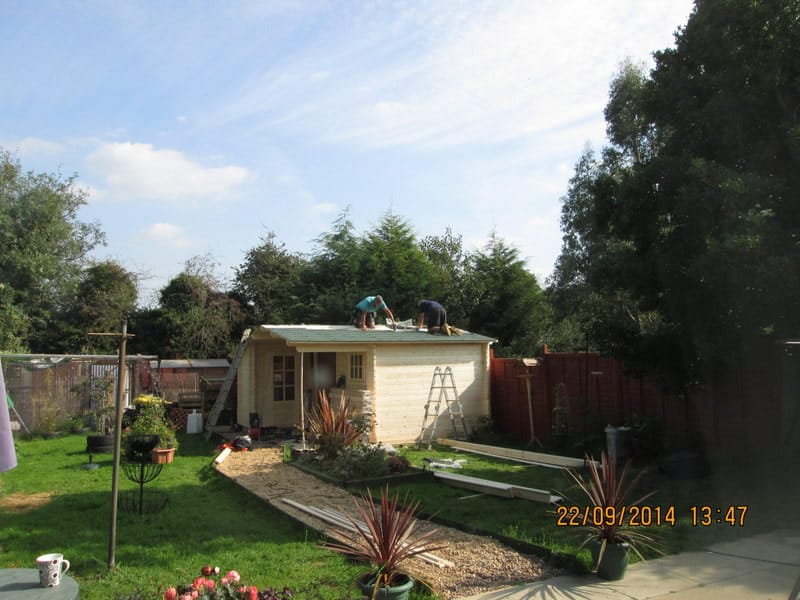
13:47 which is about six hours into the fit and the roof shingles are almost done.
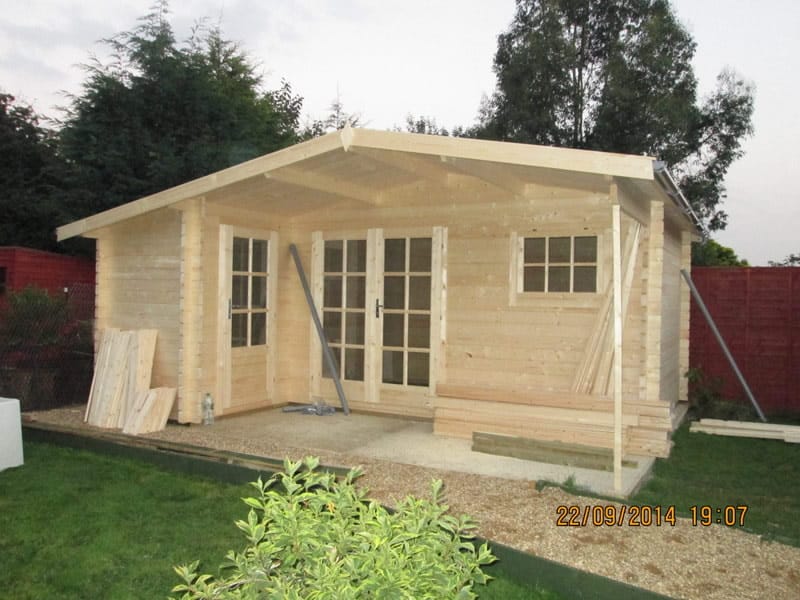
19:07 and the fitters have left site, tidied up and even had time to fit the guttering during the install.
So there you have it, fitted in a day, and this building is probably one of our most complicated ones. These are the plans they will have been following: Log Cabin Plans and are the same as the ones referenced at the beginning of the post.
But of course, these guys you will say ‘know what they are doing’, there are no real tricks honest.
It’s not a matter of ‘they know all the parts’ All they are doing is trusting themselves, the plans and the product. The only edge they will have on someone doing it for the first time is they can identify parts in the plans and sort them as they are unpacking, i’ll come on to that a bit later.
Of course I’ll give a little leeway for inexperience and I would say this cabin should take you, being inexperienced, two – two and a half days. My rule of thumb is a 4 x 3m and less is generally one day, bigger is one and a half to two and a monster like the Edelweiss is three to four.
This though is only if you have trust and the package is within 100m of the base.
It took forever – Richard you’re WRONG!
If you are considering buying and installing one of our log cabins, no doubt you will have a scan through some of our reviews. Have a look at the reviews for Asmund Corner Log Cabin, this is one of our best sellers.
You’ll see lots of varying time scales in the various reviews from 1 day all the way to 5 days
- My wife & I constructed the cabin with virtually no assistance in 5 days which went well
- The cabin itself took my brother and myself only a few days to completely assemble and finish
- 11 hours to fully erect the cabin
- 5 working days to construct, single-handed
- Quick construction – 3 days in total, four once I have finished the shingling.
- It has taken three adults two days to complete the build.
- I paid a local landscaping contractor to build mine, and it took 2 men with carpentry skills 2.5 days to assemble it
- very easy to assemble
- instructions for assembly are easy to follow to construct.
- As occasional DIY’rs I couldn’t believe how quickly we built it
- The cabin was quite straightforward to put together, taking about 4 days to build in total (Two people)
- My husband and Son, put it up in no time at all, with no problems
- It took 1.5 days to erect with 2 men.
So yes, you could well shout at me after you have found it took longer. Howeverm, I still stand by my assessment that it comes down to trust in yourself, the Product, Plans, Company and Advice.
It’s interesting that some customers get it banged up really quickly, yet the review left by a poor lady who hired a ‘landscaper with carpentry skills’ to build hers took 2.5 days and had a lot of problems, I remember well talking those ‘Fitters’ through it.
If you are employing fitters such as carpenters, joiners or builders gently point them to all our advice. A log cabin could be totally new to them even if they don’t admit it to you. Don’t rely on their trade giving them the information on the correct way to install a cabin.
As a quick example this was an installation by ‘Professional Carpenter and joiner of 20 years experience’
Very large gaps in the wall logs were appearing and the customer was in discussion with me after this happened six months later. She assured me it was installed by a carpenter of 20 years experience (I shudder when I hear this statement) and she used him for loads of work and that his work was excellent so therefore, the building was defective.
Gaps were showing in her building
I explained to the customer exactly what was wrong with this log cabin several times but she would not take my advice and kept referring to how experienced the carpenter was that had installed it.
See there’s the Trust issue again!
The customer was very uncooperative and after discussions I agreed to visit her. If it was our fault, I agreed we would supply a complete new building and also cover all the costs for installation and painting. But, if it was not our fault she would pay for the inspection and rectification.
Our customer trusted her experienced carpenter and refused to trust me.
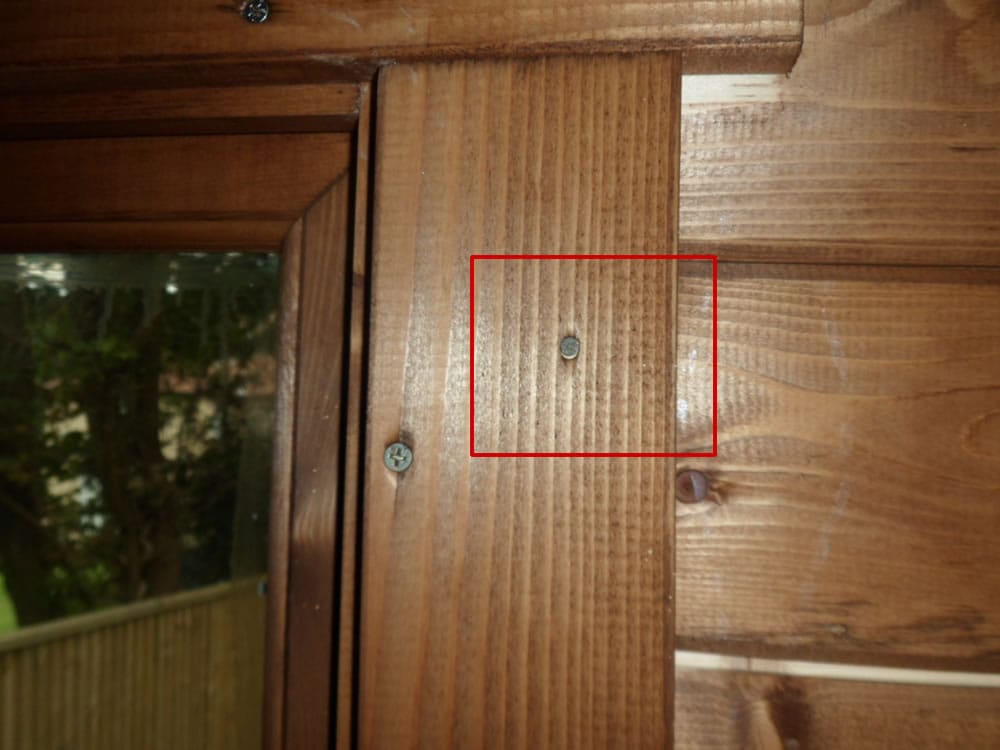
Nails in the fascia going through to the logs.
I found several nails going through the window and door fascias which went into the logs. Doing this will stop your building from moving and you will either have gaps or splits.
After I removed all of these the whole thing settled back down again to where it should be. All gaps closed straightaway. Remind any fitter, no matter what trade. WOOD MOVES and doors and windows have to be independent to the wall logs. I guarantee you a tradesperson will always overlook this if they have not installed a cabin before.
The lady was a bit miffed having to pay me for the visit, embarrassing the ‘Experienced Carpenter’ there.
If you’re employing a trade, gently remind them to have a look at the various pieces of advice there is and they will fit quicker, be cheaper and you and I won’t be having a discussion in a few months time.
So what’s the secret?
The secret to install your log cabin quickly is all in the identification of parts in the plans and not worrying about what you do not understand. I always tell people I talk to: ‘Take it one stage at a time’.
All will become clear as it goes up and do not focus on bits you do not understand until you reach that point. The biggest mistake with an installation is over thinking it. Fitting a log cabin is Easy!
We start our day fitting and note the package number we find on the packaging, just in case we have problems later and need to ask for parts, claims etc, if you buy from us we will always ask for this number so you may as well note it down just in case.
- Take the tanalised lengths of timber off the package or the profiled foundation beams, put them straight onto your base and do not worry about them.
- You will find a big bag of nails and roofing tacks, put these to one side. Yes we send lots, don’t worry about them.
- Do not open the floor packs if you have these. These will be on top of the main package. Put them away somewhere, you don’t need these until you’ve finished building the cabin
- Take the plastic off carefully and try to keep it in one piece, it might be handy to use this if it chucks down later or to cover the purlins / rafters / apexes to protect them from the sun.
- The pack is not going to be in fitting order so don’t expect it to be.
- Start unpacking and look at the various log sizes as you go, put each log size in it’s own area. Do not think about anything at this point, just unpack it and lay out the logs of the same size on top of each other. Make extra stacks next to them if needed you can go about ten logs high before the stack gets a bit unstable. Try to keep them supported, it helps if you have some timber to lay and support them on.
- Anything you can’t identify – Don’t start looking at the plans for it and don’t worry about it, put it to one side and remember where you put it and roughly what it looked like.
- Rafter and purlins are easy to spot. Put them to one side and away from the build. Keep them straight, supported and covered from a hot sun to stop any warps.
- When you come across a log cut horizontally in half, put it straight onto the base, this is a starter log and the beginning of the build. It may also be a top log but worry about it later.
- Roof boards will all be together, put these to one side and do not worry about them.
- As you unpack you will come to the plans and generic instructions. Put these to one side, don’t even look at them. You can also see far more detailed generic instructions and videos online that I have written to compliment those received with the log cabin if you fancy reading them: Installation Manual
- Keep unpacking and for most buildings you will come to doors and windows, put these somewhere safe.
You should now have an area full of logs, bits and bobs. Don’t worry about any of it, and don’t panic at the site of it – ‘one section at a time’ and this is what all professional fitters will do.
Quick Identification of parts
So here’s a few heads up, look for these as you unpack the cabin and Do NOT worry about any of them, recognise them and put them to one side depending on your cabin.

Starter logs, these are logs cut horizontally in half

Normal logs, nothing is different with these, they are all the same even when attached to a half starter log. If you have posts for canopies these may be longer than required. You can cut these down to fit as required.
You may find odd cut logs, put these to one side until you need then and do not worry about them. When you come to that section in the plans then look at them. Do not over think a build – it’s Easy!
Some times with the corner log cabin look for a log with the tongues cut off. Put it to one side and worry about it when you need it.
Summary of Part Three
- Do not panic at all the bits
- Try to identify the parts as you are unpacking them and don’t worry about anything you cannot immediately identify.
- Place the most common parts together. Don’t worry about the odd things you do not understand until you are at that point.
- As you are installing only worry about the section you are at. As you build you will understand other parts that come into it as you reach that level.
- The more wood you use, the less piles you will have. Other odd parts will become apparent as you build.
More tips coming soon.
This post is a work in progress. Please see the videos at the bottom of the page which will give you lots of hints and tips.
If you have any questions at all regarding installation please always ask. Even out of hours as several of us often check emails for helps requests on our days / time off.
If you need help out of hours send an email to info@tuin.co.uk and entitle it Fitting Help. Myself or other experienced fitters will then get back to you. It helps if you send us a picture(s) of what you are seeing and a brief description of the problem.
Please make sure you also read the very detailed instruction manual that compliments, replaces and enhances the manual that comes with the cabin:
Detailed Log Cabin Fitting Video
Watching this video will help a lot. I have heavily annotated this with lots of advice but you will need a PC to see them.
This is an apex cabin and yes I know it’s quite long but I wanted to make every step clear. Most of this will also apply with pyramid log cabins.
It’s interesting when I look at the stats people view up to 9.46 minutes. I know it’s boring but try to watch a little longer. You can then see see how we support the purlins so they are straight. Observe the fitting of the final parts, including the roof trims.
Sorry it’s so long but it had to be to get everything in!
Corner Log Cabin install – Quick Overview.
This is just a quick overview of a corner cabin install. A more detailed one will follow as we make them but this gives you a good idea that it isn’t too hard. Perfectly aligning the roof can be tricky, with patience you will succeed.
I’m considering a log cabin, and assembling it myself.
I have a concrete base prepared, but I’m wondering how the foundation beams are secured/fixed to the base to keep the structure from shifting
(apologies if I’ve missed someting obvious)
I’ve not seen any guidance regarding this
Thanks for any advice
Hi Bill
Happy to help, Typically there really isn’t much need to fix the foundation beams down to your concrete slab, as the shear weight of the buildings is substantial enough to keep it well and truly in place
However, with that said theres no harm in fixing those foundations down before you get started. You can use fischer expanding bolts to do this,
hope this Helps, Ben
Hi, we have one of your cabins being delivered in a couple of weeks. With regards to squaring up the base, I see in the video thaty the guys are using a buildrs square – are there any other (easy) ways of doing this or should I just suck it up and buy a square? Thanks
On the help page; log Cabin installation it shows the 3,4,5 method where you can make your own.
I’m putting together the Dunmore Clock house cabin, in the kit there are 6 long threaded studding lengths supplied with Nuts and washers, i believe they go through all the corner logs top to bottom as there are holes through each log provided, i was told to fit these and screw the nuts on hand tight, will this cause a problem when the cabin expands in the summer, i thought the advice was to not fix the logs together to allow for expansion and contraction. I’m about to fit the roof tongue and groove boards which will cover these holes so thought I’d ask for advise before i go to far.
Thanks.
In the case of the big 70mm there are rods provided, these should be made hand tight and checked every few months that they are no too tight. The cabin will contract going into the summer months.
Hello, can you tell me the rules about how much gap should be left between the garden fence and the cabin wall?
Deborah
There are no real ‘rules’ on where to place the cabin as far as the cabin goes. You will though need to consider on going treatment of the timber and any other maintenance required. You will also need to be able to build it and depending on the building access maybe required for a ladder or even scaffolding. There may also be ‘rules’ as regards planning and it is best to check this with the planning office.
I want to insulate the walls of a log cabin and cover with plywood. Is this not possible as it would mean screwing latts to the logs.
It is possible to insulate the walls of a log cabin if you require this. Please see this article for advice on this: Dealing with expansion and contraction in a log cabin.
Hi,
On your manual, first log of two side walls are full log, front and back are half logs, for half logs fixing to base beams, it will be no problem, but for the full logs fixing to the beams, how will you do it as the full logs over 10cm wide?
I watched your videos, they are all half logs on first logs, so I couldn’t figure out how to fix the full log as first logs.
Please advise .
We normally only fix the half logs as this helps to keep the building square as we install it. I personally will also use a fixing either side of a door as I think it provides a little more strength and support. If you do also want to fix the full height logs you can do this as you require. In the past I have screwed from the inside at an angle and so the screw head will be hidden behind the eventual skirting board that will be fitted. all buildings will start with half logs opposite each other and full logs opposite each other. For more advice on installation please see this page: Log Cabin Installation Advice
I haven’t even chosen the log cabin i am going to buy, yet your article has already filled me with an even dose of confidence and excitement. Lets hope it really is this Easy! 🙂