


We use IKO as our supplier for felt shingles. We find them to be the best on the market, they’re also the easiest to use. All our Log Cabins and Gazebos are offered with them as an option. Here we have some helpful guidance and tips on fitting felt shingles.
We’re the only supplier that offers such a range of colours and styles. A possible combination of 6 colours and three styles:
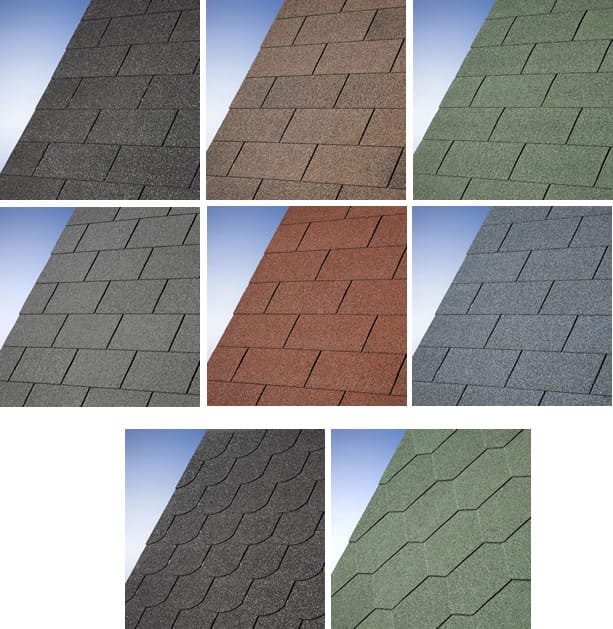
Felt IKO shingles supplied with our log cabins and garden buildings
- Felt IKO shingles supplied with our log cabins and garden buildings
The instructions on fitting felt shingles are on the packaging received but can be a little confusing if the installer has not done this style of roofing before and I do seem to spend a lot of my weekends on emergency calls to customers who need a little advice and are getting in a muddle with them.
Check out our full range of IKO Felt Roofing Shingles.
So, lets throw away the instructions and I’ll explain how I fit them to log cabins.
First thing to know, is don’t leave them in direct sunlight, they have a bitumen strip that runs along the back of the tile. This is designed to melt with the sun and stick the roof together, the last thing you want is to have them stick together in the pack.
The tiles come in strips which contain three or four tiles in line depending on the type. The strips are in 1.0m lengths.
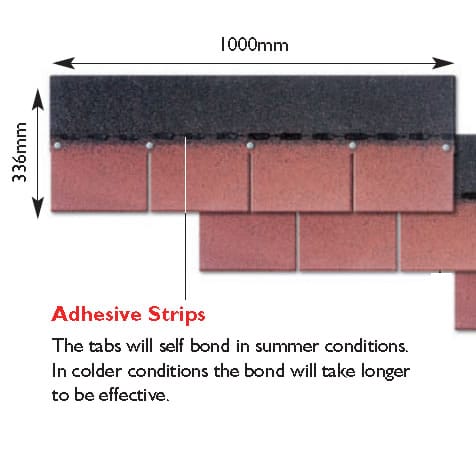
- Felt shingle strip
First we need to apply them to the leading edge of the roof and this is where I differ from the instructions but I think it gives a better finish.
Overhang
Consider whether you will be having guttering or not. If you are then you will need to work out the overhang needed to reach the centre of the gutter. If you are not fitting guttering then we need to set the overhang. I tend to use a piece of roof board (18mm) and use that as a template for my overhang.
Starter Tiles
The first tile, put on the roof and turn it upside down so the tiles are facing up. Then turn it upside down. In my opinion it looks nicer. Then I carry on and butt each tile together for the full roof length. I tend to only work from one side of the roof starting with a full tile. When I get to the other end I then cut the tile flush with the roof board. Make sure it is exactly flush as if not you will not get the bargeboard on. In the case of hipped roofs also make sure this is flush at the corner points, it will save you problems later on.
Now we have the first layer on start again from the side you started at. I always start from the left. Take your tile strip, this time the right way up with the tiles pointing downwards. Place it directly on top of the ‘starter’ one. I then move it half a tile to the left which then covers the joins on the tiles butted together underneath. I differ again with the instructions and only use three nails. One in either end just above the bitumen strip and one offset in the centre of the tile. If you follow my ‘three nail’ recommendation please do make sure you offset the centre one otherwise you will see nail heads. When you’re finished, there should be no nails visible.
Some fitters, for quickness, like to use staple guns. I’m told this method also works well.
I now carry on my first layer, once again butting them up together and, making sure I trim flush with the boards.
Trimming
The normal method for trimming the tiles is with a stanley knife or similar. However, you’ll go through loads of blades and get cramp in your hands. Where I want to trim I carefully fold the tile over and then hit the crease with my hand or hammer, I call it my ‘folding over and bashing’ technique. As a result, the tile is broken where the trim is needed. It’s not a neat finish but the trim line is never seen and it does save your hands!
Subsequent Layers
Starting from my preferred left hand side I’m now back to a full tile flush with the edge of the roof. I then position the tile to the top of the split line of the tiles beneath. It’s normally about 145mm. I then cut a block of wood from leftover boards at that measurement and use that as a template so each and every tile I lay is to that measurement. This makes sure they are all level.
I then carry on up the roof laying each layer of tiles. I do stop periodically, especially on very large roofs to check I’m still working in line, there’s nothing worse than seeing ‘wiggles’ in the tile lines.
Ridges
Once I’ve reached the ridge I will fold over the tiles as appears to be the neatest to me. I may trim as necessary.
Next we now need to finish the ridge or in the case of the hipped roof the corners. To do this we cut the tile strips into individual tiles. Again I use my ‘folding over and bashing’ technique to do this as it saves my hands from cramp, feel free to use a sharp blade though if you want to be really neat.
To make it easy to fold over the ridge I find the small ‘nick’ in the side of the tile and cut upwards at an angle or use the ‘fold and bash’ technique.
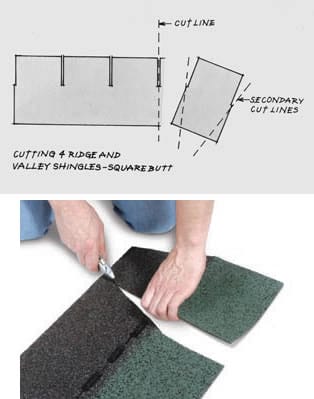
- Cutting the tiles for the ridge.
Wind
I now lick my finger and stick it in the air. I’m looking for where the wind comes from the most as I don’t really want my ridge tiles to be overlapped with the wind coming directly at them and under the flap. Once established I will start from my chosen end. Then we finish by driving in nails either side of the tile at the bitumen strip. Once again I’m overlapping them by about 145mm or using my template block.
If I feel the log cabin is particularly exposed or it is during winter when I am installing I’ll use a drop of mastic or the proper felt tile glue in each of the corners of the overlapping tiles.
Final
If you’re doing a hipped roof such as one of gazebos, and you haven’t got a roof finial for it, you will have to be a little careful how you finish. With a pyramid roof such as our Corner Log Cabins the tiles on each of the corner tend to form a rose type fan at the top, they naturally want to interlock into each other, be careful at this point to finish it nicely.
I hope this has helped to explain a little how to do the tiles or at least how I do them. I also hope it might reduce my Sunday morning emergency customer help calls!
But I’m always here for customers who have bought directly from us. So contact me any time. Day or night and I’ll help you through your install. Please though, consider my lay in Sunday morning. After 1000 is fine for an emergency call 🙂
Hi Richard,
Having completed one elevation of my Riina cabin roof, I thought, “There has to be a better way of cutting shingles!” Well, there is. I found this blade for a standard multi tool on Amazon.
https://www.amazon.co.uk/gp/product/B00RLORH68/ref=ppx_yo_dt_b_asin_title_o02_s00?ie=UTF8&psc=1
I bought three, figuring that the shingles would be pretty hard on it, but having completed the other three elevations of the roof and cut and trimmed all the individual shingles for the hipped corners, I’m still on the first blade. If you have a lot to do, I’d say it’s even worth buying a cheap multi tool for this alone!
Hi – I’m looking at a clockhouse…maybe Trev, but wanted to know about fitting shingles for the clockhouse part, and whether that is a just a ‘plant-on’ to an already shingled roof, or if it’s installed and then, the shingles fitted and overlapped to form a valley either side? What I’d really like to do is to adapt it so that it’s structurally part of the roof and can have a window installed in it for extra sunlight from above. I’m happy with how I would do that, but not sure how you’d fit shingles to make the joining edges waterproof. Any ideas Richard….or anyone? Thanks
When I’ve fitted a dormer to a cabin I will do the same as the ridge, using single tiles but obviously curved the opposite way. This gives a nice finish and I think looks really nice. Other fitters though may just use a length of felt to seal both edges.
Hi Richard, I am just completing my Clockhouse. I’ve insulated the roof with 50mm celotex and now need to fit the barge boards. On the roof sides, the celotex and rough cut edge of the shingles, along with the edge roof board are exposed – the barge board (in an L shape) fits over this exposed edge. Should I simply nail the barge board on or would you recommend additional protection, eg. a bead of shingle glue or silicon to form a better seal? I’m concerned water may get under the barge board.
Thanks,
Phil
You shouldn’t need to use any sealant but I would make sure they have been given a good treatment underneath, this is often overlooked. Also I tend to use screws rather than nails as if you need to take them off it’s a lot easier to remove.
are shingles suitable for philip cabin roof or do i need to add felt underlay
Shingles are fine for that cabin, underlay is belt and braces though and is recommended if you are in an exposed position where shingles have the chance of blowing off. The underfelt will then still offer protection should this happen. Generally correct installation and the use of bitumen glue will stop that ever happening though.
We have ordered celotex to insulate our clock house roof. Can we shingle directly on the celotex or do we need to cover the celotex with ply (or similar) first ? Thank you
Please see this article for more details on insulating the roof: https://www.tuin.co.uk/blog/insulating-a-log-cabin-floor-and-roof/ If the insulaton board you are using is less than 50mm in thickness it is not really necessary to use a ply face.
Hi Richard
About to order a Karen.
I’m fitting 50mm insulation.
You say use 65mm nails to fit the shingles. But that’s a lot of nails and work, isn’t it? Can I use adhesive instead? Or adhesive plus reduced nails?
Unfortunately there is no getting around the work, for a fit that will never give you problems you will need to use that amount of nails and ideal shingle glue as well. We’ve tried several ways in the past, including a staple gun but none work as well as clout nails and a dab of shingle glue
I’m glad this has come up because we also used 50mm insulation but we found that 65mm clout nails were not long enough to go through securely where the shingles overlapped. Especially over the apex where there was sometimes a third shingle going over it in some places. We used 70mm clout nails and 75mm on the apex.
Isn’t that nice, the EBay seller of nails has listed how many nails per kilo for every size and weight. Must have counted them himself, what a star.
So 2kg is 676 nails.
Richard, how many shingles am I getting?
I visited my new bungalow just now, and we move in on the 15th, so time to get Karen ordered.
The Karen should have 8 packs, each pack has about 20 – 25 sheets of three or four tab shingles, this does change depending on what shingle style you order. When you place your order check with the guys in the office for an exact number but remember to have some spare as well.
Thanks, Richards, if I allow three nails per shingle, that’s 8x25x3, so 600 required. As 2kg contains 676 nails, that is perfect! Do you want me to let you know how many I use?
Yes please, let us know how many you used. If you have time add the fourth nail as shown and don’t forget the ridge tiles will need nailing. Consider bitumen glue as well.
Yesterday I finished my tiling on my new Karen! Green square ones, they look good and straight.
I promised to let you know the nail count – it was nearly 2kg of 65mm nails, and 1.25kg of 75mm nails.
The tiles were nailed through 50mm Celuform as you recommended. I used two 65mm per tile plus one 75mm in the middle at an angle to prevent it going right through. 70mm would be ideal, as someone said recently.
It looks great: photos, video and review to follow when fascias etc fitted. I used adhesive around perimeter, especially on the small cut tiles.
Tiling took me about 12 hours over two days, on my own. Yesterday morning I went to Screwfix and bought a carpenter’s belt to hold the nails / knife / tape / hammer – recommended. The insulation was easy to cut and fit. The low pitch roof was safe to work on. I used a 145mm wood gauge to keep rows level, as you recommend above. I am able to use the supplied timber for all the fascias and trim, no extra needed. The supplied eaves batten was increased to 50mm using scrap, and screwed on top of the eaves boards instead of below, to a) hold the insulation lower edge and b) provide a fix for the 65mm fascia.
Thanks again for all your advice on the website. I have been reading it since December, and the build went well with no hitches and no departure from the advice.
I called IKO direct and spoke to their tech team and got correct answer to my question (below). They advise IKO Type 3B glass fibre underlay for the roof shingles. Since they supply easy shingle I’ll go with their advice! WR
Great, However, an underlay only service two purposes, this is an extract from the NRCA: “Underlayment (or “felt paper” as it is frequently called) is installed over the roof deck before the application of asphalt shingles. An underlayment performs two primary functions: it provides temporary weather protection until the asphalt shingles are installed, and it provides a secondary weatherproofing barrier if moisture infiltrates the asphalt shingles.”
The question is not one of condensation, it is whether the shingles are fitted correctly and the condition while you are installing. It is primarily a protection should the shingle fail through defects in installation or the product itself. Using an underlay will give you protection against water ingress. You can also use a standard roofing felt for this purpose.
However, when shingles are fitted correctly on a shed / log cabin construction there is rarely a need for the additional expense of a underlay.
Please could you state is it OK to use breathable underlay under the shingles Richard?
Hi Mick
Very happy to help, Richard is no longer with the company but i’ll happily offer our take on that questions
We have never seen the need for breathable underlay underneath the shingles we supply, although we have seen and heard of fitters adding their own for good measure. IKO ( the shingles manufacture ) will recommend an underlay but that is just a precaution should the shingles themselves ever get damaged over the cabins lifespan
Hope this helps, Ben
Should I buy breathable underlay before fitting the shingles, or non-breathable underlay? My own initial thought would be breathable to avoid any condensation and consequent rotting on the top of the wooden roof, but I’m open to idea. Many thanks, WR.
Mark . Watched video and looks really easy .One question , the guy fits shingles with protective film on bitumen strip still on!!! Is this correct or should you peel off prior to installation ??
Fitting the shingles is not too bad at all once you get into a rhythm, it is time consuming though but well worth it. Removing the strip depends on the shingles. If nothing is written on the strip then remove it. If it says ‘Do not remove’ in the case of straight shingles then leave the strip on.
Found shingles absolutely useless on a 8.5 x 5.5m cabin due to pitch of roof to keep under 2.5m, cabin supplier not answering emails whihc make sme think they are aware these are not fit for purpose on structures that large as not enough pitch and the water just soaks into the shingles and board underneath?
You are correct, at a pitch below 10 degrees the shingles are not very effective at draining off water, at these low pitches we always recommend using an underlayer of felt and extensive use of shingle glue to ensure a good seal.
I have just (November in UK) bought some shingles to re-roof my garden shed. Should I wait until spring for some bitumen melting sunshine, or complete the job now in the cold?
I have fitted felt shinlges in all weather and all temperatures. You are right though to consider the sticky strip. It is a good idea to use a bitumen glue at all times of the year, especially on the ridge shingles. I would recommend you consider using this, only a dot is generally needed in each corner of the overlap.
I’m keen to get more info on the use of bitumen glue please Richard. We’re fitting in this very cold weather and it is our first ever attempt at roofing!
Would this product do the job and exactly how do you use it?
https://www.screwfix.com/p/no-nonsense-roof-gutter-sealant-black-310ml/67521?activeTab=qaTT
You say “one dot on each corner of an overlap”. What about using it to stick the first row down? Thanks!
I haven’t used that product although the reviews seem to suggest it will work. I’ve only used glue such as our Shingle Glue
Generally i find a dot of glue on each corner of an overlap to be sufficient. Certainly it is a very good idea to glue the first layer all the way along the leading roof edge and also the row of tiles that sits directly on top of it. This is especially important in exposed areas.
Thanks Richard – any ideas at all how many tubes I will need for a 2.6 x 2.6 Pyramid roof? (Daniel Corner Cabin)
Two tubes should be fine, you may want three to be on the safe side.
Hi there.I have purchased the Emma Log Cabin with standard Shingles.Just to confirm on the initial layer of shingles would you recommend putting 2 x layers on top of each other so the wooden roof itself is covered between the tile effect
You will need to have two layers of tiles directly on top of each other and offset by half a tile. If you do not you will end up with a gap link this: https://wp.me/a2LGPA-1su
I like to turn the first tile upside down as it then gives a straight edge and in my opinion looks nicer. Please see the installation videos above and here: https://www.tuin.co.uk/IKO-Felt-Shingles.html
When cutting shingles, turn then over and cut from the back, and bend to detach. The Stanley blades last *much* longer. I learnt this when cutting abrasive paper.
Good instructions , if putting a nail ” just above the bitumen strip ” that means the nail goes through only one shingle , it that correct? Thanks
No that is not correct, nails will go through all the shingles and embed into the wood beneath, please see this page for videos on how to install and other advice: Felt shingles Install
Hi Richard
i have a royal pent cabin, I have laid felt underlay on the roof and then applied the shingles, but they have not stuck together, any thoughts as i now have a leak:(
I’ve forwarded your email to the main team at info@tuin.co.uk who will be able to help. BUT, we do advise against shingles on a flat roof as they can be a problem due to the gradient.
If you have to use shingles on a flat or pent roof for planning or your local area requirements then please use LOADS of shingle glue on all the shingles to help adhesion.
Preferably though only use Felt or for a very long term solution the EPDM roofing sheet or the Easy Rood Membrane is proving to be very good.
As your shingles are laid on top of felt and a flat / pent roof, to seal any leaks you must use bitumen glue extensively.
I brought the Ingrid summer house the pitch is quite steep, this may be a silly question, Iam working from a scaffold tower on 2 sides but the other 2 sides iam having to work from a ladder. Question is as it is so steep how do you get to the top without have to stand on the roof singles and risk sliding off or ripping the shingles any suggestions?
All fitters will stand on the shingles without any problem at all so please do not be afraid to work on them. Steep pitches can sometimes make it a little more uncomfortable to work on. For high roofs such as the olaug I will always use a harness and tie myself off. For a building such as the Ingrid I will simply add a deal to the roof screwed into the corner of the roof while I am working. Often there will be a spare log which can be used for this or parts from the pallet itself, this gives extra foot hold.
Depending on the build I may also use roof ladders / scaffolding tower but for the Ingrid I would be working from the ladder and then climb on the roof with a deal screwed at the lower position for extra purchase.
Hi Richard.
Is it a problem to fit the shingles if the roof is wet, or rain is forecast before the roof will be completed? I am a little concerned about the moisture not being able to escape once the shingles are on.
Thanks
Dave
I have fitted shingles in howling thunderstorms, rain, snow, sleet and that horrible slanty rain. I have never known a roof to be affected. I was a lot though!
Thanks for the video I learnt a lot from that. One problem with it was, when do you take the white paper off the back of the tiles? if you leave it until all the tiles are in position, you will have a hard job to remove the paper covering the adhesive part.
Just a thought and I wondered what you might say on that?
Some shingles such as some of the straight ones will have a plastic covering that says ‘Do Not Remove’. If a shingles covering does not say this then remove the film before installing it.
great help thank you
Great, the parts with pictures are much easier to understand. Maybe you could add a picture of the overhang, starter tile position and subsequent layers. It’d be much easier to follow. 🙂
Thank you very much for your comments. I have now updated this with some videos to help more.
Hi we have just bought a Peggy log cabin , we have beaver tail shingles how do you do the ridge peice with them please
You create the ridge tiles the same as all the other styles, cut them into individual tiles and lay them across the ridge. See the videos above for more details.