


Expansion / Contraction in Log Cabins is very commonon with the first year of life. However this is all to do with how timber naturally acts. We know that Log Cabins move, and certainly within the first year of life they can move a lot. I explain this in an article about moisture content in log cabins. It greatly affects the expansion and contraction of the wall logs.
The trouble is this movement can be a bit of a problem if we want to put things on the wall. Or perhaps adding some shelves or fixing machinery. You may even want to partition a portion of your cabin for several reasons. Perhaps you want a shower or a toilet or just a separate storage area. You might also want a thinner log building due to your budget but you would like to insulate the walls to use it as a garden office.
It is easy to do, but we must keep this in mind when doing so. The bloomin’ thing will move and we don’t want to stop it. If we do inhibit this natural movement we can end up with all sorts of horrible things happening such as:
- Splits in the logs – This will normally be caused by logs being held together
- Gaps appearing where logs have been held – normally by a window frame being screwed to the logs
- Moisture entering through gaps and splits
To avoid all these problems,to fix anything to a log cabin wall this is the simplest and best thing to use:
Expansion Slat for Log Cabins
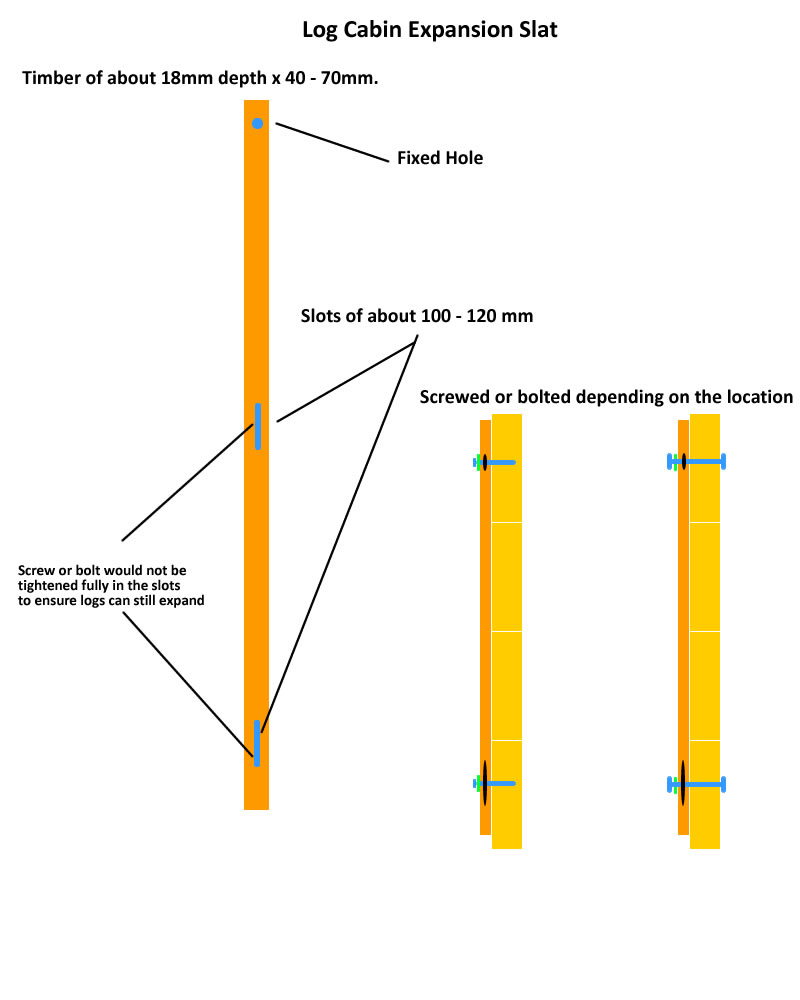
This is a handy bit of wood and you can make it out of left over floorboards or roof boards. Any timber will suffice though and you will pick the thickness depending on the job you want it to do.
I often advise customers to make these for use as storm braces when in exposed locations. Off-cuts from the roof or floor boards are fine to use. In order to make them inconspicuous, you place them behind the corner interlocks. This slat will then be fixed to the top log and the bottom of the slat to a lower log, tying the whole cabin together.
The very simple principle here is that we have one fixed hole at the top and slots in the middle and end (depending on the length). Top hole screwed tight, slot screws tightened with washers. This allows the logs to move behind the bracket.
Shelf Fixing in a Log Cabin
Using this system you can put up shelves, cupboards and fix tools to the walls:
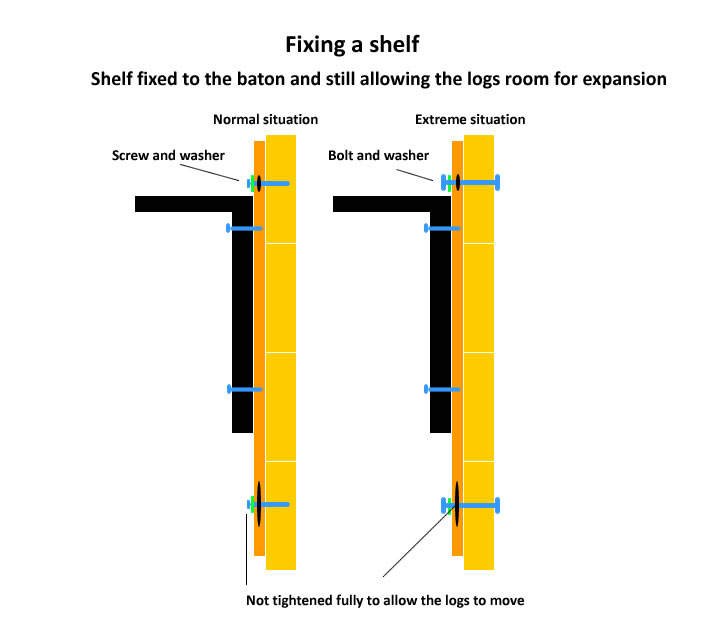
You will see from my diagram that we are fixing the shelves to the expansion slat, not to the logs. For heavier duty uses you may want a thicker slat and bolt it fully through the log cabin wall.
In addition to securing cupboards to walls, it’s also useful for securing consumer units.
NOTE: in the first month or so a log cabin will settle quite a bit from first being erected. It’s best to leave it for a few weeks before adding brackets and securing fittings. Within the first year the cabin will move the most as the wood needs to ‘die’ a little more. Year two will be a little less. Years three, four and onwards the movement is hugely reduced. Also remember the most important thing with a log cabin is to properly treat it. Proper treatment with a good depth of treatment will greatly inhibit the natural contraction and expansion and reduce it to a minimum. More details on Treating a log cabin
Partition Walls in Log Cabins
The same as you do in your home you may wish to put a partition wall into your log cabin. You can do so as long as you remember the log cabin is always moving!
Using the simple principle of the ‘expansion slat’ explained above we can create slots in framing and make a wall as any stud wall would be made remember though the slot fixing should not be fully tight and always allow the logs to still move in both contraction and expansion.
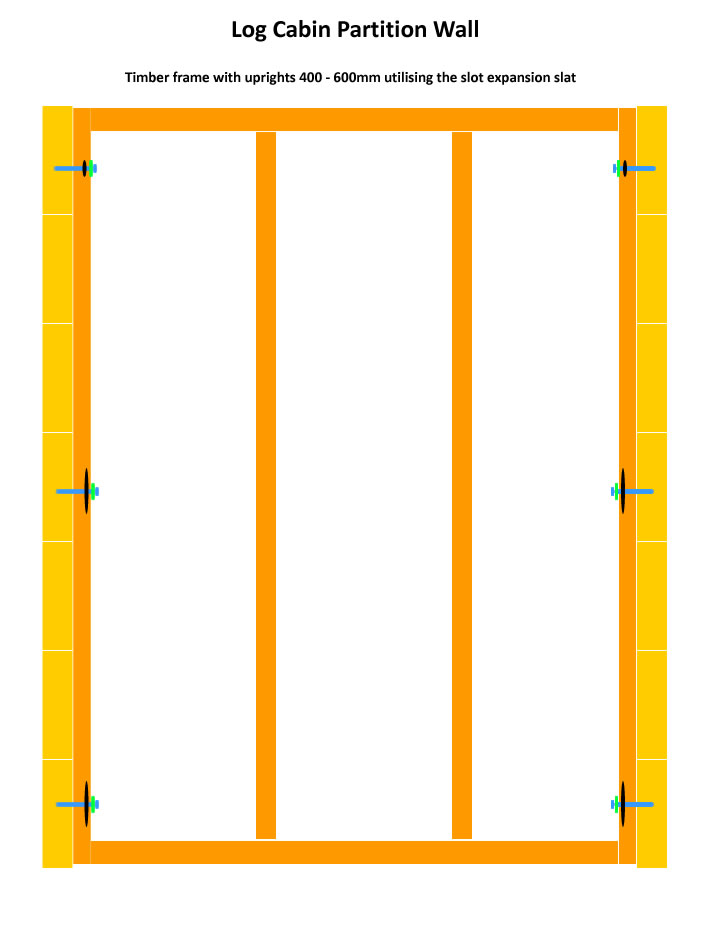
You would make a partition wall as you would any stud wall and probably with noggins for extra strength. Your final surface covering could be anything you would like including plasterboard. Nevertheless, fixing it to the floor is a mistake. Like the wall logs, the floor will be expanding and contracting as well.
Expansion / Contraction in Twin-Skin Log Cabins
You may have seen twin skin log cabins in the market. I’ve put a couple of these up and they really are a challenge, I don’t like them for a number of reasons. Mainly the design intent is all wrong but I will not expand further here. If you require my personal thoughts please feel free to ask me.
Instead of a twin skin design I prefer making an inner wall, that’s independent to the main log cabin wall. The advantages of this method are particularly useful if your budget does not allow you to buy thicker logs in order to build an insulated log cabin.
Also, if you are obtaining building control approval because you intend living in the cabin then it will need to be insulated to building standards. Thicker logs certainly help with insulation but sometimes a control officer will want more. I’ve been involved with several projects and a building officer will often ask for 50 – 100mm thick insulation in the walls (depending on the log thickness) and 100mm in the roof with 70mm in the floor. The roof and floor is easier as I make mention here: Insulating the floor and roof of a Log Cabin.
It’s completely fine to add an inner wall to your cabin and fill the cavity with insulation. As long as you bear in mind that the logs of the cabin itself are always moving as previously explained.
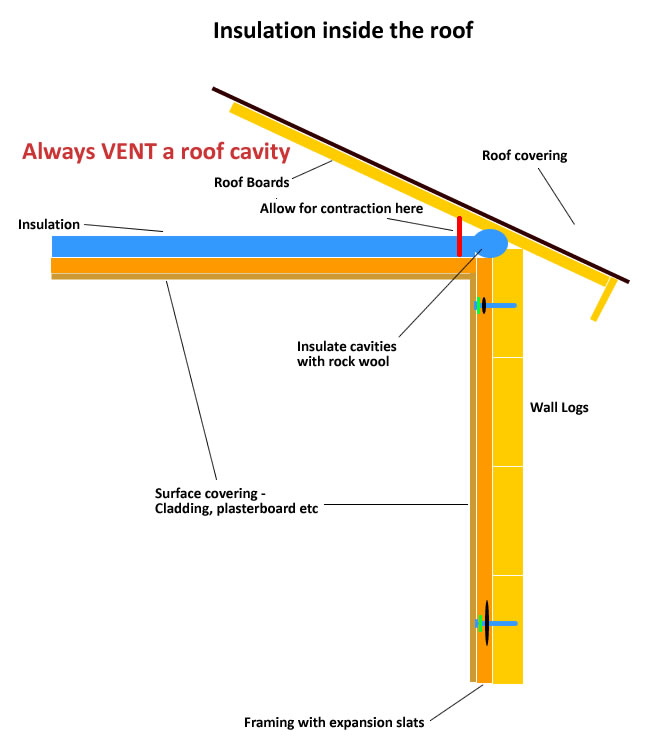
NOTE: Also though consider what you are going to do where the logs join the roof, we cannot restrict the contraction and if the cabin is dropping over the summer if you have not allowed enough room the roof could end up sitting on your internal frame causing a gap to be formed.
Allow for the contraction as well as expansion!
This explains how you can create an internal wall to allow insulation inside the log cabin:

Using the same principle with the expansion slat we can create framing internally against the wall. The frame will of course depend on the depth of insulation required but employ the same methods and remember the logs need to move independently.
Building control will ask for a breathable membrane, followed by a small air gap, and then the insulation in between the frame. On top of the frame you will place your surface covering. Timber logs of 28mm looks good or use a thinner cladding for economy or perhaps plasterboard for a smooth sleek, modern finish.
You still have the option of insulate the roof on the outside if you’re lining the walls. The reasons I like it on top of the roof is:
- It’s generally easier and quicker
- It’s less expensive
- No cavity is formed to collect condensation
If you are cladding the inside in timber and putting insulation on top of the roof you will still maintain the look and feel of a log cabin and benefit from the space the vaulted roof provides.
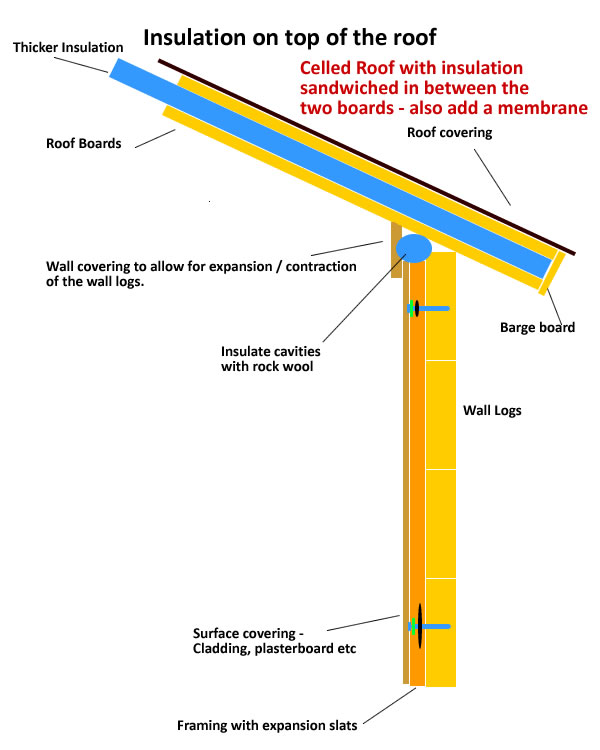
This is an example of insulation on top of the roof:
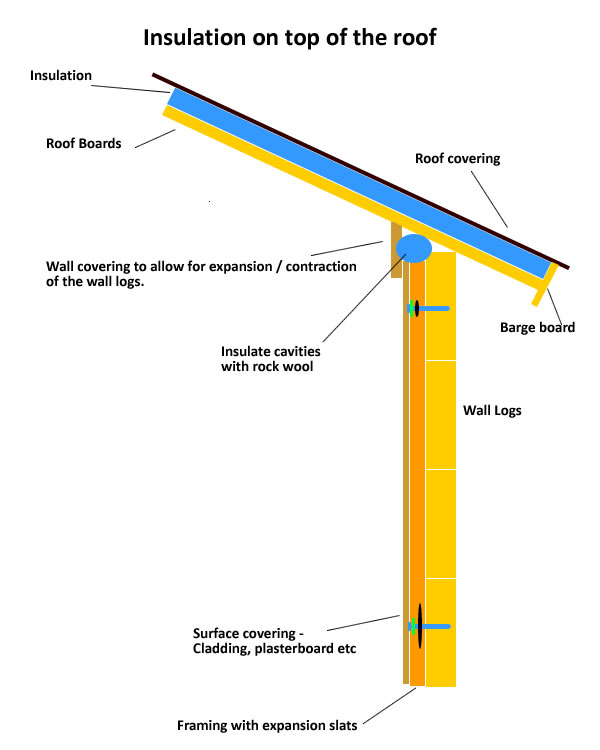
Make sure you allow enough room for contraction. With this example you can see I am keeping the inner framing below the roof boards as with contraction there is a chance the boards could sit on top of the frame making the wall logs separate.
I’ve used a fascia suspended from the ceiling that will sit in front of the inner wall but is not connected to it allowing it move up and down as the log cabin expands and contracts. Fill any cavity created with fibreglass insulation wool so it can also move.
In a previous article on roof insulation I was recommending 40mm – 50mm thick insulation. If you are going to use thicker which you may want to, you would need to ‘cell’ the roof and board on top of the insulation:
Some building control officers will ask for 100mm in the roof. To do this you will need to create a tray on the roof, then cell the tray and put in the insulation board with a final board on top and then the final roofing material. You may also wish to consider adding a breathable membrane.
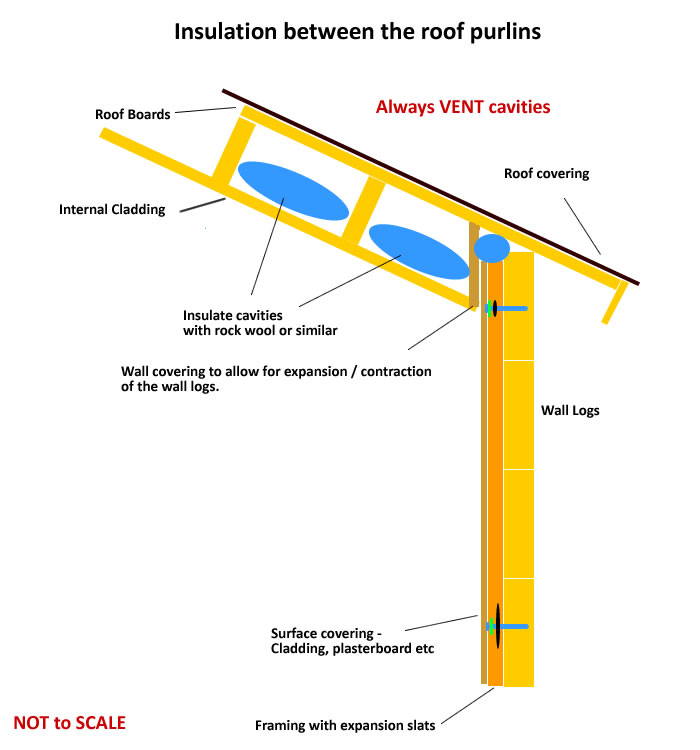
If you wish to insulate under the cabin roof you could so within the purlins and then clad underneath them:
Another method you could consider is as follows:
Again like the methods above we are making sure there is enough room for expansion and contraction of the outer wall logs.
Please remember. If you create any voids to really consider venting them as a buildup of condensation can cause huge problems.
Summary of Expansion / Contraction in Log Cabins
Log cabins are an extremely versatile building and are very inexpensive. There are many uses for them, from a simple garden shed to a full blown family home. They will all behave the same and will all move all the time. So long as you remember and allow for this you can do anything you want to them. Including partition walls and internal insulating walls as I have shown.
Please Note: These are ideas for you to take away and use as you see fit. If you go on to carry out any of these ideas please let me know how you get on but this is not a simple DIY task and you will need some knowledge and understanding of the processes and materials involved.
One last thing; the windows and doors are also part of the outside wall so don’t join any of your internal framing to the doors or windows in anyway, treat them exactly the same as the logs.
Please ask me any questions you have on this or if you do use my ideas, please let us all know how you got on. Like the timber frame bases for log cabins none of this has a hard and fast rule except: Log cabins; Move!
Excellent information, thanks Richard.
I’ve been researching which cabin to buy and generally arrive back at Tuin, but have a question about other designs if you could comment on the expansion vs your approach please?
A few cabins include long (2m +) threaded rods in the outer ends of the interlocking logs (one per corner), with no provision for adjustment after assembly. I can see that this could help with stability in the corners but this goes completely against everything you’re saying here. Is it possible that the rods are designed to expand enough under tension to allow the logs to expand and contract? Seems unlikely if inches of movement are anticipated! I note there are no separate storm braces, so maybe they perform this function too. Still thinking they must be at risk of splitting the top and bottom logs with the forces that will build up.
Interested in your thoughts please.
Hi Andrew
Thank you for your message, It’s an interesting topic for us too as you correctly point out the whole idea is to let the buildings expand and contract unimpeded. However some of the larger models as you correctly point out do feature threaded rods which goes against the grain ( pun intended )
The best way to explain it is that in some models extra stability has been deemed critical to the design, in these cases rods are supplied in the corners which are only tighten loosely when first constructed. This will in turn still allow some movement while also providing extra strength.
Hope this helps, Ben
Hi Richard, I have read this blog a couple of times and now have a question. I am having a Moa garage/workshop installed and wish to power it with an off grid solar system. The pair of solar panels are 300W, approx 1.6m by 1m and weigh 19Kg each. My plan is to mount them landscape and use 3 adjustable brackets per panel to allow seasonal variation of tilt angle. The brackets will be mounted on 3×2 battens, each 1.5m long, at 1.3m spacing, which will cross the 3 central purlins roughly above the garage portion of the roof. I am planning on fixing through the purlins and incorporating expansion slots in upper two positions on each batten. Will this be sufficient, or should I also allow for expansion in the other plane i.e. across the grain of the roof boards. I can provide a sketch for clarity if it would help. Thanks in anticipation. Dave
Hi Dave
Thanks for the message ref solar panels on the Moa log garage.
Truth be told you may not even need to incorporate any sort of expansion slots on those battens as once the roof boards are all double nailed theres not a whole load of possible roof movement anyway ( its mainly the walls only that you need to be mindful with )
No harm of course in being extra careful
Hope this helps, Ben
Thanks Ben.
Hi Richard,
Great level of detail for fixing items to the log walls, thanks 🙂 I may have missed this question but I’m putting some decorative framed panels on two of my Agnes cabin walls. I’ve got the principle of the top fixing being firm and then slots in the frames for the sliding fixings. However, should there be a gap at the bottom between the underside of the decorative frame and the floor or is it OK for the frame to sit / rest on the floor? What I obviously want to avoid is the cabin logs contracting and therefore the decorative frame having no where to contract to. Is there contraction in the log heights after construction or is it a case of the logs expanding in height and then contracting back to the original build height?
Thanks!
tim
The logs will either be expanded or contracted depending on the time of year you are building, there will always be some variation. I would leave a slight gap at the bottom of your frame, especially if you are installing during the colder, wetter months.
Hi Richard
This has been an excellent source of information for us putting up our James Log Cabin & the service from all team members has been impeccable – Thank you!
Please can I ask regarding the 3 x large windows which are now sat well on the supporting log (we had to slacken the facia as they were way too tight to slide down into position). However the internal gap above all the windows is large ( around 20 -30mm) should we lift the windows and re-tighten the facias to hold them higher or should we add a slither of wood under the windows to support the weight as they are very heavy!
Many thanks again
Gary
During the winter the logs are going to be the biggest possible due to absorption of the surrounding moisture. This will leave the largest possible gap above the doors and window frames. As Spring and then Summer comes this gap will reduce by a lot. You can if you want to lift the frame and put a packer under the window or door to close up the gap. But you must remember that you have done this and check for the gap in the warmer months as you may need to remove it again.
Hi -great blog, and so helpful when deciding what to go for. The expansion slots make sense, but this might seem like a rookie question – how do you cut the expansion slots in the wood itself – is there a clever drill bit that can be used? And how long do they need to be? thank you!
Helen
You can use a router to make the slot, you could also use a jigsaw. The slot needs to belong enough to cope with the expansion and contraction. About 100 – 150mm should be ok.
I am just planning a log cabin project as extra guest accommodation for visiting family but was thinking of using Superquilt insulation instead of PIR boards for walls and roof both for space saving and cost benefits.
. Has anybody done this and any tips please?
Hi there. I spent the last four days installing a Riina 58mm cabin. It is an amazing thing and your blog and tutorials are fantastic. I did read all the posts about expecting movement but I wanted to check. My top log (the one immediately below the roof boards) was a little warped, slightly twisted, slightly banana`. I used the methods you described – in this case I screwed a couple of offcuts into the end grain and used a clamp to bring the tongues together. I then put a couple of screws in underneath (as it is under the overhang) to hold temporarily whilst the warp worked itself out. I removed the screws this evening but it has pulled apart – albeit to a lesser degree again as soon as I removed them, even though the shingles are all now on with that weight. Now it is not twisted but is a little banana – lifted at each end but snug in the middle. Just looking for reassurance that this is normal (I hope). I have a photo if that is of use but I can’t seem to add it here. Thanks again (Richard and all at Tuin).
This will go down over the next couple of days with the weight of the roof and shingles. You could also wet it with a hose pipe for 5 minutes and that will help it to absorb moisture and allow it to go down a little quicker.
Great information on here, wish I’d seen it before I put internal partitions in my 4 log cabins. The one thing I would add is that you need an expansion gap betwen the top of your vertical stud to the underside of the roof, to make sure the roof can rise and fal with the walls – my vertical studs were more or less under the roof purlings and as a result the roof didn’t fall with the walls – once cut down, the roof and sides ofthe building dropped back between 25mm & 35mm on the 4 cabins I have and all the gaps closed up nicely, ready for trimming back in, it really is amazing how much the wood swells and contracts
Hi, there’s so much good info on this site – thank you! We have a 5m square log cabin and I’m planning to put in an additional stud wall to partition off an area along the rear wall. This will be timber framed and plasterboarded. I’ve read your description in this blog and have a couple of qustions if that’s ok? Do I just need to cater for vertical expansion/contraction or horizontal too? If I make the frame for the stud wall can this go tight againt the existing exterior side walls or should I leave an expansion gap at the sides? I guess the same question goes for plasterboard sitting on top of the frame too, is that likely to crack in future if its’ tight up to the exterior side walls.
You don’t get much movement in te length of the logs, it is mainly in the height. Like anything though there is still some movement and I would be tempted to add about 5mm overall so things can still move unhindered.
I used to live in a log cabin, and this blog post is superb. I wish I had known all this years ago. Thank you for writing it, Richard. You know your stuff !
Hi Richard
I have a 58mm Blackpool cabin I am going to clad the inside using the expansion slot method on my stud wall frame.
From outside in my layers are 58mm log , breathable membrane, small air gap, 70mm pir, dpm then 9mm ply.
Obviously I need air vents on the top log on the outside but do I need the hole to go through all the layers to the inside so effectively I could install an air brick? And then one more on the opposite wall? Would this suffice, I will have a fridge freezer in there.
Many thanks
I think it would be a good idea to vent all the way through especially as you have a fridge freezer. Fridges can create a lot of condensation. You may need to install another vent closer to it so I would keep a good eye on what moisture is created by it and add vents if necessary.
Hi Richard,
I am going to be using an Aiste cabin for a gym, I’d like to hang a 36kg punchbag from a ceiling purling am couple of feet from the walls in a corner, would this be possible or would the bag be too heavy?
Thanks,
Danny
I think I would be tempted to put in a seperate beam on joist hangers to accommodate the bag. The roof beams may well cope with it but of course the weight applied will depend on how hard you punch 🙂
Thanks for such a quick reply Richard! Do you mean a horizontal beam that sits on the walls (i.e. going across at the same height as the eaves) or something attached to the purlins? I’m just an OKish DIYer so this is a steep learning curve for me, even just the terminology! I don’t punch very hard, it will probably be more ornamental, as is the rest of the gym!
Thanks for such a quick reply Richard! Do you mean a horizontal beam that sits on the walls (i.e. going across at the same height as the eaves) or something attached to the purlins? I’m just an OKish DIYer so this is a steep learning curve for me, even just the terminology! I don’t punch very hard, it will probably be more ornamental, as is the rest of the gym!!
I wouldn’t attach it to the existing purlins, instead I’d run a new one suspended by joist hanger from the top of the wall.
Thanks, I get you now – cheers!
Hi, in one of the diagrams, where 40-50mm insulation is used you seem to put the roof covering (e.g felt) directly onto the insulation, is that desirable ? or would it be better to place boards on top like the thicker insulation design ?
For anything below 50mm we normally put the roof covering for a pitched roof on top of the insulation board, there is not normally a reason to add another layer.
Interesting read on expansion, I was hoping to apply claddin to the bottom 1.3m on the cabin, was going to use silicon to put it in place, how much expansion can you expect? Will the silicon have enough flex to with stand the expansion? If not, what are my alternative method of applying the cladding? Thanks dan
Depending on the treatment you apply inside and outside the logs can move quite a bit, especially in the first year of use. I would not recommend using silicone for the cladding, I do not think it will cope with the movement. I suggest using an expansion slat or similar as detailed at the top of this post.
I have never done it this way but if you have to I think it is best, as you say, to not have an air gap. I would though make sure you have a vent high in the apex so moisture can escape. I would be interested in whether this works for you and would others I’m sure. Please let us know.
Hi everyone I bought a Berlin log cabin 4 years ago for my woodland supported it on foundations of council paving slab and breeze blocks then a 4×4 wooden frame with damp proof membrane top bottom of 4×4 then cabin on top. Yes there has been a small amount expansion and contraction but no cracks or anything like that, Before putting together we put water proof sealer on tongue and grooves also and any knots used on outside filled with putty as still flexible and will absorb preserver. Also sealed all corner cross joints with putty too to prevent any ingress of water and it has worked well. Hence recent purchase of 1 more berlin and 2 Hendricks awesome quality and service. And will post all my photos eventualy of the way I constructed it all
Hi, I’ve got a 28mm cabin from you guys (Love it!)
We’ve built a small bar in there, and want to wall mount an old TV I’ve looked up the spec’s it weighs 16kg. Is this gonna cause us an issue?
If the logs were 58mm I don’t think it would be a problem but at 28mm I think I would be inclined to make a seperate frame to transfer weight down to the foundations rather than rely on a single log
A couple of questions I have is in regard to the air gap when adding a second wall as you have explained. If I attach the membrane to the exterior wall surely over time it would be pulled off over time as the wall expands and contracts. If I attached it to the battons as you mentioned in a previous question and left the air gap inside the wall I am building how could I create air flow through this setup?
Could I have an air gap between the exterior cabin wall and interior battons, with the breathable membrane attached to one side of the battons, celotex in-between them and plasterboard on the other side? I could then vent the air gap through the exterior wall with vents but I’m not sure if this is a good idea and I would probably create flow into the cabin through the gap between the top of the walls and the roof even with a piece of wood covering it but not attached to the wall.
I can’t see how air can circulate in the air gaps if the membrane is attached to the battons and the battons are attached to the exterior wall with expansion bolts as it will be relatively tight and with the air gap blocked on all sides. Or doesn’t this matter and I’m just over thinking it.
Thank you and thanks again for all these articles!
I haven’t heard of a membrane coming off, you can tack it quite loosely to allow for the movements. I would not be venting the cavity, I don’t think it is necessary, others may of course have other ideas or opinions. I would though make sure the whole building is vented and air is allowed to circulate.
Hi Richard, this is very interesting and your diagrams are great, thank you very much.
One question I have, that I am surprised has not been asked, is what type of insulation to use for the internal frame wall? My understanding is that for a log cabin the walls must breath, does this then mean that the internal insulated wall must use a breathable insulation? Is OSB for the finish classed as breathable?
Appreciate your comments on this, many thanks.
I would use an insulation board, something like celotex or similar such as our insulation boards I know some people will also use rockwool but I would prefer the boards as it is easier. You could use OSB as the inner wall but I don’t think it would look very nice.
Hello Richard, thank you for the quick reply.
The boards you suggest are made from polyisocyanurate foam from what I understand is breathable, can I confirm that it is a requirement to have breathable insulation?
Does the air gap between the insulation and breathable membrane need to be vented and if it is does the insulation need to be breathable in that situation?
The product you suggest says “log cabins floors only”, why is this?
Where I live we can get -30c, from what I have read polyisocyanurate performs badly in cold weather. I wish to avoid Rockwall as it sinks over time and also performs badly in cold weather.
Many thanks for your comments on this, all very interesting and informative.
Tim
I gave those boards as an example, i.e a solid board is easier to use rather than the rockwool type product. It is a good idea to vent the building but I do not see a reason to vent the cavity in a log cabin, others may of course disagree and any comments are appreciated.
Agree regarding Rockwall Vs boards. This brings me back to my original comment, of what type of insulation board is recommend for walls and does it need to be breathable?
Many thanks Richard for sharing your insight.
This is where it can get tricky and advise goes all over. I have used celotex type boards without reported problems for many years, other customers has as well over the many years. When I finally get time to finish my shepherd hut I’ll be using these type of boards as well.
But, like anything, other people have opinions and thoughts. For me it would be the Celotex type boards, others may have an opinion and I’d love to hear them.
Thank you Richard, agree there does not appear to a universal right or wrong here, your view is very helpful. If anyone else had any additional comments I too would be interested to hear.
Thanks again!
hi Richard
Great article – planning on insulating my cabin which is located at the end of my garden. Thinking of using the approach you have provided with an internal wall for the frount wall.
The other 3 walls are actually quite well hidden with a lean to on the left and a cabin extension on the right and rear fence/trees behind. For these walls I was thinking of just placing 50mm insulation on the outside between the nibs (70mm depth) and then using hardboard or OSB as cladding. Would I also need to first fix a vapor barrier between the cabin and insulation to protect for condensation?
Also, rather then screwing the frame to the wall, I was thinking of justing cutting and fixing small wooden stops on the nibs. This would retain the frame+insulation wall against the cabin ball but also allow for free vertical expansion / contraction. Not sure if this approach has ever been done or considered before?
Just to make sure I have the directions right. A cabin built in summer will contract over winter? A winter built cabin will expand over summer?
is there some guidance on how much vertical expansion/contraction to cater for? on a 2.4m apex (2m on sides) high cabin what would be the contraction expected to be in winter?
Cheers
During the Autumn and Winter the relative humidity in the air increases and more moisture can be naturally absorbed through wood, this will cause it to increase in size. During Spring and Summer the relative humidity in the air drops and as such moisture in the wood also drops as it tries to reach an equilibrium with the surrounding environment. This will make the logs become smaller.
Simply put: Autumn / Winter logs will expand. Spring / Summer they will contract.
I understand you are thinking of insulating the cabin externally, this is not something I have done or heard of but the same principles all apply – do not restrict the natural movement of the logs.
Over the course of a year there can be as much as a 21% difference in relative humidity. This has a direct correlation to untreated woods moisture content. For untreated wood you can expect for every 4% change in humidity there will be a change of 1% in the wood. So, for a completely untreated log it could theoretically grow or shrink by 1.114mm assuming the log is 114mm. Therefore, theoretically you could see a movement of 5.98mm in a log! This is in theory though, in practice you might see 3mm movement in a completely untreated log. But, 15 logs on top of each other all moving 3mm up and down can be quite a bit!
Note though, much of this movement can be substantially reduced with a top quality treatment with several layers, this then inhibits the natural flow of moisture into and from the wood.
Other articles which may be of use when looking at this:
Contraction in Log Cabins
Treatment of Log Cabins
Depth of Treatment of wall logs in a log cabin
Thanks Richard. Your answer is almost perfect. I have treated the wood with preservative but appreciate the need to baseline your figures with untreated wood. I will guesstimate 6 to 7cm expansion this winter. Appreciate many factors in play here, including global warming, and will not ask you more.
You didn’t answer approach to floating wall I proposed of just using stops? Though I guess since external insulation is a new idea to you it may need me to experiment.
To be honest I couldn’t quite get the ‘stops’ idea. Could you please send a diagram of what you are proposing to info@tuin.co.uk marked for me to look at referencing the blog and I’ll have a look and try to help further.
We externally insulated our log cabin 3 years ago. We did not allow for significant movement but our cabin had been in situ for 1 year and the movement had seemed to have stopped. We just took a chance really and have had great results. It’s super-warm and all of the non-natural materials (most anyway) and the mess were limited to the outside. No new gaps, cracks, mould or anything negative. We just had to replace windows to allow for additional ventilation as I worried we had effectively achieved air tightness and were too warm at times, which is a good complaint!
Hi – Thanks for the really useful article and site – I’m just in the process of designing a log cabin for a garden room, and considering whether to go twin-skin, or build my own internal walls as above. (Any further clues on why you don’t like the twin-skins appreciated..?!)
Anyhow, my actual question relates to whether there was any logic to having the ‘fixed’ bolt at the top of the frame, rather than the bottom?
Isn’t the general movement in the wall upwards, due to the expansion of each log being compounded towards the roof – hence, wouldn’t a partition or internal wall fixed in this way at the top tend to lift and ride up away from the floor due to the movement in the log it was bolted to?
I’m wondering if the frame was fixed at the bottom, near the floor, with the expansion slots at the top; wouldn’t the wall stay seated on the floor, and the logs expand upwards behind it without the internal wall moving?
Any further thoughts welcome!
Thanks
Nick
brilliant information Richard thank you
When using plasterboard, what would you do around the angled purlins (Jenny log cabin)? Would you need an expansion gap around them (which would look odd) with some sort of architrave covering?
Or is it ok if the top is quite tight to the roof / purlins as the frame has the expansion slot at the bottom?
I was planning of expansion slot at bottom, with skirting boards to cover. Wasn’t sure if you also need a gap at the top with some sort of architrave covering gap?
You will need to treat the internal framing and the log cabin as two seperate structures. The cabin must be allowed to move up and down. Each and every wall log will move, this will of course affect the purlin.
If you are plasterboarding the roof I would not fix it to the wall frames at all, only the roof and then produce a fascia from it for the wall to pass behind.
This is more regarding the top of the side walls.
I would build the frame and PB as you suggested in the post.
The question is regarding the two outer perlins, as they are diagonally pointing inwards, if the building will grow and shrink (vertically) would there need to be some form of expansion in the PB around the area that the side purlins connect to the side walls?
Imagine how the PB is cut to shape around the outer (angled) perlins, and what happens if the building shrinks.
The top of the PB would end up pushing down on the perlin due to its shape.
Sorry if it’s difficult to visualise the issue.
I understand now, you are referring to the apex wall where the purlins meet. With most cabins there will only be a maximum of five – six logs in this portion. This is far less of an expansion problem.
I would not recommend the plasterboard is tight against the purlin though and would still guard against this with a sliding fascia.
I would consider though plaster boarding the whole roof seperate to the main walls with a sliding fascia therefore removing any worries.
This is really useful. I’d be really grateful for some advice – my electrical boxes are screwed to the outer cabin wall – how can I deal with the socket faces moving on the plasterboard as the boxes move behind?
The only way to deal with this is to use low depth back boxes suitable for plasterboard and to mount these instead of fixing to the logs.
Richard, Greetings from the USA. I have benefited a HUGE amount from the information you have provided on this website! You can’t find it elsewhere, so thanks for all of this.
I have a question about the general nature of expansion and contraction in log cabins:
Do the individual logs expand and contract equally from the top to the bottom of the wall? Or do the upper logs, which have less compression weight on them, expand at a greater amount than the lower logs?
I am asking because the laws of physics in my mind say that the walls would ‘stretch’ vertically rather than each log expand in unison to the same degree. Is that correct? I’m curious because I am considering a large 70mm cabin to use as a residence, and trying to account for the expansion/contraction with the installation of shower unit, cabinets, etc..
I’m pleased to hear I have been of help over in the USA. You guys have some proper and great log cabins but they will all behave the same way. And …. We cannot be certain of it due to timer, each log is different, each tree is different. Many a time I will have lifted a log and “oooofed” at its weight, the next log is lighter. This is due to the density of the log and where it was cut from.
Most good suppliers will take the cuts close to the heart of the tree where the strength is, this will be the most densest part. We can also take cuts further away but watch out for this in your cabin, the further away the cheaper the timber.
When it comes to expansion you cannot apply a uniform theory across all the logs as they will all vary. Wood by its nature will always surprise you so I would allow for the expansion across the whole height and not across a portion of it.
As I always mention, proper treatment will help to stop a lot of the changes in timber and should never be overlooked on how important it is.
Yes, our cabins in the United States are indeed much different than the Scandinavian style, but personally I prefer the Scandinavian appearance much better. I was born on the wrong continent I guess 😉
Your answer is the same thing that I assumed, but here’s where I’m puzzled: If each log behaves very independently due to its intrinsic nature, how exactly do they stay joined together on the wall? I realize they interlock at the corners and are tongue & grooved together along the length, but without fasteners, what prevents gaps from appearing even when there is nothing else inhibiting the movement? If say, a middle log decides he wants to swell up and bow and the upper and lower logs don’t, well?…
Each log will expand and contract, it is going to depend on where it was taken from the tree, the type of cut and the make up of the wood, this cannot be helped. But, most good log cabins will take wood from a similar place in the tree so all will be similar. As they expand they will concertina up and down, no gaps should appear if they are not connected together in any way. But, on some manufacturers the tongue is not very big and sometimes problems can occur when this is the case. Rarely though as they would not be in business for very long if this was the apparent with them.
Quick question, does the roof t &g move reason i ask is if you a nailing shingles in surely they would also move? I will be installing over top and thinking may need extra timbers to support the osb board i am using to sandwich the insulation worried fixing into t&g may cause problems.
regards
stuart
The T&G will expand and contract like any timber but this will be nailed on at two points across each junction, for instance the top log top roof rafter and any purlins. This then restricts much of the movement and will not affect the felt shingles or roofing felt at all.
If you are using OSB board to sandwich the insulation you will need to create a frame around the roof. It is then a good idea to batten it the dimensions of the board. Ideally the framing and batons will be the same depth as the insulation.
Hi Richard and thanks for an excellent article. If adding an internal wall, what about the breathable membrane? How do you attach that inside of the outer wall, allowing for movement of the logs? My understanding is that without a membrane I’d have problems. However, a membrane is normally fixed taut to the wall. Any thoughts you have would be appreciated.
If you would like to add a membrane you could do so in exactly the same fashion, fixing it to smaller slats. Or simply fix it to the expansion slats you are already using, perhaps staple the membrane behind the slat before attaching to the logs.
good suggestion, thanks!
Hi Richard,
Thanks for your blogs, very informative and helpful.
Concerning the partition wall with slots and fixed hole, would I be correct in thinking with the fixed holes at the top, the frame itself will rise up with the logs thus leaving a gap between the floor and the footer of the partition ?
Would it be better if the fixed holes were at the bottom so the frame would be almost stationary and the gap would appear at the roof as the logs expand ?, yes the frame would have to be smaller height wise to allow for contraction.
Or I have missed something here ?
Thanks for you time.
You are quite correct a gap would start to form at the bottom as the logs expand. Equally the other way the gap will be at the top. Either way is fine. Knowing where the gap is going to be and allowing for it and covering it is the consideration. Personally I would have the gap at the bottom and hide it behind a large skirting board. Its easier to see there and adjust if necessary and I think, easier to finish. It is of course only my opinion and others may have a better idea. Remember as well the time of year when considering this. Summer there will be maximum contraction, Winter there will be maximum expansion.
Hi, sorry to jump on this post but if you fit a skirting board can it be filled and joined at the mitre without cracking during expansion and contraction due to it being connected to the wall next to it and also sealed from skirting to wall and then maybe fit a scotia beading fixed to the laminate but not to the skirting to hide the gap?
There is negligible movement in one log so you should be fine to fill the skirting at the mitre. As long as the laminate can move under the skirting a bead will also be fine.
I want to insulate my cabin from the inside of the roof purlins. I wanted to sound proof it as much as possible too, but everything I have read says you have to make it air tight too! You say, you need to vent the purlins. How many vents and placed where?
Many thanks
P.S. I have made the storm braces make sense to me now from your blog.
I don’t like insulating on the underside of the roof at all. You can have all sorts of problems with condensation forming. I’ve known internal insulation installation to fall down because of condensation. My advice is to always insulate on top of the roof. But, if you have to do it internally you need to give the moisture in the air an escape route as you would your loft in your house. I would suggest one vent opposite each other in each compartment you make.
Great blog Richard; thanks for sharing such great insights! One question please? I intend to go with the suggested option to insulate under the cabin roof and within the purlins + clad underneath them. I intend to use Celotex and leave a small airgap, approx. 2cm. Noting your comments, do I still need to vent this small air space? Assuming I need to vent this, is a single drill hole sufficient? Many Thanks
My preferred method to ensure you have NO problems at all is to put al the insulation on top of the roof. Please see this post: Log Cabin Roof insulation I would only put it inside the building if i really had to and then i would be having a larger air gap with two vents in each end.
Been waiting for this one – thank you Richard. Will Tuin be adding an insulated stud wall as an option, so we can you to have it done professionally?
It’s not something we’ve thought about supplying Matt. If you give me a call I can always talk through how to do it. None of this is hard and doesn’t need a ‘professional’, just remember a log cabin moves! Then make allowance for it and add a bit. There’s several different ways to accomplish the same thing.
hello have been reading your article on twin wall and expansion slots.but could you explain why there is no provision for horizontal expansion(horizontal slot,only verticle as the 2nd wall is a fixed square.
Wood hardly expands across it’s length, it does of course a little but not enough to be concerned about. Woud does though expand a lot across the grain.
Another excellent post Richard. It’s good to know extra wall/ceiling insulation can be added to the build after completion if the winters prove too harsh!
I think you will be fine with your 58mm building, I remember you insulated the roof and floor. But of course, it can be done later if you find it too cool but I do not think you will. The 58’s are pretty good at keeping enough heat in.
Excellent article, thank you. Regarding creating twin wall for insulation, if an air gap is needed between the breathable membrane and insulation, is a second frame required to achieve this? or in practice can the membrane touch the inner surface of the cabin wall, behind the frame, and can the insulation infilling the frame touch the membrane?
thanks, Alan
There is lots of talk around this and other people may have other ideas but you could tack the membrane to the logs and fix the board to the frame maintaining a small gap.