


I’ve spoken about the treatment of your log cabin in a previous post and I wanted to explain a little more about the importance of the depth of wood treatment which we recommend as 80 – 120 microns.
I personally try to make it very clear to customers the importance of a good treatment. Poor treatment results in splits and cracks, shrunk logs, uneven logs and other horrible things.
All of this is entirely down to the treatment you are using, especially the depth and quality of treatment!
This post will give the technical aspects why we advise this, honestly I’m not making it up, there’s very good reasons for it:
Moisture Content, Sponges and the UK
I was sent this picture this week, The customer has had this corner cabin for about 9 months. The picture is showing a warped door on one of our Ingrid corner log cabins:
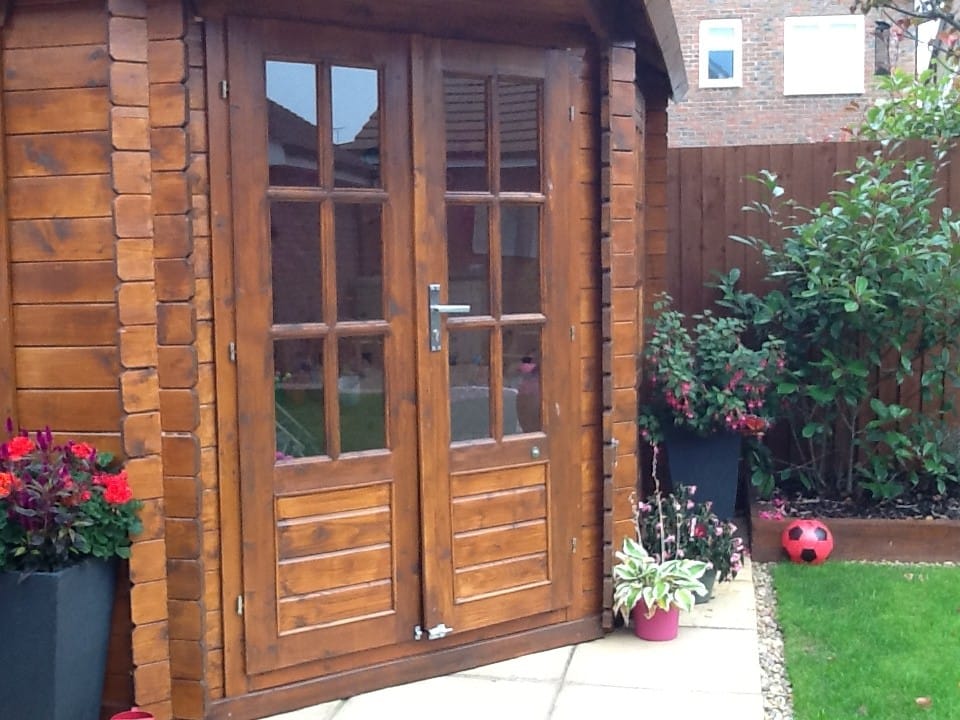
Warped door on an Ingrid log cabin. Notice the bolt at the bottom they have applied. This is the correct thing to do if you are experiencing a warp, but the correct treatment could prevent it.
I get a few of these problems over a year and 99% of the time it comes down to the treatment. Not just the wood treatment brand, but the way it has been applied. I’ll come back to the warp in a little bit. Let’s look a little more at the wood in this door.
Wood is a Sponge
Wood does of course warp and move, it’s natural and we all know that. The annoying thing with wood is that it acts like a sponge, you have to view every piece of wood in the Log Cabin as a sponge.
In a building there are shorter and longer logs – shorter and longer sponges. There doors and windows, horizontal and vertical parts to the frames, all of which are sponges.
Each one of these sponges is trying to be the same as it’s environment, I talk about this in my post on Splits and Cracks in Timber and how wood is constantly trying to reach an equilibrium with its surroundings.
If we zoom into a piece of wood you’ll see exactly why it’s a sponge:
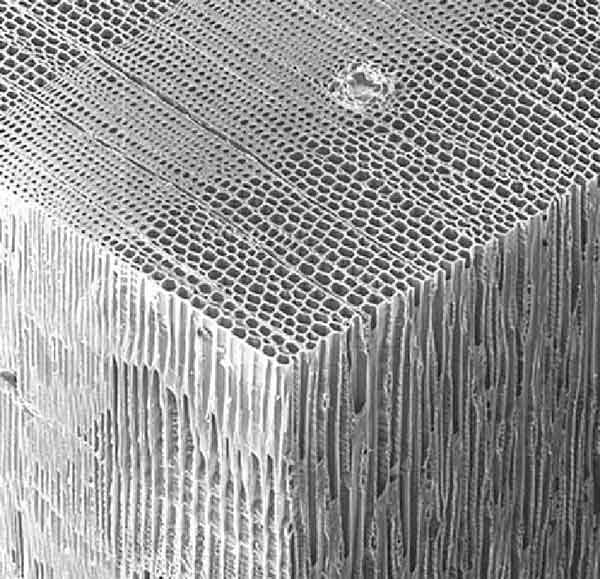
Wood is a sponge and is made up of straws all drawing water for the tree.
Layer upon layer of straws are all drawing water for the tree. Many now support the Cohesion method theory where a tree draws it’s water using the tension of water, very clever stuff wood.
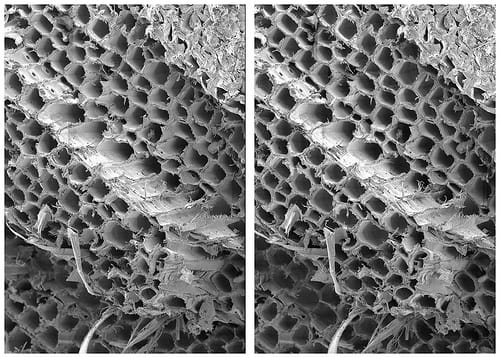
You can easily see from these pictures that when we look closely wood is full of holes. This will cause a problem as they all fill with/drain of water. Seeing as we killed the poor thing there is no tension.
For an untreated piece of wood this is happening constantly, it’s trying to reach the same moisture content as the surrounding air. This is known a Relative Humidity and is a measurement of the amount of moisture in the air around us.
Relative Humidity in UK
There is a direct link between the relative humidity and the moisture content in wood. The UK has an average high humidity of 92% and a low of 69% and this also depends on where you live.
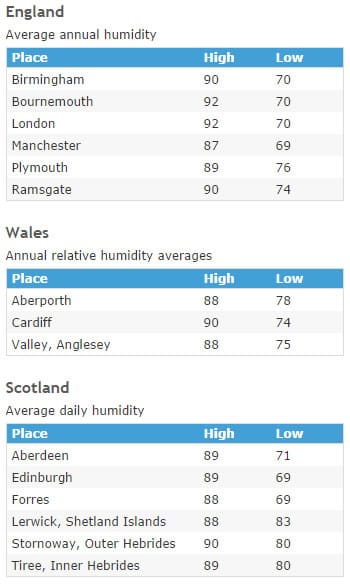
Average humidity levels and these change according to where you are in the UK.
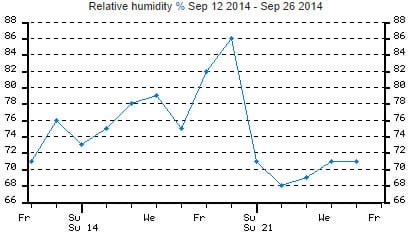
Relative humidity changes over the course of a month can be quite dramatic in its highs and lows.
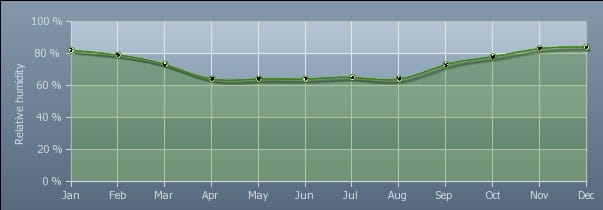
Relative Humidity in the months of the year in the UK
You can see from these that there is a difference in humidity. Over the course of a year it is 21% which is huge. You can also see how it is higher – wetter in the winter and lower – drier in the summer.
If you look at the graph of September you will see a difference of 18%. All of this is making wood grow and then contract, it’s happening constantly.
Moisture Content vs Relative Humidity
There is a direct correlation of the untreated woods moisture content and the humidity in the air:
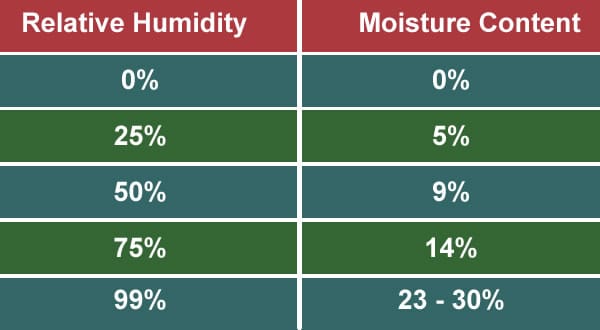
There is a direct correlation of the amount of moisture in wood according to the relative humidity in the air.
Moisture Content of our Log Cabins
You’ll see from the charts above that at 75% relative humidity the moisture content of wood is 14%. The average is about 75% and this is why we dry all our log cabins to 14%.
It means that when we machine the wood it is at its ‘average’ moisture content for its lifetime in its intended location of use. To get it to this level of 14% takes about three days in a kiln.
By the way these things aren’t cheap to run either and they contribute to some of the cost of your log cabin.
You will see some manufacturers / suppliers happily tell you their log cabins are dried to 20%. I’ve seen a very high profile supplier happily state this in a promotional video as if it is a good thing!
Using these charts you can blatantly see that the relative humidity would need to be considerably higher to maintain the moisture content at that level and the UK would need a severe weather shift if that was to happen.
The supplier of course saves a day’s worth of money in the kilns, but it means, once built, the cabin shrinks more to the UK’s average of 14%. This is why if you buy a log cabin and find loose joints as you install or a month or two later you see gaps appear, this is all down to the moisture content of the timber at the time of milling and that it is now reaching the UK’s relative humidity.
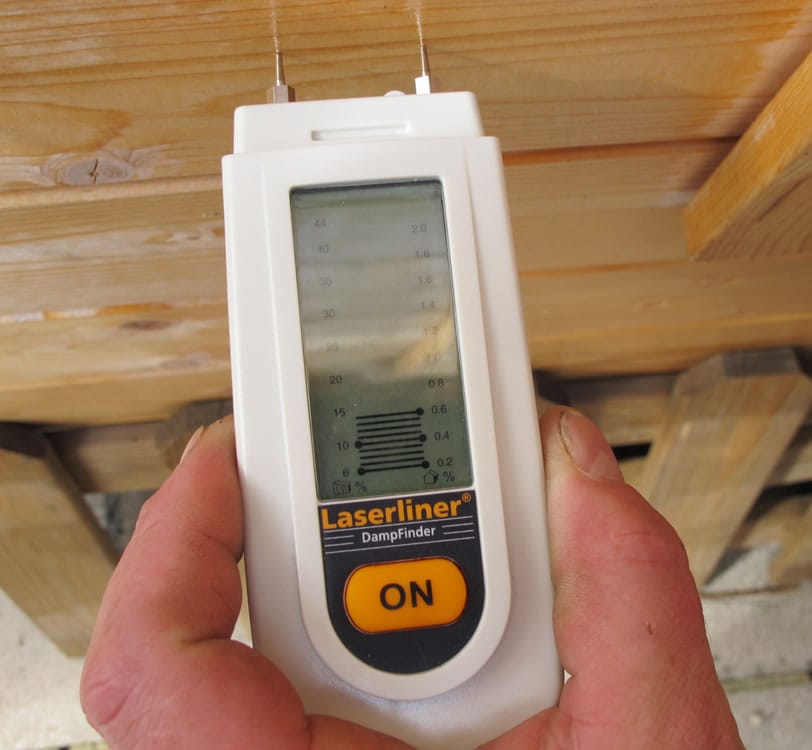
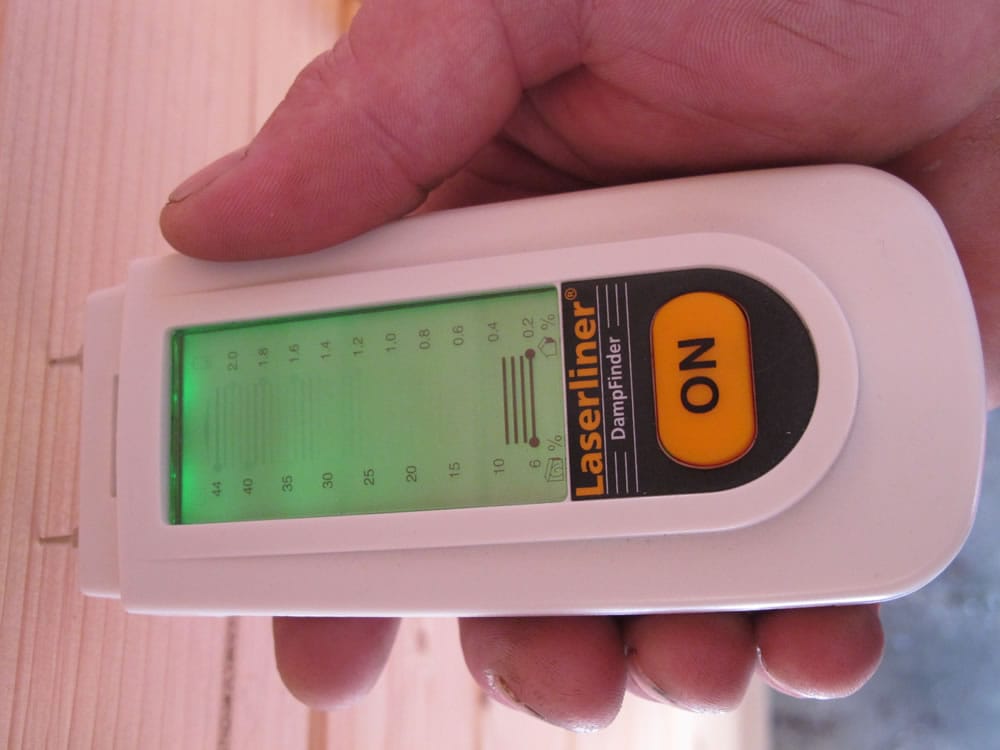
One of our 45mm show cabins I measured today. As expected the moisture content of the wood is 14% using my moisture metre. My meter is a very handy tool when finding out what is wrong with a customers log cabin. Every time it’s treatment! Wood by its very nature cannot be ‘defective’ or ‘faulty’
14% – 16% Moisture Content in your Timber
So, understanding this, look for log cabins and indeed any other timber for use outside in the garden and make sure it has a kiln dried moisture content of between 14% and 16%. If it’s not at that then it soon will be and that maybe a problem as the joints will become looser.
If it is above this it will need to shrink further to reach this level which is the UK average.
This is also a very good question to ask any prospective supplier as it makes a large difference. You’ll see why in the next paragraph.
Movement in your Log Cabin due to untreated wood
Here’s a startling statement and one that should explain it all in a few words:
For every 4 % change in relative humidity there is a change in the wood of 1%.
Take a log of 114mm. Don’t treat it. Don’t treat it properly. Leave it out all year. for every 4% change it will grow or shrink 1.14mm.
We’ve already seen a difference of 21% in the UK. That’s about five 4% blocks of growths.
Would you believe that means a theoretical movement of 5.98mm for each log. In reality it’s about 3mm per log as wood can’t move that quickly but it’s still a bloomin’ lot.
Put that across 15 logs on top of each other and you have a theoretical movement of 89.78mm. WOW!
Understand that this is not a good thing. We don’t want your cabin or indeed your doors and windows moving to these degrees, if it does you can see various problems start to happen over time:
- Warps in doors and windows
- Cracks and Splits
- Gaps may appear in some logs when they shrink quicker than a larger log.
Even though we use an average of 14% this can still be a problem as when relative humidity drops below 75%. The logs also follow it and shrink. If treated improperly, and if the drop is sudden, the smaller sponges lose their water quicker than the bigger sponges in your walls. As such, you see gaps appearing on the small logs.
It makes sense when you think of them as inhibited sponges, and when you see the figures above it’s quite obvious why it’s happening and why the cabin is up and down like yoyo.
I did actually have a complaint a while ago that our logs were tight to get in, whereas a neighbours cabin from a different supplier had fallen into place. This is why, if it’s a humid day the logs in a cabin will be very tight as they have swollen. A less humid days and they will be looser. But if you started with a log with a moisture content of 20% that then shrinks down to UK average 14% it will fall in to place, handy for when you are fitting.
Imagine what happens though when that same log shrinks down to say 10% moisture content during a scorching hot summer – yup, nice loose logs and gaps in the corners.
This is a ‘print screen’ I took from a promotional video of a log cabin I watched on youtube, you can clearly see gaps between the logs and this is down to the wood not being dried to 14% before milling. This supplier states they dry to 20% as if it’s a good thing. With further shrinking to the UK average of 14 – 16% the wood becomes smaller and you will see this. Some manufacturers will dry to 20% as it saves a days cost of the kiln.
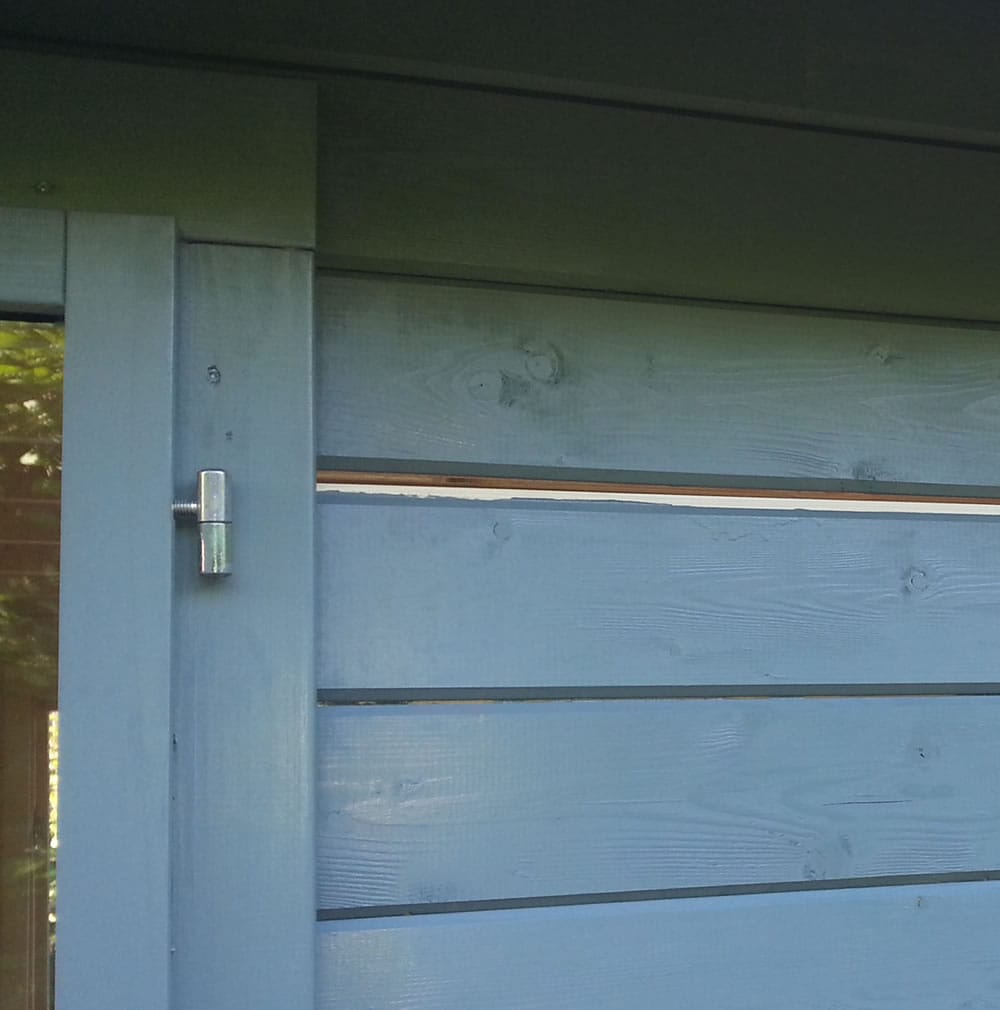
Wind and Water Tight Connections
As well as this promotional video cabin having moisture content issues it also does not have ‘Wind and Water Tight Connections’ They’re the subject of this post: Wind and Watertight Connections in log cabins this is something we do as standard that others obviously do not do. Here’s a quick overview, you should be able to see the difference in the picture below. It’s a feature we don’t shout about too much. Having seen this ‘promotional video’ from a heavily advertised manufacturer perhaps we should!
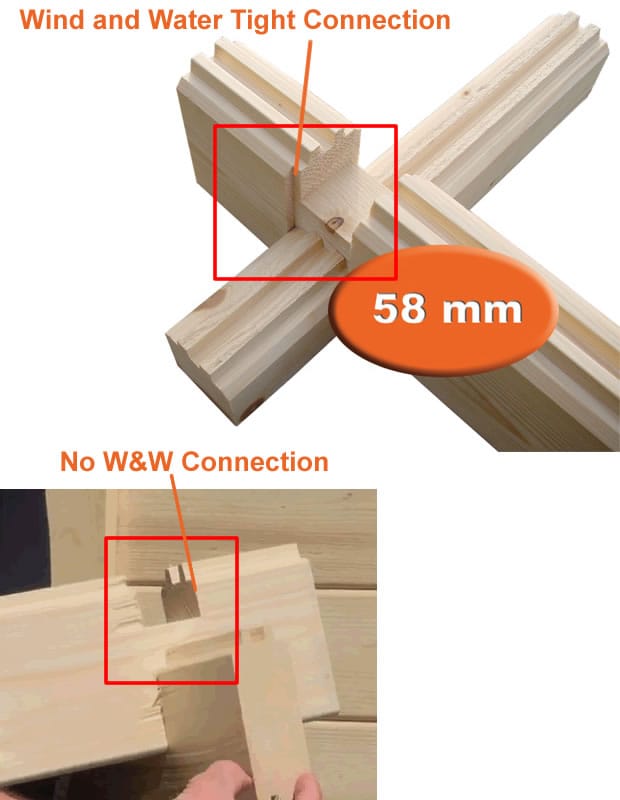
Wind and water tight connection on our walls logs. With a moisture content of 14% – 16% and good connections with proper treatment your cabin will last for years. Not having a stepped W&W connection is not helping in sealing the cabin from the weather or helping to give allowance for further shrinkage. Creating the extra cuts to make this connection costs money and machinery. It is a good place for a manufacturer to save it along with less time in the kilns.
Inhibit the movement of wood with a Good Quality Treatment
Now we know all this it is becoming crystal clear that we need to do something about it and that is where treatment is so important.
There’s all the bits about UV light protection, water repellent, fungicides etc which are all really good but the biggest thing a good treatment is doing is stopping this moisture transfer. It’s basically bunging up all the holes in the wood.
Getting back to the door at the start of this post. We had several conversations over this door and one of them was:
‘What did you treat it with?’ The answer was a very satisfactory Ronseal product which is known to be very good and one we recommend. The next question was:
‘How many layers did you give it?’ The answer was ‘two’
This is part of the problem. The manufacturer states three coats in their instructions and there’s a reason for that, they don’t just make it up. They know you need the proper depth of treatment for it to be properly effective and bung up the pesky holes in the wood and to stop any come back on them.
I pointed this out to my customer and suggested he needed to treat it as per Ronseals instructions and should have done so from the outset and that this could have probably stopped the warp. His reply was:
‘A third coat will be applied when i see fit’
This was missing the point completely! If three coats is suggested on the tin then please use three coats from the outset. Otherwise, it will not be functioning as it should and you can still expect problems.
Putting it on nine months later or when ‘you see fit’ really isn’t going to help.
Depth of Timber Treatment on your Log Cabin
I’ve been playing with some of our show buildings today. Wrongly, this year we only put one coat of wood treatment on them as we just didn’t have time. Now we are suffering as some of them are looking less than good and starting to show all the faults I warn customers against. A false economy and one we’ve got to now fix and treat them properly.
In a sense though it was a good exercise and it showed some interesting results and is the inspiration for an experiment I am going to be running over the coming year for another post.
I went around the buildings with my meters:
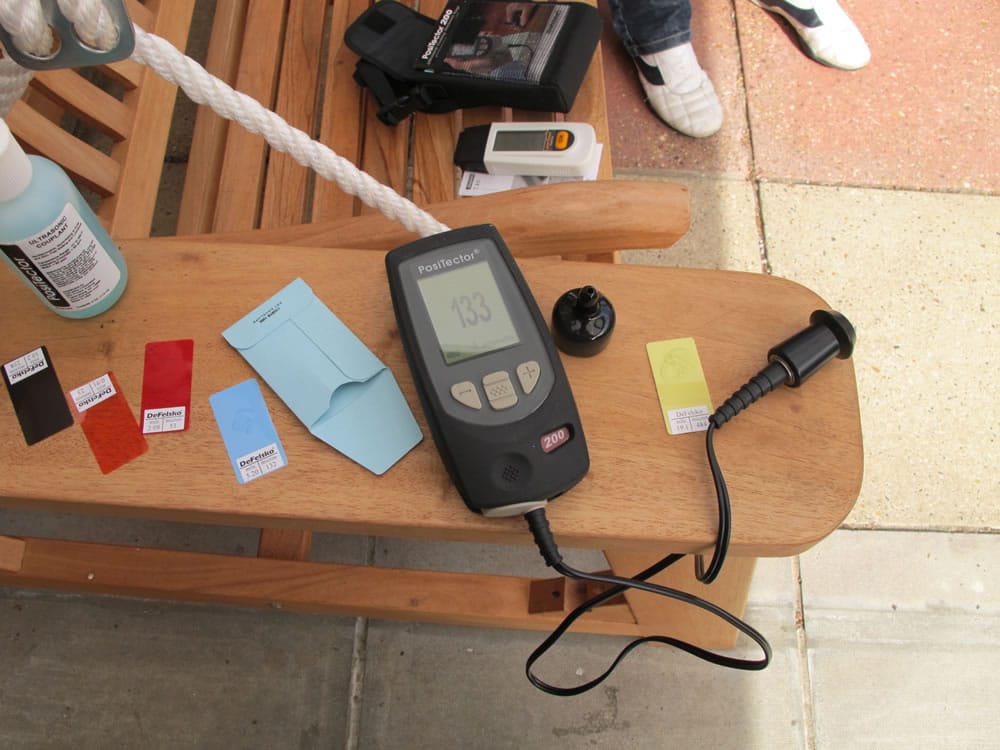
Two types of meters for establishing what is happening with timber and log cabins; A moisture meter and a depth of treatment meter.
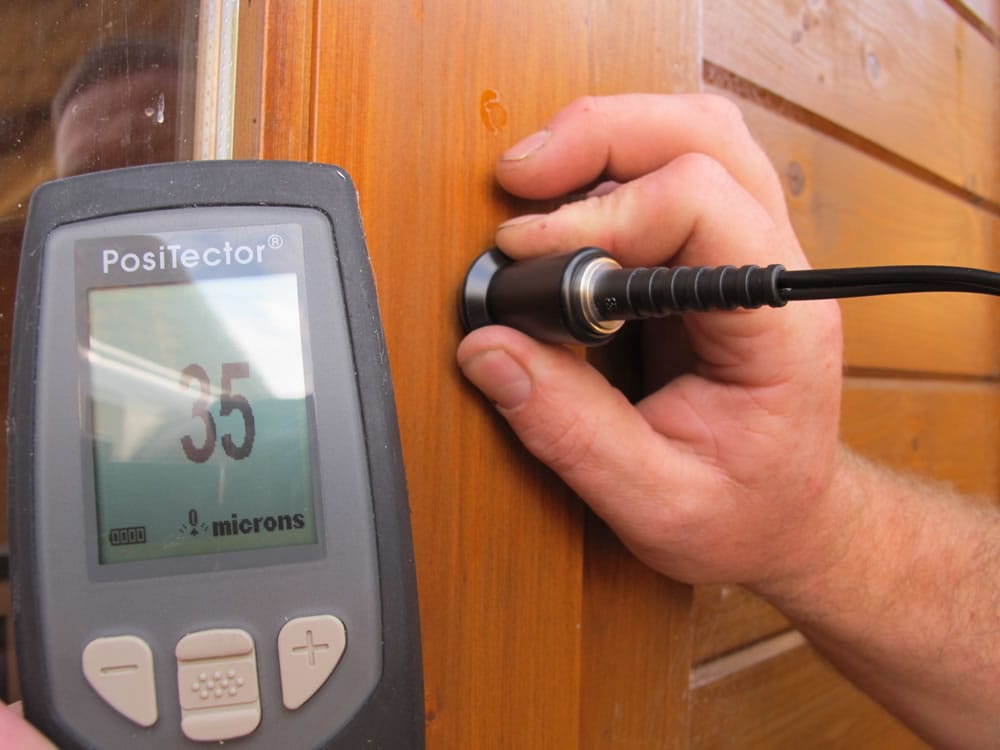
First of all I calibrate it against several test pieces of various thicknesses to make sure it is functioning properly. This meter measures the depth of an applied surface treatment to wood in microns. Like my moisture meter this one is also used a lot in fault finding with log cabins. Yup, every single time it comes down to the treatment used and applied affecting the wood.
Remember we’re looking for a depth of 80 – 120 microns as I have mentioned in the Log Cabin Treatment post which is the equivalent of two to three coats of a high quality wood treatment. This is to fully ensure the treatment is going to be effective in inhibiting the constant transfer of moisture and to bung up all those holes in our wood making it a little less sponge like.
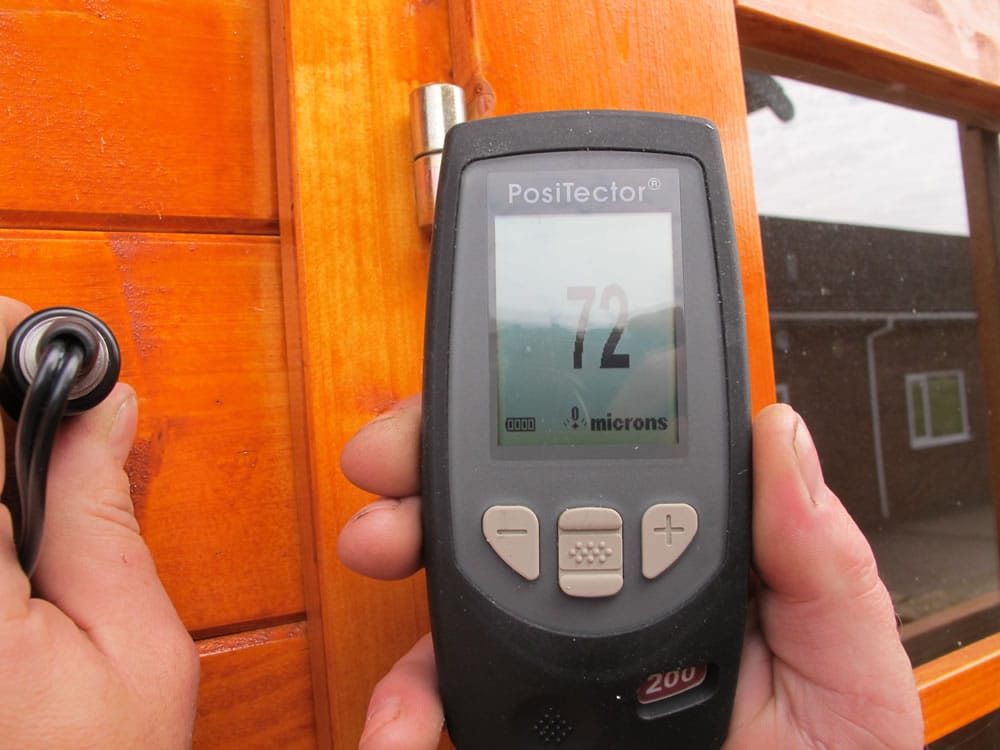
A reading of 72 microns.
Only one coat and this one was using one of our stains. With just one coat this attained 72 microns, with two coats it would be pretty much there. Be aware though that it does vary according to the painters skills in keeping an even coat.
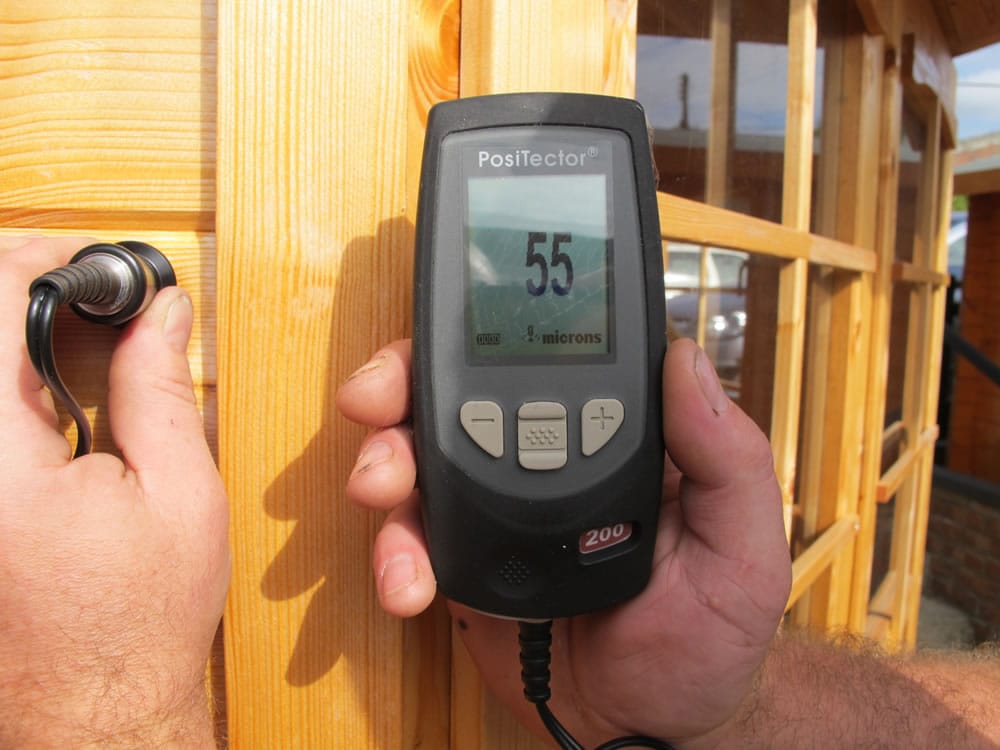
A reading of 55 microns
This one was interesting for me and confirmed what I knew. Clear, or close to clear wood treatments cannot give the same depth of coverage in one go. This would take three coats to be effective.
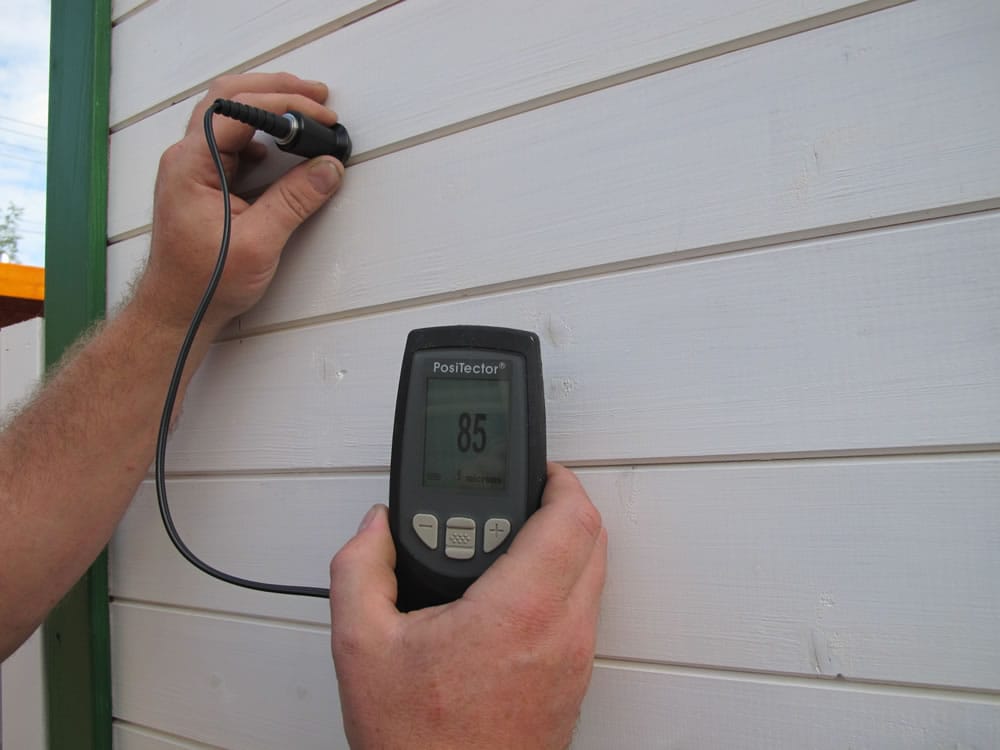
This building is a shepherd hut we have on display using one of our paints. Still only one coat but done by a professional painter so it’s quite uniform and he applied it quite thick. Requires another coat, but only just. Still not a bad coverage at 85 microns.
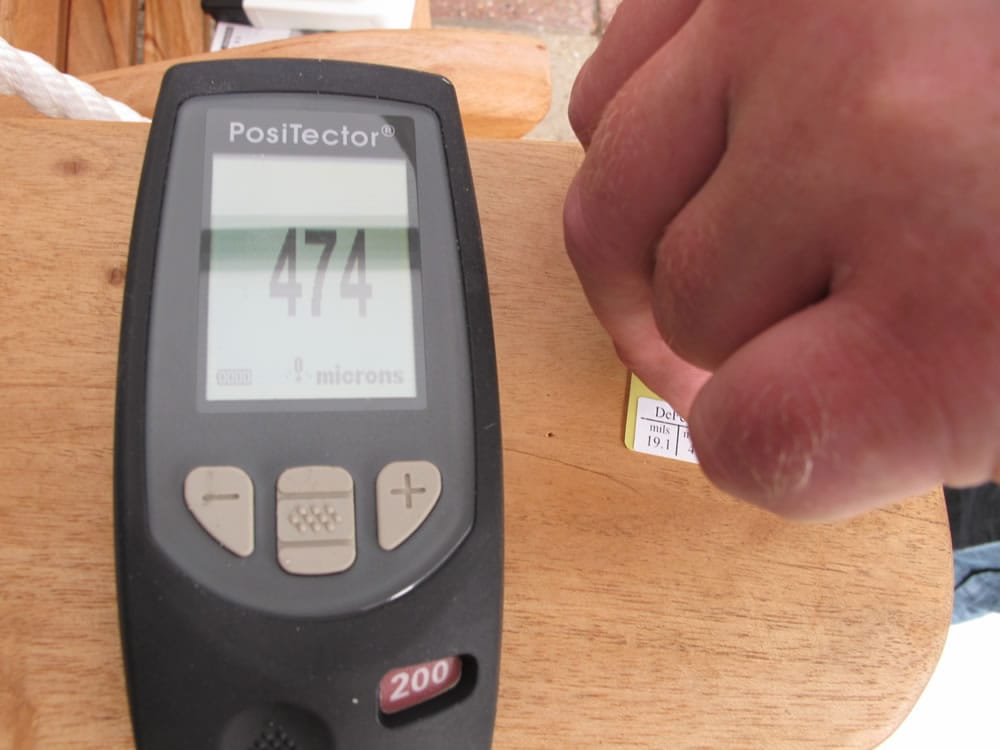
This last building really surprised me. It’s a bespoke 58mm log cabin that was made to fit an area. It’s been up for years and we used to use it as an office for some staff. We painted this with a treatment obtained locally, I know for a fact it has had four coats on it over it’s life of about 10 years as I painted two coats myself.
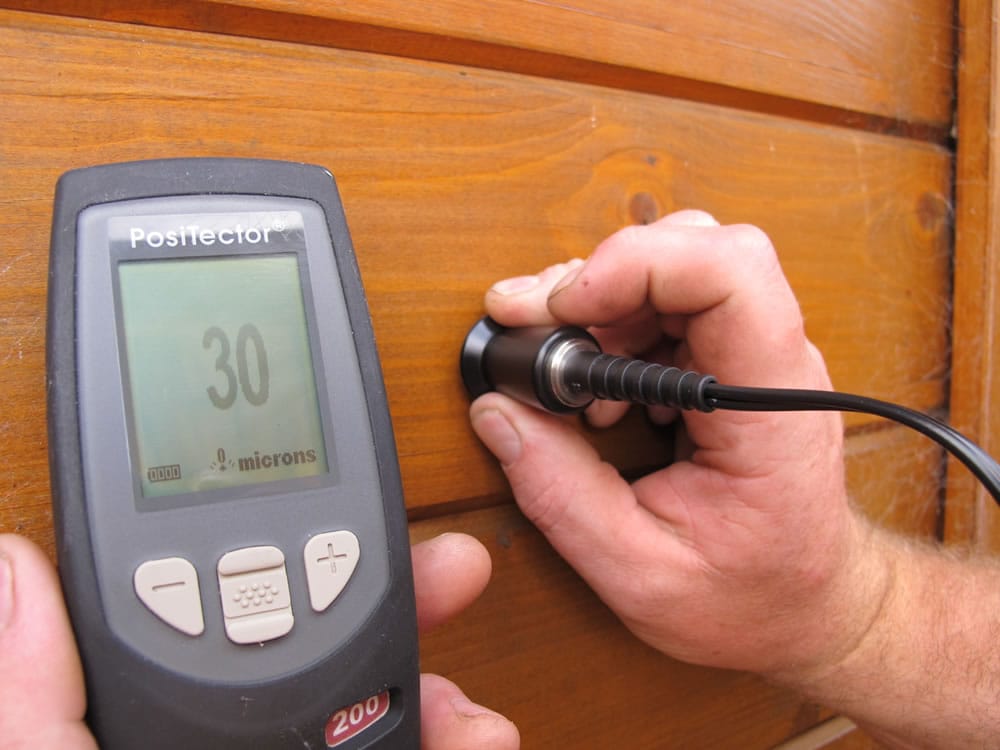
This building has had four coats (of a treatment we don’t recommend), I was really surprised at the depth!
And the wood treatment that we used? Yup something cheap! We’ve still got the tin. If you visit our show site ask us about this cabin, it’s the big old one at the end.
Here’s another measurement at the door, slightly thicker but still very much down from where we need it to be.
Virtually the same depth on the door as well.
I was actually quite shocked at the difference in the depth across the treatments. This one I know was one of the cheaper wood treatments you can get. Some of the really cheap ones barely register on this meter. You’d need to apply 8 – 10 coats to get to the 80 – 120 microns needed. With this cabin we do have all the features that we don’t want. I’ll do a post dedicated to this cabin one day.
Keep an eye out for my experiment post. I am going to paint lots logs in lots of different treatments from various manufacturers and various coats applied. I’m then going to monitor and measure them over the course of a year for moisture content and expansion / contraction to prove all of this more.
It’s worth knowing that when you pay for a treatment much of the cost of it is for the depth of the application.
So, my advice is:
Buy a top quality wood treatment and follow exactly what it say on the tin to get a proper depth. Don’t only put on two if it asks for three!
Just to finish, a customer will tell me ‘But I used it on my shed and it was fine’ A shed and a log cabin are two entirely different animals. A shed is held together by a frame and the cladding will be about 12mm. It does not behave at all the same as a slotted wall log which is not held at all.
Here’s a good example of a sponge in action with only one layer of a poor treatment:
Smaller logs shrinking quickly by the side of a window far quicker than the large ones elsewhere in the cabin will leave a gap. When all the others have shrunk to the same moisture content this gap then closes. It’s best though if we can inhibit this by properly treating the cabin with a good treatment and the proper depth from the outset. We really don’t want this happening!
This cabin only had one coat, the customer told me it was fine for his shed:

Fine for a shed perhaps but a shed is held together with nails on a timber frame with a thickness of about 12mm. A 45mm lump of wood is a bit different. Even so, notice the contraction of the boards, is it really fine for a shed as well,? Perhaps you should follow the same rules for all your garden timber as all of it is behaving in exactly the same way.
Also, all of the above applies for both tanalised and non-tanalised buildings. All tanalised buildings behave in exactly the same way as an untreated one and STILL require all of the above.
Moisture Difference in the outside to the inside of a Log Cabin
For a future post I’m going to be showing one of our neglected show buildings, and whether a log cabin should be treated inside, after seeing these readings and for this specific building the answer is yes for several reasons.
This moisture content reading I showed you earlier of the 45mm building was 14%, this was an external reading of a log. Looking at the same log internally it is showing a very surprising 9% moisture content! This is due to it being sealed up most of the time, no ventilation, no damp proof membrane in the base and in constant sunlight with high temperatures inside compared to the outside.
Big heat build up inside an unventilated log cabin means the moisture content has dropped to 9% this cabin is a show building and has not been treated on the inside. Un-vented and in direct heat all day with no damp proof membrane in the base or a timber floor.
This is why sometimes you can see a split in a wall log open up, the poor thing is bigger on the outside than the inside. We need to treat the inside of this cabin as well!
I think this explains it well so please also consider treating inside your cabin if some of the above conditions exist so the entire log regulates properly.
Further advise on Log Cabin Ventilation.
Please also see my other advice post on the Treatment of your Log Cabin which has other information you may well be interested in.
This post also forms part of my timber series, currently in progess:
- Types of Timber in your log cabin
- How we can cut a timber log to make a cheap log cabin.
- Moisture content in timber, machining and the impact of the content.
- Timber calculation to cut costs you can work out yourself. See where you maybe opting for a bargain while adding to a companies profits.
- More expansion information for log cabins.
- The pitfalls of thinner logs, barge-boards, windows and doors.
- Drying processes – kiln dried versus natural drying.
Would you recommend treating each log before it is assembled or assemble it then treat the whole structure?
Thanks
Hi Les
Very happy to help, As in a perfect world where we have a lot of time. Treating each log first is by far the best thing to do
However, This takes a lot of time and a mountain of space. Not many customers will be able to do this
At the very least id say getting a single coat of the primer/undercoat on before installation is a good compromise
Carefree protectant, this product is quite expensive to buy,, the cost I’m not to concerned about, what I am concerned about ( only a little ) is one tin = one litre of product, question , how much area will this one litre cover? I’m on the verge of purchasing a 3m X3m cabin. How many tins will I need to give the cabin a full treatment
It is an expensive treatment and does require several coats. On each cani page they list how much is recommended for each building.
I found this to be a fascinating article and very informative. We are contemplating buys a double glazed Tuin summer house (the Alex possibly) maybe later this year and this article makes me wonder if it is worth investing in moisture and treatment depth meters to get this important part of the built process just right!
Can Tuin please inform of the cost of these types of meters and possibly recommend any? Thank you!
I don’t think it is really necessary to invest in these, several good coats of good quality treatment should suffice. If you are interested though, these are the meters we use, the depth meter is very expensive.
Hi
What does Tuin Recommend for treating outside and inside of the Truus cabin?
Please see this page for details on treatment of a log cabin.
I plan to paint my cabin with Crown 10 year weathershield on the outside, but then Danish Oil on the inside. Will this work, given the disparity of the treatments….?
I always recommend treating both sides equally where possible, this is especially important with the doors and windows to avoid warps.