


Garden Decks, we love them and they have been growing in popularity ever since i started working in this industry. We have a range of different options to suit any situation and a great knowledge base on their construction. Decking is an affordable way to transfer a space in your garden into a useable space.
We have a very helpful advice section below for those that choose to take on such an endeavor, Please enjoy!
Decking Installation Guide:
I’ve been asked a lot recently about our Garden Decking and especially how it is installed and on what sort of base, so I thought a short guide maybe helpful to our customers. Of course it’s also a plug about our products, our composite decking is proving very popular as are our decking tiles and decking boards. Interestingly sales for the composite decking is increasing month on month

Composite decking
As a quick guide I suggest the following, of course there are lots of ways of accomplishing the same thing but this, I hope, is a good guide or at least gives you a few pointers.
Planning
Like any project, planning is the most important part, it shouldn’t be overlooked, what’s the old saying? The five ‘P’s’: Planning Prevents Pi – – Poor Performance!
So, first make a rough drawing of your design, laying out pieces of wood to mark the edge of the planned decking always helps me to visualise how it will look. Boards at right angles helps to draw your eye into the house, board’s parallel show off the width of the decking.
It’s a good idea to make a scale drawing and also add the house walls, openings, obstacles etc. If you’re attaching the deck to your house always make sure that the attachment point is 150mm below the damp proof course. Make sure as well, you allow access to inspection covers and importantly don’t block air vents.
Measuring
Using your scale drawing calculate the area of the deck. Divide the area of the deck by the size of the tiles you are using or the timber / composite decking planks. Remember you will have to include spaces for expansion and drainage between planks, I tend to use 5mm as a guide.
If you need help calculating what is required please do contact us.
Ground Work
An outdoor deck is usually supported by concrete footings and constructed on top of a framework. You can either place it at ground level or use uprights to raise it if needed.
First it’s a good idea to use pegs and string to set out the deck perimeter. Clear all turf and vegetation and firm the ground if needed. It’s a really good idea to lay weed inhibiting membrane down on the area at this point to stop any nasties coming through.
Decking Frame
Putting the framework on concrete foundations is a good idea. You could lay concrete for this but slabs are a lot easier. Slabs would normally be placed in a grid pattern about 1400mm apart to allow for adequate support for the joists. If you have bad drainage or poor soil condition consider using poured concrete in holes of at least 300mm square. Use a spirit level and try to make sure the deck slopes (away from the house) roughly 10mm for every meter.
Create the outer frame of the deck with pressure treated, tanalised timber. 150mm x 50mm is ideal. Where the timber touches the ground use a damp proof course membrane. In our ‘ground level’ method these joists will simply be placed on the ground being supported by the concrete grid. For the ‘raised’ method these will be supported by uprights, I recommend 90 – 100mm sq tanalised timber.
With the frame in place use at least 100mm screws and wood glue to fix it together. If the decking is being attached to the house make sure you add plenty of spacers to allow for a drainage gap. Stainless steel washers are excellent for this. Next you will infill the outer frame with joists spaced at 400mm intervals. These should be at right angles to the finished decking tiles or boards. You could use off cuts of timber to create noggins in between the joists for extra strength.
Laying the Decking
Once your framework is complete and totally rigid you can start laying your decking boards or tiles. Lay about 6 boards at a time, I have already mentioned an expansion gap and to accomplish this evenly I tend to use a decking screw as a spacer (remove after fixing).
A few notes on fixing your decking boards:
- Always use stainless steel or galvanised screws, there’s nothing worse than seeing rusty screw heads and stained decking boards.
- Always pre-drill your screw holes, without this you run a risk of splitting the timber.
- Screw the end of the boards first and then to every joist.
- If the boards are wider than the deck you must make sure you stagger the boards and that joints are over a joist.
Raised Decks
Raised decks are slightly trickier and need a little bit more thought. As I mentioned you will be using uprights of about 100mm square. These will be held in place using metal supports of either a bolt in style or an adjustable concreted anchor.
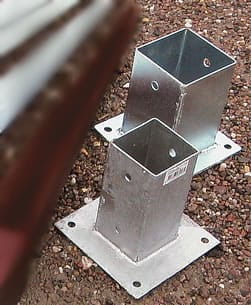
Bolt down post anchors
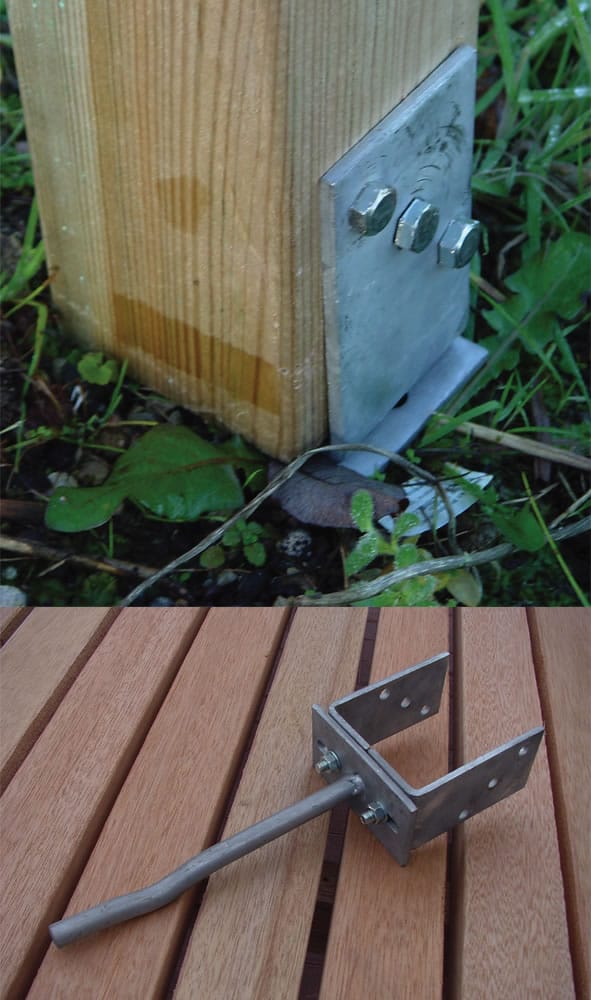
Concrete anchor for posts
The frame is constructed as above but will be utilising joist hangers for added strength.
If the deck is over 60cm in height we strongly recommend a rail to prevent a nasty fall.
Also, any cut timber or drill holes would benefit from a timber treatment
If you’re like us and sometimes enjoy the simpler life when it comes to DIY, look out for precaulated kits as it helps take some of the worry and concerns that might come during the planning phase of the project.
I hope this has been helpful. If you need any help or advice with your decking project please contact us